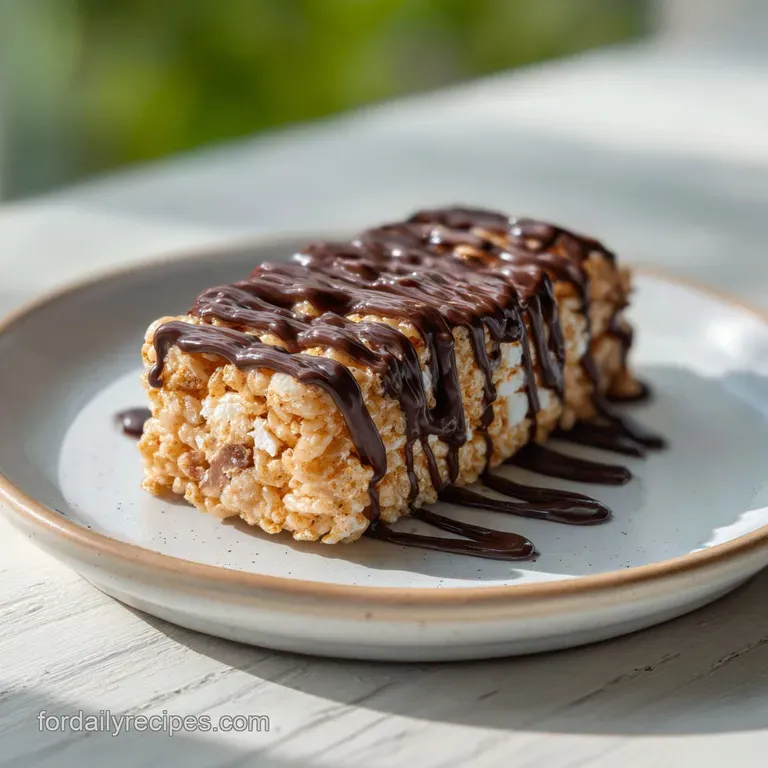
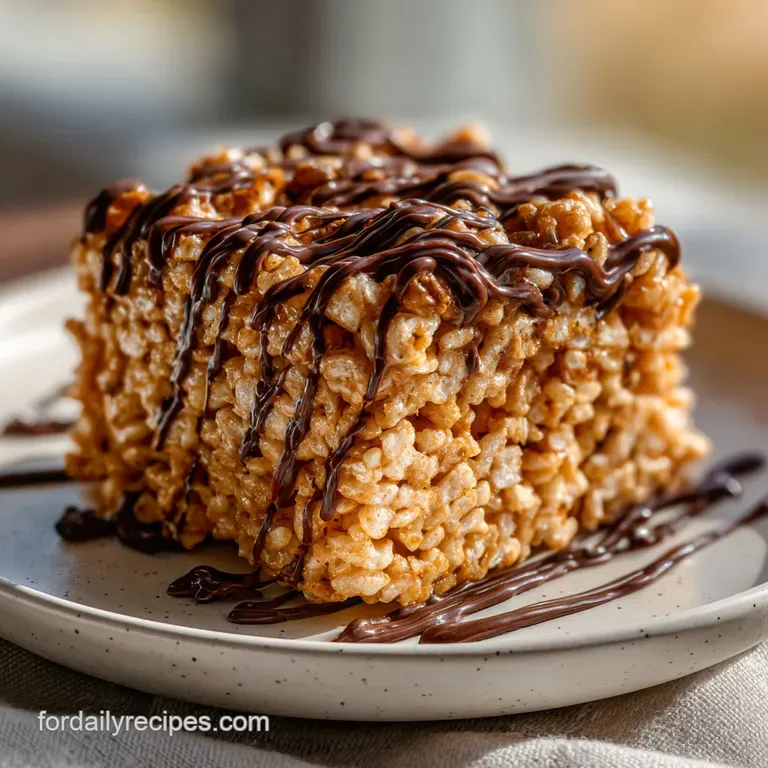
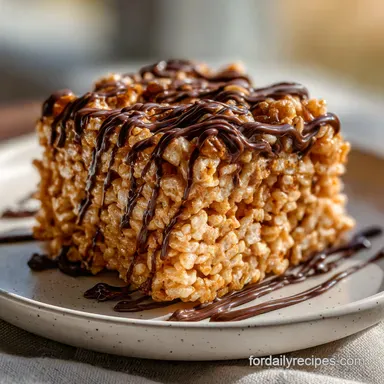
Butterfinger Rice Krispie Treat with Chocolate
- Time: Active 10 minutes, Passive 5 minutes, Total 15 minutes
- Flavor/Texture Hook: Shatter crisp cereal with salty sweet peanut butter flakes and velvety chocolate.
- Perfect for: Last minute bake sales, budget-friendly party snacks, or high energy lunchbox treats.
- Why These Treats Stay Soft
- Essential Recipe Timing and Specs
- Ingredient Analysis and Smart Swaps
- Tools for a No Fuss Bake
- Steps for the Crispy Base
- Solving Sticky Marshmallow Problems
- Scaling Your Batch Up
- Debunking Cereal Treat Myths
- Storing Your Treats for Freshness
- Serving and Presentation Ideas
- Recipe FAQs
- 📝 Recipe Card
Why These Treats Stay Soft
The biggest mistake I see people make is cranking up the heat to melt the marshmallows faster. If you treat sugar with too much aggression, it crystallizes and turns into a literal brick once it cools. By keeping the flame low and steady, we keep the corn syrup and sugar in the marshmallows in a fluid state.
This recipe works because we stop the heat early.
Residual Melt: Removing the pot when the marshmallows are still slightly lumpy allows the remaining heat to finish the job gently, preventing the sugar from over heating.
Fat Barrier: The half cup of unsalted butter coats each grain of rice cereal, creating a moisture barrier that keeps the cereal from getting soggy while keeping the marshmallow matrix flexible.
No Pack Method: If you press the mixture into the pan with too much force, you crush the air pockets, resulting in a dense, tough bar instead of a light, airy treat.
| Servings | Ingredient Adjustments | Pan Size | Cook Time |
|---|---|---|---|
| 8 people | 3 cups cereal, 5 oz marshmallows | 8x4 inch loaf pan | 5 minutes |
| 16 people | 6 cups cereal, 10 oz marshmallows | 9x9 inch square pan | 5 minutes |
| 32 people | 12 cups cereal, 20 oz marshmallows | 9x13 inch pan (double) | 8 minutes |
Setting up your station before you turn on the stove is the smartest move you can make. Since the marshmallow mixture sets quickly, you don't want to be fumbling with candy bar wrappers while the sugar is cooling. I usually chop my candy and measure the cereal into a large bowl first. If you are looking for a different texture profile for a separate occasion, you might want to try these No Bake Peanut Butter Bars which offer a similar salty sweet vibe but with a denser, fudgier base.
Essential Recipe Timing and Specs
When you are working with melted sugar, precision matters more than you think. You have about a three minute window between "perfectly mixed" and "starting to set." This is why we use a 9x9-inch pan rather than a larger one, as it gives the treats that thick, chunky profile we all love.
Keeping the bars at least an inch thick ensures the center stays soft while the edges get that slight crispness.
| Component | Science Role | Pro Secret |
|---|---|---|
| Fresh Mini Marshmallows | Provides the structural "glue" | Use a fresh bag; old marshmallows are drier and will result in a crumbly treat. |
| Unsalted Butter | Emulsifies the sugar and adds richness | Brown the butter slightly until it foams to add a nutty depth to the base. |
| Fine Sea Salt | Cuts through the intense sweetness | Never skip this; it wakes up the peanut butter flavor in the candy bars. |
| Coconut Oil | Lowers the melting point of chocolate | A tiny bit creates a "snap" in the drizzle that doesn't shatter when bitten. |
The choice of cereal also plays a role in the structural integrity. Generic store brand crispy rice works just as well as the name brand, which is great for the budget. However, make sure the cereal is fresh.
If the box has been open for a month, the treats will taste stale no matter how much chocolate you drizzle over the top. I always buy a fresh box specifically for this recipe to ensure that signature "shatter" when you take a bite.
Ingredient Analysis and Smart Swaps
For this recipe, we are using very specific amounts to get the ratio of "sticky" to "crunchy" just right. The pure vanilla extract is not just for scent, it acts as a bridge between the salty peanut butter and the sweet marshmallow. If you are out of something, don't panic.
There are ways to pivot without ruining the final product.
- 6 cups (150g) Crispy Rice Cereal: The backbone of the treat. Why this? Provides the essential airy crunch and volume.
- 10 oz (283g) Fresh Mini Marshmallows: The binding agent. Why this? Mini versions melt faster and more evenly than jumbo ones.
- 1/2 cup (113g) Unsalted Butter: Adds fat and flavor. Why this? Prevents the marshmallow from sticking to your teeth.
- 1/2 tsp (3g) Fine Sea Salt: The flavor balancer. Why this? Enhances the chocolate and peanut butter notes.
- 1.5 cups (200g) Butterfinger candy bars: The star ingredient. Why this? Adds a unique, flaky, peanut infused crunch.
- 1/2 cup (90g) Semi sweet chocolate chips: The topping. Why this? Provides a dark contrast to the sugary base.
| Original Ingredient | Substitute | Why It Works |
|---|---|---|
| Butterfingers | Peanut Butter Chips + Pretzels | Mix 1/2 cup chips and 1 cup crushed pretzels for a similar salty crunch. |
| Semi sweet Chips | Dark Chocolate (70%) | Adds a sophisticated bitterness. Note: Will be less sweet. |
| Pure Vanilla | Maple Syrup | Adds a woody, autumnal sweetness. Use the same 1 tsp amount. |
If you are leaning into the dairy-free side of things for a friend, you might find inspiration in my Coconut Ice Cream which uses similar coconut oil techniques for a velvety finish. Just remember that switching ingredients often changes the setting time, so give yourself an extra ten minutes of cooling if you use a liquid sweetener like maple syrup.
Tools for a No Fuss Bake
You don't need a professional kitchen, but a few specific tools will make your life significantly easier. A heavy bottomed pot is non negotiable. Thin pots have "hot spots" that will scorch the marshmallows in seconds. I prefer a large Dutch oven or a heavy stainless steel pot.
It provides even heat distribution, which is key for that gentle 90% melt we are aiming for.
A greased silicone spatula is your best friend here. Marshmallows are relentless when it comes to sticking, so rub a little butter or a quick spray of oil onto your spatula before you start stirring. Also, parchment paper is a must.
If you try to grease the pan directly with just butter, you might find yourself struggling to pry the bars out. The "overhang" method allows you to lift the entire block of treats out of the pan and onto a cutting board for clean, even slices.
Steps for the Crispy Base
- Line a 9x9-inch baking pan with parchment paper, leaving an overhang on two sides for easy removal. Lightly grease the parchment with butter or cooking spray. Note: This ensures you can lift the treats out without them breaking.
- In a large, heavy bottomed non stick pot over low heat, melt the unsalted butter until it begins to foam. Look for small bubbles and a nutty scent.
- Add the mini marshmallows and sea salt to the pot. Stir constantly with a greased silicone spatula. Remove the pot from heat when the marshmallows are 90% melted, with small lumps still visible, to prevent overcooking the sugar. The mixture should look like thick, white lava.
- Stir in the vanilla extract and half of the chopped Butterfinger pieces into the warm marshmallow mixture until partially melted. The candy will swirl into the white base.
- Gently fold in the crispy rice cereal and the remaining Butterfinger shards until evenly coated. Do not crush the cereal. Note: Folding preserves the air bubbles for a lighter texture.
- Transfer the mixture to the prepared pan. Using a greased spatula, gently press the mixture into the corners. Do not pack tightly, as this results in hard treats. Keep the top looking textured, not flat.
- In a small microwave safe bowl, combine chocolate chips and coconut oil. Heat in 20 second intervals, stirring until glossy and smooth. Drizzle over the treats. The coconut oil creates a silky, pourable consistency.
- Allow treats to cool at room temperature for 30 minutes before slicing into 16 squares. Waiting allows the sugar structure to stabilize for a clean cut.
One trick I learned after a few messy batches is to use the back of a measuring cup, lightly greased, to level the top if the spatula is sticking. But again, keep the pressure light.
You want the treats to be "snug" in the pan, not "compacted." If you see the rice cereal pieces shattering as you press, you are pushing way too hard.
Solving Sticky Marshmallow Problems
Why Your Treats Are Rock Hard
This is the most common grievance with homemade cereal bars. Usually, it comes down to heat or pressure. If the marshmallows were boiled or simmered too long, the sugar reaches a "hard ball" stage. Once it cools, it becomes glass like.
Similarly, if you packed the mixture into the pan like you were tamping down soil, there is no room for your teeth to sink into the bar.
Why the Drizzle Won't Set
If your chocolate drizzle stays tacky or wet for hours, it is likely a humidity issue or a ratio problem. Chocolate needs a stable environment to firm up. If your kitchen is very warm, the coconut oil might keep the chocolate in a semi liquid state.
Putting the pan in the fridge for just five minutes can help jump start the setting process, but don't leave it there too long or the marshmallow base will get tough.
| Problem | Root Cause | Solution |
|---|---|---|
| Soggy Cereal | Marshmallows were too hot or cereal was old. | Use fresh cereal and melt marshmallows on the lowest setting possible. |
| Falling Apart | Not enough marshmallow or not pressed enough. | Ensure a 10 oz bag is used; gently but firmly press into pan corners. |
| Too Sticky | Didn't allow enough cooling time. | Let the pan sit for the full 30 minutes before attempting to slice. |
Common Mistakes Checklist
- ✓ Use a fresh bag of marshmallows (old ones don't melt, they just get lumpy).
- ✓ Stop melting when you still see a few marshmallow shapes (residual heat is your friend).
- ✓ Grease everything: the pot, the spatula, the pan, and even your hands if you use them.
- ✓ Avoid the fridge for cooling (cold air dries out the marshmallow and makes it brittle).
- ✓ Chop the candy bars into varied sizes (dust for flavor, chunks for texture).
Scaling Your Batch Up
If you are feeding a crowd or prepping for a large event, scaling this recipe is straightforward, but you need to be mindful of your pot size. Doubling the recipe requires a very large stockpot to ensure you have enough room to fold in the cereal without it flying over the sides.
When scaling down to a half batch, use a standard loaf pan. This keeps the bars thick. If you put a half batch in a 9x9-inch pan, they will be thin and lose that satisfying chew. For a half batch, you can use half of a beaten egg to measure out small quantities of liquid if needed, but since this recipe doesn't use eggs, just halve the measurements exactly.
When scaling up (2x or 4x), I recommend keeping the salt and vanilla at 1.5x the original amount rather than a full double. Too much vanilla can make the treats taste "boozy," and too much salt can overpower the delicate cereal.
Also, work in batches if your stove doesn't have a large burner, as uneven heating in a massive pot will lead to some marshmallows burning while others haven't even begun to soften.
Debunking Cereal Treat Myths
One myth that needs to die is that "marshmallow fluff" makes a better treat. While fluff is convenient, it lacks the gelatin structure found in whole marshmallows. Treats made with fluff often end up greasy and don't hold their shape at room temperature. They tend to "slump" over time.
Stick to the mini marshmallows for a structural win.
Another misconception is that you must use high heat to get a "smooth" melt. People think that visible lumps are a failure. In reality, those tiny remaining bits of marshmallow create "pockets of soft" in the finished bar.
When you stir in the cereal, those last few lumps will melt into the crevices anyway, providing a much better texture than a scorched, perfectly liquid syrup.
Storing Your Treats for Freshness
To keep these treats in peak condition, room temperature is the way to go. Place them in an airtight container with sheets of wax paper or parchment between the layers. This prevents the chocolate drizzle on the top layer from sticking to the bottoms of the bars above them.
They will stay fresh and chewy for up to 3 days. After that, they start to lose their moisture and get a bit crunchy.
If you find yourself with scraps or "crumbs" from the bottom of the pan, don't throw them out. They make an incredible topping for vanilla bean ice cream or can be folded into a batch of brownie batter for a hidden crunch. To freeze, wrap individual squares tightly in plastic wrap and then place them in a freezer bag.
They can stay frozen for up to 2 months. Just let them sit on the counter for 20 minutes to thaw before eating. Never microwave them to thaw, as the chocolate will melt and the marshmallow will turn into a sticky puddle.
Serving and Presentation Ideas
Since these bars have a bit of a rustic look, I like to lean into that for serving. Instead of perfect, clinical squares, I sometimes cut them into long "fingers" or even use a large circular cutter for "treat discs." The contrast of the orange Butterfinger bits against the dark chocolate drizzle is visually striking, so you don't need much else.
For a party, you can stack them in a pyramid on a wooden board. If you want to go the extra mile, sprinkle a tiny pinch of flaky Maldon salt over the chocolate drizzle while it is still wet. It highlights the peanut butter and makes the whole treat feel a bit more grown up.
If you have leftovers, they are the perfect companion to a cup of dark coffee or a cold glass of milk. The bitterness of the coffee cuts right through the sugar, making it a very dangerous afternoon snack. You could even serve them alongside a bowl of something creamy to balance the textures._
Each square contains about 230 calories, making it a substantial snack. Because they are so rich, cutting them into 16 squares for a 9x9 pan is usually the sweet spot for portioning. Any larger and it becomes a bit overwhelming; any smaller and you miss out on that glorious thick bar experience.
Just remember to use a sharp, non serrated knife for the cleanest cuts, and wipe the blade between each slice if it starts to get gummy.

Recipe FAQs
Why do my Butterfinger treats become hard or overly crunchy?
Over packing the mixture is the primary culprit. When transferring the cereal into the 9x9-inch pan, use your greased spatula to gently press the mixture into the corners rather than compressing it firmly.
How to keep the marshmallow mixture from overcooking?
Remove the pot from heat while small lumps are still visible. Stirring the mixture constantly until 90% melted prevents the sugar from recrystallizing, which is the same creamy texture principle used in our other marshmallow based desserts.
Is it true I should keep these in the refrigerator to keep them fresh?
No, this is a common misconception. Storing them at room temperature in an airtight container with parchment paper between layers is best for maintaining the ideal chewy texture for up to 3 days.
How to prevent the chocolate drizzle from sticking to the container lid?
Place sheets of wax paper or parchment between the layers of bars. This simple barrier stops the chocolate drizzle on the top layer from adhering to the bottom of the container or the bars stacked above.
How to achieve the smoothest chocolate drizzle?
Combine your chocolate chips with the coconut oil and microwave in 20-second intervals. Stirring thoroughly between each session ensures a glossy, uniform consistency that drizzles easily over the treats.
What is the secret to getting the bars out of the pan without breaking them?
Use the parchment paper overhang. By lining the 9x9-inch pan and leaving extra paper on two sides, you create a sling that allows you to lift the entire block out effortlessly before slicing.
How to ensure the Butterfinger pieces distribute evenly?
Stir half into the warm marshmallow mixture and fold the remainder in with the cereal. Adding them in two stages ensures you get pockets of crunchy candy throughout the bars without melting all the pieces into the marshmallow base.
Butterfinger Rice Krispie Treats
Ingredients:
Instructions:
Nutrition Facts:
| Calories | 230 kcal |
|---|---|
| Protein | 1.9 g |
| Fat | 9.6 g |
| Carbs | 34.4 g |
| Fiber | 0.6 g |
| Sugar | 24.8 g |
| Sodium | 136 mg |
