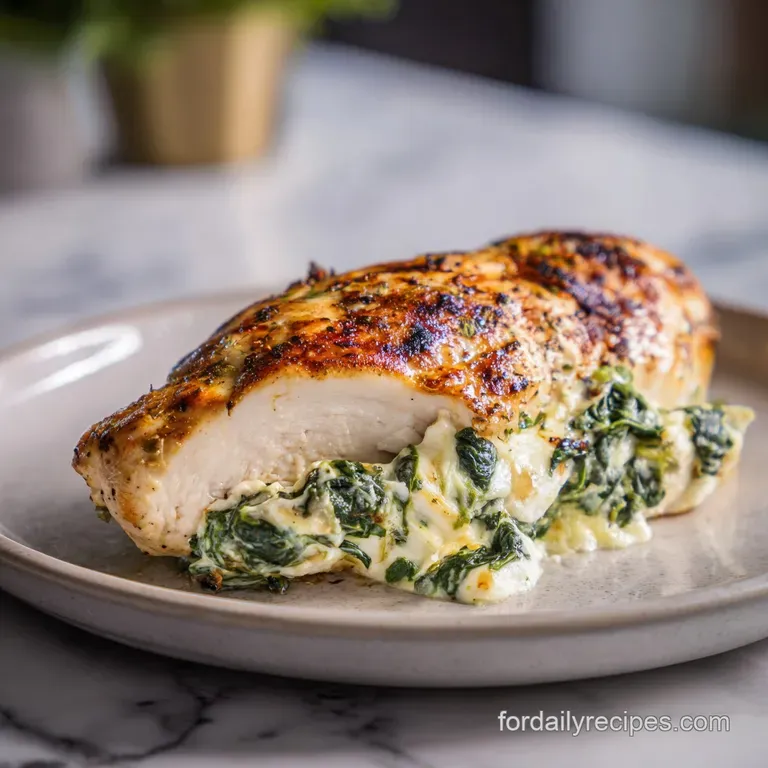
Spinach Stuffed Chicken Breast
- Time: Active 15 minutes, Passive 25 minutes, Total 40 minutes
- Flavor/Texture Hook: Golden brown seared exterior with a molten, garlic infused cream cheese heart
- Perfect for: Anniversary dinners, heritage family gatherings, or treating a dear friend
- Master the Heritage Flavors of This Stuffed Chicken Breast
- The Thermodynamics of the Spinach Core
- Essential Technical Specifications for a Successful Family Dinner
- Component Analysis of Your Heritage Ingredients
- Selecting Quality Components for a Time Honored Flavor Profile
- Culinary Tools Required for a Flawless Searing Process
- Step-by-Step Transformation From Raw Ingredients to Golden Perfection
- Overcoming Potential Obstacles to Ensure a Velvety Finish
- Modifying the Heritage Recipe for Diverse Family Needs
- Managing Your Preparation Time and Repurposing Every Scraps
- Final Flourishes for a Table Setting That Honors Generations
- Debunking Common Myths About Searing and Stuffing
- Recipe FAQs
- 📝 Recipe Card
Master the Heritage Flavors of This Stuffed Chicken Breast
I still remember the first time I attempted a stuffed chicken breast for my grandmother's birthday. I wanted it to be this elegant, time honored gesture of love, but I ended up with a pan full of escaped cheese and chicken that felt more like a rubber ball than a meal.
It was a mess, but the house smelled like garlic and toasted paprika, so we laughed and ate the "cheese soup" with extra biscuits anyway. Since then, I've spent years refining the technique to make sure the filling stays exactly where it belongs.
There is something deeply nostalgic about the sizzle of a cast iron pan as it meets seasoned poultry. The aroma of smoked paprika and garlic powder blooming in hot olive oil reminds me of Sunday afternoons spent in the kitchen, learning that the best meals aren't the most complicated ones, but the ones made with patience.
This isn't about some modern trend; it's about a reliable, heart warming dish that has been passed down because it simply works.
You'll find that the secret isn't in a fancy gadget, but in the way we treat the ingredients. We're going to create a deep pocket, fill it with a mixture that balances the richness of cream cheese with the earthiness of wilted spinach, and then sear it to lock everything in.
It's a method that honors the ingredients and ensures the chicken never dries out. Trust me, once you see that golden crust and cut into the velvety center, you'll never go back to plain breasts again.
The Thermodynamics of the Spinach Core
Thermal Insulation: The dense cream cheese mixture acts as a heat buffer, slowing down the internal temperature rise of the inner meat fibers to prevent overcooking. This moisture rich barrier creates a "steam chamber" effect that hydrates the poultry from the inside out during the oven finish.
| Thickness | Internal Temp | Rest Time | Visual Cue |
|---|---|---|---|
| 2 cm | 74°C | 5 mins | Juices run clear when pierced |
| 3 cm | 74°C | 7 mins | Meat is opaque and firm |
| 4 cm | 74°C | 8 mins | Golden crust with slight bounce |
The cooling of the filling is just as important as the cooking of the meat. If you slice into the breast too early, the molten cheese will flow out like a river. Giving it those few minutes of rest allows the proteins to relax and the filling to set into a sliceable, custardy texture.
Essential Technical Specifications for a Successful Family Dinner
| Component | Fresh Method | Shortcut Version | Impact on Heritage Flavor |
|---|---|---|---|
| Spinach | Fresh baby spinach, wilted and squeezed dry | Frozen chopped spinach, thawed and drained | Fresh spinach offers a brighter, less metallic finish |
| Garlic | Hand minced fresh clove | Jarred minced garlic | Fresh garlic provides a sharper, more aromatic punch |
| Herbs | Chopped fresh parsley | Dried parsley flakes | Fresh herbs add a vibrant green color and clean aroma |
Choosing fresh ingredients is a tradition in my kitchen. While shortcuts exist, the time honored way of wilting your own spinach ensures you control the moisture. Excess water is the enemy of a good sear, so taking that extra minute to squeeze the greens makes all the difference in the final texture.
Component Analysis of Your Heritage Ingredients
| Ingredient | Science Role | Pro Secret |
|---|---|---|
| Cream Cheese | Fat based moisture barrier | Use full fat for a stable emulsion that won't "break" into oil |
| Smoked Paprika | Hygroscopic crust builder | Rub it in 10 mins early to help the salt draw out surface proteins |
| Chicken Broth | Conductive heat transfer | Scrape the pan bits (fond) into the broth for a deeper umami finish |
| Sea Salt | Protein denaturant | Salt the inside of the pocket to season the meat from within |
These components work together to create a dish that is far more than the sum of its parts. The way the salt interacts with the poultry proteins helps them hold onto water, which is why we never skip the seasoning step. For more tips on getting the base right, you might want to look at this Chicken Breast Recipe which focuses on achieving that perfect texture every single time.
Selecting Quality Components for a Time Honored Flavor Profile
- 4 large boneless skinless chicken breasts (approx. 225g each): Why this? Larger breasts are easier to pocket without cutting through the other side.
- Substitute: Boneless turkey breasts for a holiday style variation.
- 1 tbsp olive oil: Why this? High smoke point for the initial sear without burning the spices.
- Substitute: Avocado oil or clarified butter (ghee).
- 1 tsp smoked paprika: Why this? Adds a deep, wood fired aroma without needing a grill.
- Substitute: Sweet paprika with a pinch of chipotle powder.
- 1 tsp garlic powder: Why this? Coats the meat evenly for a consistent savory crust.
- Substitute: Onion powder or a high-quality Poultry Seasoning recipe.
- 1/2 tsp sea salt & 1/2 tsp cracked black pepper: Why this? Fundamental seasoning to enhance the natural poultry flavors.
- Substitute: Kosher salt or white pepper for a milder bite.
- 115g cream cheese, softened: Why this? The anchor of the filling; provides a rich, velvety mouthfeel.
- Substitute: Neufchâtel for a slightly lower fat content.
- 2 cups fresh baby spinach, chopped and wilted: Why this? Adds vitamins and a beautiful green contrast to the white meat.
- Substitute: Finely chopped kale or Swiss chard.
- 1/4 cup shredded parmesan cheese: Why this? Adds a salty, nutty "bite" and helps thicken the filling.
- Substitute: Pecorino Romano or aged Asiago.
- 1 clove garlic, minced: Why this? Fresh aromatic base for the creamy center.
- Substitute: 1/4 tsp garlic paste.
- 1/4 tsp red pepper flakes: Why this? A subtle back of-the throat warmth to balance the richness.
- Substitute: A dash of cayenne or omit for sensitive palates.
- 60ml chicken broth: Why this? Deglazes the pan to create a simple, savory finishing sauce.
- Substitute: Dry white wine (like Sauvignon Blanc).
- 1 tbsp cold butter: Why this? Emulsifies the pan sauce for a glossy, restaurant style finish.
- Substitute: A splash of heavy cream.
- 1 tbsp fresh parsley, chopped: Why this? A final pop of color and fresh herbal notes.
- Substitute: Fresh chives or cilantro.
Culinary Tools Required for a Flawless Searing Process
To do this right, you really need a heavy bottomed skillet. I swear by my grandmother's old cast iron pan; it holds heat like nothing else and gives the chicken a crust that "shatters" slightly when you bite into it. If you don't have cast iron, a heavy stainless steel pan works well too.
You'll also need a very sharp paring knife to create that pocket. A dull knife is dangerous and will likely tear the meat, leading to the dreaded filling leak.
Chef's Tip: Freeze your butter for 10 minutes before whisking it into the pan sauce at the end. The cold fat emulsifies more slowly, creating a much glossier and more stable sauce that won't separate on the plate.
step-by-step Transformation From Raw Ingredients to Golden Perfection
- Prep the chicken. Pat the 4 breasts completely dry with paper towels. Note: Surface moisture causes steaming rather than searing.
- Create the pocket. Using a sharp knife, cut a slit into the thickest part of each breast about 7-8 cm long, being careful not to cut all the way through to the other side.
- Wilt the greens. Sauté the 2 cups of spinach in a dry pan for 2 minutes until shrunken and dark green, then squeeze out every drop of liquid.
- Mix the core. Combine the 115g cream cheese, wilted spinach, 1/4 cup parmesan, minced garlic, and red pepper flakes in a bowl.
- Stuff the poultry. Spoon the mixture into each pocket and press the edges together. Note: Use toothpicks to secure the opening if the breasts are smaller.
- Season the exterior. Rub the olive oil over the chicken, then sprinkle with the smoked paprika, garlic powder, salt, and pepper.
- Sizzle and sear. Heat your skillet over medium high heat and sear the chicken for 3-5 minutes per side until a deep mahogany crust forms.
- Oven finish. Transfer the pan to a preheated oven at 200°C for 10-15 minutes until the internal temperature hits 74°C.
- Deglaze the pan. Remove chicken to a plate. Pour the 60ml broth into the hot pan, scraping up the browned bits for 2 minutes.
- Emulsify the sauce. Whisk in the cold butter and parsley until the liquid turns velvety and thick, then pour over the chicken.
Overcoming Potential Obstacles to Ensure a Velvety Finish
Structural Failure and Filling Leakage
If your filling is escaping, it's usually because the pocket was cut too wide or the pan wasn't hot enough to "seal" the meat proteins quickly. Think of the sear as a biological zipper; it tightens the fibers around the filling.
Identifying and Correcting Rubbery Texture
Rubbery chicken is almost always a result of overcooking. Because the filling stays moist, it can be tempting to keep it in the oven longer. Always rely on a digital thermometer rather than "feel."
| Problem | Root Cause | Solution |
|---|---|---|
| Filling is watery | Spinach wasn't squeezed enough | Drain wilted spinach in a clean kitchen towel before mixing |
| Meat is dry | Oven temp too low or cook time too long | Use 200°C for a faster finish and pull at 72°C (carryover will hit 74°C) |
| Skin is pale | Pan wasn't preheated | Wait for the oil to shimmer and slightly smoke before adding meat |
Common Mistakes Checklist
- ✓ Skipping the "pat dry" step (leads to grey, boiled looking meat)
- ✓ Using low-fat cream cheese (it lacks the stability to stay creamy under heat)
- ✓ Cutting the pocket through the back (creates an escape hatch for the cheese)
- ✓ Slicing immediately after cooking (the filling needs time to coagulate)
- ✓ Crowding the pan (drops the temperature and prevents a crispy crust)
Modifying the Heritage Recipe for Diverse Family Needs
Scaling Down (Cooking for Two): If you only need two servings, cut the ingredient list in half. Use a smaller 20 cm skillet to ensure the pan sauce doesn't evaporate too quickly. Reduce the oven time by about 3 minutes as smaller pans often run hotter.
Scaling Up (Feeding a Crowd): To make 8 or 12 servings, sear the chicken in batches. Don't try to crowd them all into one pan or they will steam. Once seared, move them to a large baking sheet to finish in the oven.
For the sauce, use a larger ratio of broth (increase by 1.5x) but keep the butter the same to prevent it from becoming too greasy.
Baking Adjustments: If you prefer to skip the stovetop entirely, you can bake them at 180°C for 25-30 minutes. You won't get that "shatter"-crisp skin, but it's a more hands off approach for busy evenings.
Managing Your Preparation Time and Repurposing Every Scraps
Storage Guidelines: You can keep these in the fridge for up to 3-4 days in an airtight container. When reheating, I recommend a low oven (150°C) with a splash of water in the dish, covered in foil.
This prevents the cream cheese from getting oily and the chicken from turning into leather. You can freeze the stuffed (but uncooked) breasts for up to 3 months just thaw them completely in the fridge before searing.
Zero Waste Heritage: Don't throw away those spinach stems! Finely mince them and add them to the filling for extra crunch and nutrients. If you have leftover filling, it makes an incredible spread for toasted biscuits the next morning.
Any leftover chicken can be sliced thin and added to a salad or used as a rich base for a pot pie the following night.
Final Flourishes for a Table Setting That Honors Generations
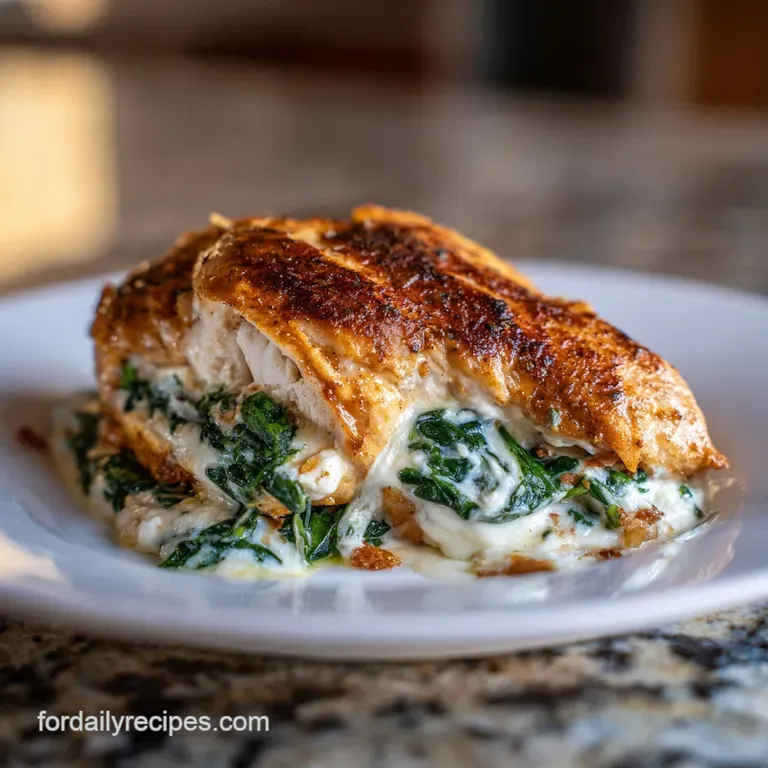
Plating this dish is all about showcasing that beautiful cross section. I like to slice each breast on a slight bias (diagonal) to reveal the vibrant green and white spiral inside. Lay the slices over a bed of creamy mashed potatoes or a simple rice pilaf to catch every drop of that pan sauce.
A sprig of fresh parsley and a final dusting of cracked black pepper makes it look like it came from a high end bistro, but the flavor will always taste like home. If you want a bit more acidity, a squeeze of fresh lemon right before serving cuts through the richness of the cream cheese perfectly. It's these little touches the ones passed down through generations that turn a simple meal into a memory. For another comforting bird dish, my Turmeric Chicken Recipe is a wonderful way to use similar techniques with a completely different flavor profile.
Debunking Common Myths About Searing and Stuffing
Myth 1: Searing "seals in" the juices. This is an old kitchen tale. Searing is actually for the Maillard reaction creating those complex, savory flavor compounds and a crispy texture. The juices stay inside because we don't overcook the fibers and we let the meat rest.
Myth 2: You must use toothpicks to keep it closed. While they help beginners, a proper sear on the open side of the breast actually tightens the protein "lips" of the pocket, naturally holding the filling in. If you've cut the pocket correctly and the pan is hot, the meat will do the work for you.
Myth 3: Fresh spinach is always better than frozen. Actually, for the filling, high-quality frozen spinach can be just as good if it is squeezed incredibly dry.
However, fresh spinach allows you to control the "wilt" and preserve a bit more of that garden fresh aroma that makes this recipe feel so special.

Recipe FAQs
What can I stuff inside a chicken breast?
Cream cheese, spinach, and parmesan are ideal due to their binding ability and moisture content.
You can also use herb and breadcrumb mixtures, goat cheese with sun-dried tomatoes, or even blue cheese and bacon. Ensure your filling isn't too wet, or it will escape during cooking.
What's the best thing to stuff a chicken with?
A rich, semi soft cheese base combined with finely chopped, dry greens creates the best molten center.
For this recipe, the blend of cream cheese, wilted spinach, and Parmesan works perfectly because the fats stabilize the filling, preventing it from breaking down. If you enjoy this creamy texture, you might also like the sauce base in our Cottage Cheese Chicken recipe.
What temperature should stuffed chicken breast be cooked at?
Finish cooking at 200°C (400°F) until the internal temperature reaches 74°C (165°F).
For the best crust, sear the chicken on the stovetop first, then immediately transfer the oven safe skillet to the preheated oven. Always use a meat thermometer for accuracy.
Should you bake chicken at 350 or 400?
Use 400°F (200°C) for stuffed chicken to achieve a fast sear and quick finish.
Baking at 350°F (175°C) often requires a longer cook time, increasing the risk that the lean chicken meat dries out before the center reaches a safe temperature. A higher heat ensures the outside browns nicely before the interior overcooks.
How to ensure the stuffing doesn't leak out during cooking?
Sear the chicken immediately after stuffing over high heat to seal the edges.
Ensure the pocket is not overstuffed, and if necessary, secure the opening with a toothpick. The initial high heat causes the chicken proteins to constrict around the opening, forming a natural seal.
What is the best way to keep the chicken moist while cooking?
Use a high fat, moist filling and finish the cooking process in a covered pan or foil tent.
The filling acts as an internal buffer against heat; you can also baste the exterior frequently during the oven phase. If you master temperature control here, applying those same precision skills to a weeknight side dish will give you perfect results, such as in our oven-roasted Baby Potatoes recipe.
Can I prepare stuffed chicken breasts ahead of time?
Yes, you can stuff and refrigerate them up to 12 hours before cooking.
Allow the stuffed chicken to sit at room temperature for about 30 minutes before searing to temper the coldness, which promotes even cooking. For a quick meal using similar flavor concepts, check out our Dinner Idea with recipe.
Spinach Stuffed Chicken Breast
Ingredients:
Instructions:
Nutrition Facts:
| Calories | 552 kcal |
|---|---|
| Protein | 71.2 g |
| Fat | 26.4 g |
| Carbs | 3.8 g |
| Fiber | 0.9 g |
| Sugar | 1.1 g |
| Sodium | 615 mg |
