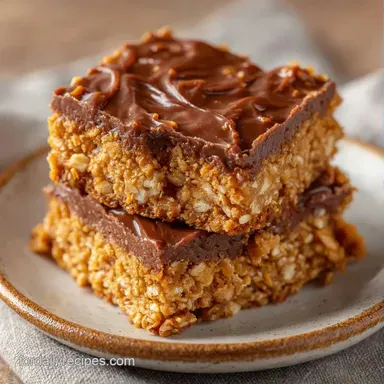
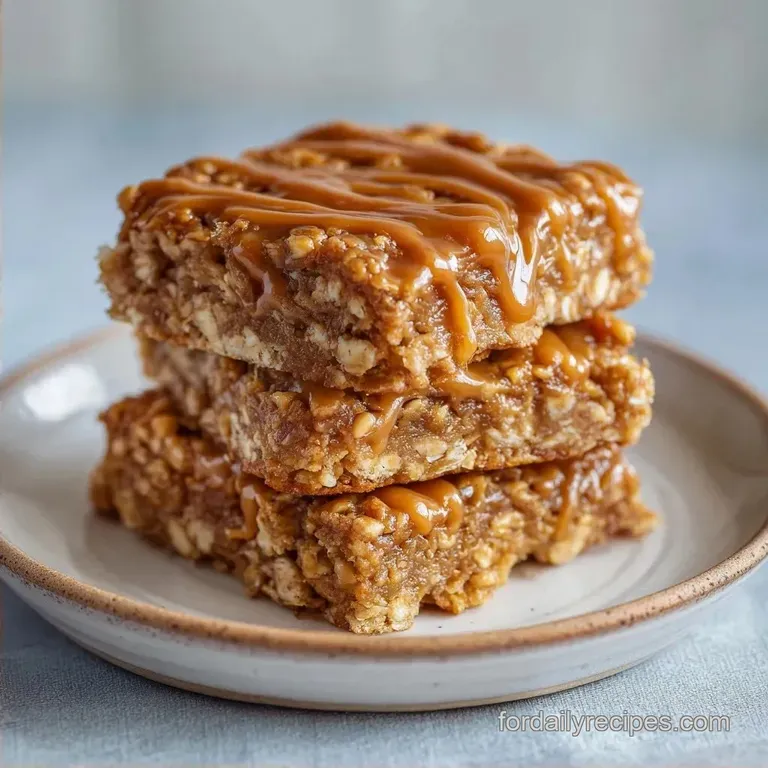
High-Protein Peanut Butter Breakfast Bars: Chewy and Dense
- Time: 15 min active + 20 min baking + 30 min cooling
- Flavor/Texture Hook: Nutty, salty sweet, and dense with a soft chew
- Perfect for: Monday morning meal prep or a quick gym snack
The smell of toasted oats and cinnamon hitting the air is the best part of my morning. But let's be real, most home-made bars are either bricks you could use as doorstops or a crumbly mess that ends up all over your car seat.
I've been there, usually staring at a tray of what I thought were bars but were actually just "peanut butter oatmeal cookies" that failed to set.
The trick is all in the pressing. If you just scoot the batter into the pan, you get air pockets and bars that shatter. You have to actually pack them down. Once I figured that out, these Peanut Butter Breakfast Bars became my go to for those mornings when I can't even look at a toaster.
These are plant forward, filling, and don't require any fancy equipment. You're getting a balance of healthy fats from the nut butter and slow burning carbs from the oats. They're sturdy enough to toss in a bag but soft enough that you don't need a steak knife to cut through them.
Easy Peanut Butter Breakfast Bars
Why these bars hold together
- Banana Binding
- Mashed banana acts as a natural glue and provides moisture without making the bars soggy.
- Maple Viscosity
- The syrup thickens during baking, creating a tacky structure that holds the oats in place.
- Oat Absorption
- Rolled oats soak up the liquids, which prevents the bars from leaking oil or becoming too wet.
- Fat Stability
- Peanut butter provides a creamy base that sets firm as it cools, locking in the other ingredients.
| Oat Type | Prep Time | Texture | Best For |
|---|---|---|---|
| Rolled Oats (Fresh) | 15 mins | Chewy, hearty | Long term energy |
| Quick Oats (Shortcut) | 10 mins | Softer, denser | Faster blending |
Ingredient Deep Dive
Looking at the components, it's really about the ratio of binder to bulk. If you have too much banana, they're mushy. Too much peanut butter, and they're too oily. I usually use a homemade almond milk to keep things creamy and clean.
| Ingredient | Science Role | Pro Secret |
|---|---|---|
| Rolled Oats | Structure | Use certified GF if needed; they provide the "chew" |
| Peanut Butter | Fat & Binder | Stir it well first so the oil is integrated |
| Mashed Banana | Humectant | Use a spotty, overripe banana for better sweetness |
| Maple Syrup | Sweetener | Adds a woody depth that honey lacks |
Necessary Kitchen Tools
You don't need a professional kitchen for this. A decent mixing bowl and a spatula are your primary weapons. I prefer a sturdy silicone spatula because this batter gets thick and heavy, and a flimsy one will just bend.
For the pan, an 8x8 inch square is standard. Using parchment paper isn't just a suggestion, it's a requirement. If you grease the pan with butter or oil, the bars might slide, but the parchment allows you to lift the whole block out and slice it cleanly on a cutting board.
Putting the Bars Together

Right then, let's get into the flow. To make this efficient, I follow a simple timeline: 5 minutes for prep, 5 minutes for mixing, and 20 minutes for the oven.
The Prep Flow: 1. Get the oven hot. 2. Line the pan. 3. Mash the banana until it's a smooth paste.
The Cooking Flow: 1. Mix dry ingredients first to avoid clumps. 2. Fold in the wet ingredients. 3. Press firmly into the pan.
The Finish: 1. Bake until edges are dark. 2. Cool completely. 3. Slice into 18 equal rectangles.
For the Dry Base
Gather your rolled oats, baking powder, cinnamon, and sea salt. According to King Arthur Baking, the type of oat you choose changes the texture, so stick with rolled oats for that classic breakfast bar feel.
For the Binding Mixture
You'll need your creamy peanut butter, maple syrup, that mashed banana, vanilla, and a splash of almond milk. Make sure the peanut butter is creamy, as chunky versions can create weak points in the bar's structure.
Baking and Setting
- Preheat oven to 350°F (175°C) and line an 8x8 inch baking pan with parchment paper, leaving an overhang on the sides.
- In a large mixing bowl, whisk together the rolled oats, baking powder, cinnamon, and salt until evenly distributed.
- Add the peanut butter, maple syrup, mashed banana, vanilla extract, and almond milk to the dry ingredients.
- Fold the mixture with a spatula until no dry streaks remain and the batter is thick and heavy. Note: Don't overmix or they get gummy.
- Press the mixture firmly into the prepared baking pan, smoothing the top with the back of a spoon.
- Bake for 18–22 minutes until the edges are deep mahogany brown and the center feels springy to the touch.
- Allow the bars to cool completely in the pan for at least 30 minutes before lifting them out.
- Slice into 18 rectangles.
Fixing Common Bar Issues
The most frequent complaint I hear is that the bars are too soft. Usually, this happens because the banana was too large or the oven wasn't fully preheated. If they feel like cake, you might have added too much baking powder.
Why Your Bars Crumble
If your Peanut Butter Breakfast Bars fall apart when you slice them, you likely didn't press them firmly enough into the pan. You want to apply real pressure, almost like you're packing a suitcase.
Why the Center Stays Gooey
This is usually a temperature issue. If the edges are brown but the middle is soft, give them another 2-3 minutes. The "springy" test is key, not the "toothpick" test used for cakes.
| Problem | Root Cause | Solution |
|---|---|---|
| Too crumbly | Under pressed batter | Press firmly with a flat bottomed glass |
| Too oily | Natural PB separation | Stir peanut butter thoroughly before measuring |
| Pale edges | Oven temp too low | Ensure oven is fully preheated to 350°F |
Common Mistakes Checklist:
- ✓ Did you leave the parchment overhang? (Essential for lifting)
- ✓ Is the banana fully mashed? (Lumps create holes)
- ✓ Did you cool for 30 mins? (Slicing hot = mush)
- ✓ Did you use rolled oats? (Quick oats change the bite)
- ✓ Is the peanut butter creamy? (Chunks can cause breaking)
Different Flavor Ideas
Once you've got the base down, you can play around. I love adding things that provide a bit of contrast to the richness of the peanut butter. If you're feeling like something more crunchy, try adding an easy homemade granola topping before baking.
For a Protein Boost: Mix in 2 tablespoons of hemp seeds or a scoop of unflavored pea protein. If you add protein powder, add an extra tablespoon of almond milk, as the powder absorbs more moisture.
For a Dessert Style Bar: Fold in a handful of dark chocolate chips or dried cranberries. These turn the breakfast bars into something that feels more like a treat.
For a Nut Free Version: Swap the peanut butter for sunflower seed butter or tahini. Note that tahini is more bitter, so you might want to add an extra teaspoon of maple syrup to balance it.
Saving and Reheating Bars
Since these have fresh banana, they don't stay on the counter forever. I always move mine to the fridge after they've cooled.
Storage Guidelines Keep them in an airtight container in the fridge for up to 7 days. If you leave them out, they'll stay fine for about 2 days, but the texture is much better when chilled.
Freezing Instructions These freeze beautifully. Wrap them individually in parchment paper and toss them in a freezer bag for up to 3 months. I find this is the best way to handle a big batch without getting bored of them.
Reheating Tips To get that "just baked" feel, pop a frozen bar in the microwave for 15-20 seconds. Or, if you have the time, put them in a 300°F oven for 5 minutes to crisp up the edges again.
Zero Waste Tip If you have a bit of batter left in the bowl, don't throw it away. Just scoop it onto a baking sheet as a "tester cookie" and bake it alongside the bars.
Best Ways to Serve
I usually eat these plain, but there are ways to make them feel more like a full meal. I'm a big fan of the "Power Breakfast Pair" - one bar and a piece of fresh fruit, like a sliced apple or a handful of berries.
For a post workout snack, pair a bar with a cold glass of almond milk. The protein from the peanut butter and the fast acting carbs from the maple syrup help with recovery without making you feel bloated.
If you're serving these to guests, try a small smear of almond butter or a drizzle of melted dark chocolate on top. It makes these simple Peanut Butter Breakfast Bars look like they came from a high end cafe. Trust me, the salt in the peanut butter makes the chocolate pop.
Recipe FAQs
Are peanut butter bars healthy?
Yes, especially when homemade. These bars utilize rolled oats and peanut butter to provide a balance of slow burning carbohydrates and healthy fats. They avoid the excessive refined sugars often found in commercial alternatives.
Is it true that store-bought peanut butter bars are the healthiest option?
No, this is a common misconception. Many processed bars contain artificial preservatives and high fructose corn syrup. Making them at home lets you use natural binders like mashed banana and maple syrup.
What bars are good for diabetics?
Bars with high fiber and healthy fats. Ingredients like rolled oats and peanut butter help slow glucose absorption, preventing sharp insulin spikes. Always monitor your personal response to the maple syrup content.
What is the most filling breakfast bar?
One that balances protein, fiber, and healthy fats. The combination of oats and nut butter creates a dense texture that promotes satiety. If you enjoyed the dense, satisfying chew here, the same fat-to-dry-ratio principle is used in our peanut butter cookies.
What are some healthy breakfast ideas for busy mornings?
Make-ahead options like homemade breakfast bars. Preparing a batch on Sunday allows you to grab a nutrient dense meal without morning prep. These bars are plant forward and provide lasting energy for the day.
What are healthy breakfast options for someone in a hurry?
Portable, nutrient dense snacks. Peanut butter breakfast bars are ideal because they are sturdy enough to eat during a commute. They provide a steady release of energy thanks to the complex carbs in the oats.
How to stop the bars from crumbling?
Press the mixture firmly into the pan. Use the back of a spoon to pack the batter tightly, which eliminates air pockets. This ensures the bars maintain their rectangular shape after they cool and are sliced.
Peanut Butter Breakfast Bars