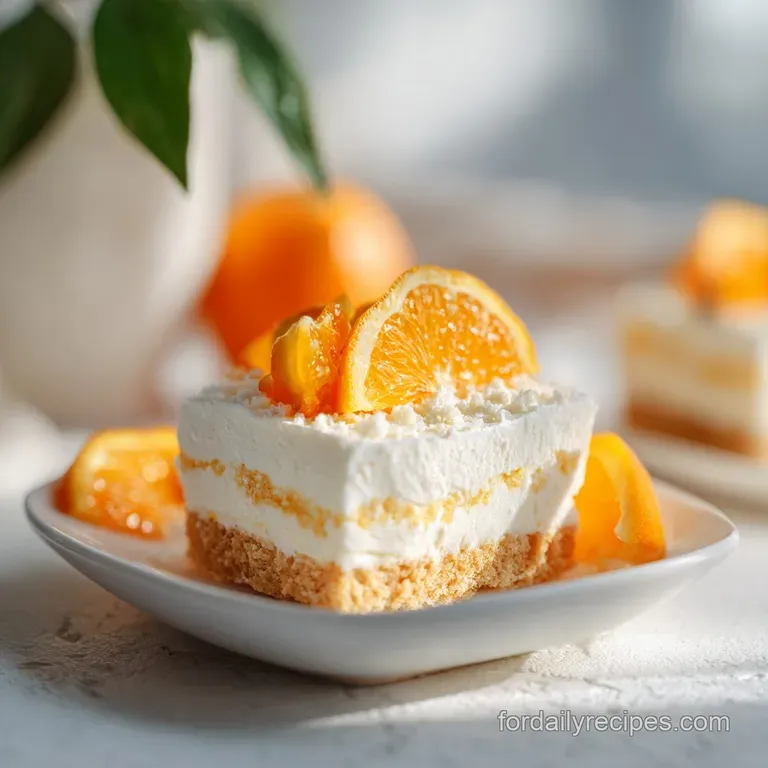
Orange Creamsicle Bars: Velvety and Refreshing

- Time: Active 25 minutes, Passive 240 minutes, Total 265 minutes
- Flavor/Texture Hook: Silky vanilla cream paired with a shatter crisp orange glaze.
- Perfect for: Stress free weeknight entertaining or summer potlucks.
- Master the Effortless Orange Creamsicle Bars Every Time
- Secret Techniques for No Bake Citrus Success
- Ingredient Deep Dive for Maximum Flavor
- Essential Components and Smart Substitutions
- Precision Tools for a Clean Slice
- Step by Step Prep Flow Guide
- Solving Common No Bake Dessert Hurdles
- Easy Flavor Variations and Simple Swaps
- Storage Tips and Reducing Kitchen Waste
- Serving Suggestions for Maximum Crowd Impact
- Recipe FAQs
- 📝 Recipe Card
Master the Effortless Orange Creamsicle Bars Every Time
We’ve all been there: you’re craving a refreshing citrus dessert, but you end up with a base that’s more like wet sand than a crisp crust. Or worse, the orange layer bleeds into the cream, creating a muddy orange mess that looks nothing like those vibrant treats from the ice cream truck.
I used to rush the chilling process, thinking twenty minutes in the fridge was "enough," only to watch my layers slide apart the second I tried to slice them.
The secret to a sharp, professional looking bar isn't fancy equipment; it's respecting the temperature. When we talk about orange creamsicle dream bars, we’re dealing with three distinct densities that need to play nice.
I’ve ruined enough batches to know that if your cream layer isn't cold and your gelatin isn't room temperature, you’re basically making orange soup.
Today, we’re fixing those frustrations. This orange creamsicle dream bars recipe is built for people with busy schedules who want high impact flavor without the fuss of an oven. We’re going to build a crust that actually stays crunchy and a cream center that holds its shape even on a warm afternoon.
It’s quick, it’s reliable, and it’s about to become your new favorite no fuss dessert.
Secret Techniques for No Bake Citrus Success
Getting that velvety texture in creamsicle dream bars requires a bit of mechanical help from the ingredients we choose. It’s not just about mixing things in a bowl; it’s about creating a stable structure that survives the transition from the fridge to the plate.
- The Lipid Barrier: By freezing the butter saturated crumbs for exactly 10 minutes, we solidify the fats. This creates a waterproof seal that prevents the moisture from the cream layer from migrating into the graham crackers, keeping the base from turning soggy.
- Cold Set Emulsification: Combining cream cheese with sweetened condensed milk creates a dense, fatty matrix. This structure traps the air from the whipped topping, ensuring the bars feel light on the tongue but remain sturdy enough to hold their weight.
- The Temperature Delta: Pouring hot gelatin over a dairy layer is a recipe for disaster. We wait for the "Citrus Bloom" to cool completely to room temperature, which prevents the heat from melting the fat in the cream layer and causing "bleeding."
- Gelatin Hydration: Dissolving the powder in boiling water first ensures every granule is hydrated, preventing a grainy texture, while the ice cold water shock speeds up the setting process without compromising the final "shatter" of the top layer.
| Method | Total Time | Texture Profile | Best Use Case |
|---|---|---|---|
| No Bake (This Recipe) | 4 hours 25 mins | Velvety cream & snappy glaze | Quick weeknight prep |
| Baked Custard Style | 6 hours + | Dense, cheesecake like | Formal dinner parties |
| Freezer Mousse | 8 hours + | Icy, semi freddo feel | Mid summer heatwaves |
Using the right method depends entirely on how much time you have and the texture you crave. While a baked version offers a traditional cheesecake bite, this no bake approach wins on efficiency and that specific "melt in-your mouth" quality we associate with the classic frozen treat. If you’re looking for other ways to use bright citrus flavors in your rotation, this Orange Crush recipe is a fantastic fizzy companion for a summer afternoon.
Ingredient Deep Dive for Maximum Flavor
Every component in these bars serves a specific structural purpose. If you’ve ever wondered why we use vanilla paste instead of just extract, or why the salt in the crust is non negotiable, this breakdown explains how we build the flavor profile from the ground up.
| Ingredient | Science Role | Pro Secret |
|---|---|---|
| Cream Cheese | Provides structural body | Use full fat bricks only; "spreadable" tubs contain too much water for a clean set. |
| Condensed Milk | Acts as a stabilizer | This replaces sugar and liquid, creating a silky bond that doesn't crystallize. |
| Vanilla Paste | Flavor depth | The tiny beans offer a visual "gourmet" cue and a more intense floral aroma. |
| Orange Gelatin | The structural crown | Bloom it fully to ensure the top layer has a glass like finish that snaps when bitten. |
While we often focus on the sweetness, the salt in the crust is what actually makes the orange flavor pop. Without it, the bars can feel one dimensional. I always use fine sea salt because it dissolves instantly into the melted butter, ensuring every bite of the crust has that perfect sweet salty balance.
Essential Components and Smart Substitutions
Before you start, make sure your cream cheese is truly at room temperature. If it's even slightly chilly, you'll end up with tiny white lumps in your cream layer that no amount of whisking can fix. It’s the difference between a velvety finish and a grainy disappointment.
- Graham cracker crumbs (1.5 cups): The foundation of the bar. Why this? Provides a honeyed, toasted base that complements the citrus.
- Unsalted butter (6 tbsp): The glue for our crust. Why this? Allows us to control the salt levels precisely.
- Granulated sugar (2 tbsp): Helps the crust caramelize and set. Why this? Bonds with the butter to create the lipid barrier.
- Fine sea salt (0.25 tsp): Balances the sugar. Why this? Sharpens the perception of the orange notes.
- Full fat cream cheese (8 oz): The core structure. Why this? Provides the necessary fat for a firm, sliceable set.
- Sweetened condensed milk (0.5 cup): Sweetener and thickener. Why this? Creates a fudge like silkiness that sugar can't mimic.
- Vanilla paste (1 tsp): Aromatics. Why this? Offers a more concentrated, authentic vanilla bean flavor.
- Whipped topping (8 oz): The aerator. Why this? Keeps the bars light and fluffy instead of heavy.
- Orange Jello (3 oz): The flavor and color. Why this? Provides a consistent, concentrated citrus punch.
- Boiling water (1 cup): The solvent. Why this? Fully dissolves the gelatin proteins.
- Ice cold water (0.5 cup): The coolant. Why this? Lowers the temperature rapidly for a faster set.
| Original Ingredient | Substitute | Why It Works |
|---|---|---|
| Graham Cracker Crumbs | Vanilla Wafers | Similar dry texture but adds a distinct buttery vanilla note. |
| Whipped Topping | Stabilized Whipped Cream | Same volume. Note: Must be stabilized with gelatin to hold shape. |
| Vanilla Paste | Vanilla Extract | Same flavor profile, though you lose the visible bean flecks. |
| Condensed Milk | Coconut Condensed Milk | Similar viscosity. Note: Adds a subtle tropical coconut undertone. |
If you find yourself with extra ingredients or want a different texture for your morning snack, these Homemade Granola Bars are another excellent way to use up butter and sweeteners while staying in the "bars" family for easy meal prep.
Precision Tools for a Clean Slice
You don't need a professional kitchen, but a few specific tools make the difference between "homemade" and "bakery quality." I highly recommend using a metal 9x9 inch pan rather than glass if you have one. Metal conducts cold more efficiently, helping the bars set faster and more evenly from the edges to the center.
A flat bottomed measuring cup is my secret weapon for the crust. Using your fingers usually leads to uneven thickness and a "slumped" edge. By pressing down with the flat base of a cup, you compress the crumbs into a tight, architectural layer that won't crumble when you lift it out.
Finally,, don't skip the parchment paper. Leave about two inches of overhang on opposite sides. This "sling" allows you to lift the entire block of bars out once they are set. Slicing inside the pan is a recipe for scratched metal and mangled first pieces.
A long, sharp chef’s knife dipped in hot water between every single cut is the only way to get those clean, sharp edges that make no bake orange creamsicle dream bars look so satisfying.
step-by-step Prep Flow Guide
Now, let’s get into the flow. This recipe moves in phases. While the crust freezes, you prep the cream. While the cream chills, you prep the orange. It’s an efficient 25 minute active window that respects your time.
1. The Compression Foundation
Line your 9x9 inch pan with parchment paper, ensuring the overhang is secure. In a bowl, mix your 1.5 cups graham cracker crumbs, 6 tbsp melted butter, 2 tbsp sugar, and 0.25 tsp sea salt. Stir until it looks like wet beach sand. Press this firmly into the pan using your flat bottomed cup.
Freeze for 10 minutes. This creates that essential lipid barrier we talked about earlier.
2. The Aerated Cream Layer
In a large bowl, beat the 8 oz softened cream cheese until it’s perfectly smooth no lumps allowed! Gradually pour in the 0.5 cup sweetened condensed milk and 1 tsp vanilla paste. Mix until fully combined. This is where the magic happens. Fold in the 8 oz thawed whipped topping using a spatula.
Do this gently; we want to keep the air in there.
3. The Controlled Citrus Bloom
Spread the cream mixture over your chilled crust. Use an offset spatula to get it flat and even. Pop this into the fridge for at least 30 minutes. While that’s chilling, whisk your 3 oz orange gelatin into 1 cup of boiling water.
Stir for 2 minutes until no crystals remain on the bottom. Stir in the 0.5 cup ice cold water.
4. The Final Assembly
Wait for the orange mixture to reach room temperature. This is vital! Once it's cool to the touch, hold a large spoon over the cream layer, back side up. Slowly pour the liquid over the spoon. This "breaks the fall" and prevents the liquid from gouging holes in your soft cream.
Refrigerate for 4 hours until the orange crown is firm and crackling. Lift out, slice into 16 bars, and serve.
Solving Common No Bake Dessert Hurdles
Sometimes things go sideways, even with the best plans. The most common issue with orange creamsicle dessert bars is the "sliding layer" syndrome, where the orange top just glides off the cream when you try to eat it.
This usually happens if the cream layer was too smooth or if the gelatin was poured on while still too warm.
Preventing Layer Bleeding Issues
If your orange layer starts to swirl into the white cream, it means your cream layer hasn't set enough or your gelatin was too hot. The temperature delta is your best friend here. Always ensure the cream layer feels firm to a light touch before adding the liquid. If the damage is already done, don't panic!
You can use a toothpick to purposefully swirl the two layers for a "marble" effect. It won't be the classic look, but it will still taste incredible.
Fixing a Crumbly Base
A crust that falls apart usually lacks enough "glue" or hasn't been compressed enough. If you notice your crust is crumbly while you're pressing it in, add another tablespoon of melted butter. The "wet sand" consistency is the visual cue you're looking for. If it looks dry and dusty, it won't hold up once it's sliced.
| Problem | Root Cause | Solution |
|---|---|---|
| Soupy Cream Layer | Cream cheese was too warm or over beaten | Chill for an extra 2 hours; use full fat ingredients next time. |
| Gritty Orange Top | Gelatin didn't dissolve fully | Whisk for a full 2 minutes in boiling water before adding cold water. |
| Stuck Parchment | Moisture got under the paper | Use a thin spatula to gently loosen the edges before lifting the sling. |
Common Mistakes Checklist
- ✓ Ensure the cream cheese is truly room temp (about 70°F/21°C) before beating.
- ✓ Don't skip the 10 minute freezer set for the crust; it's your soggy bottom insurance.
- ✓ Use the "spoon pour" technique to avoid cratering the cream layer.
- ✓ Wipe your knife clean with a hot, damp cloth between every single slice.
- ✓ Allow the full 4 hours of chill time; rushing leads to messy, soft bars.
Easy Flavor Variations and Simple Swaps
Once you’ve mastered the easy no bake orange creamsicle bars, you can start playing with the profile. The beauty of this recipe is its versatility. You can swap the citrus or the base to create entirely new flavor experiences while keeping the same reliable ratios.
1. The "Creamsicle Supreme" (Flavor Boost)
For a more intense citrus hit, add the zest of one fresh orange into the cream cheese mixture. This adds those essential oils that the gelatin powder lacks, giving it a "fresh squeezed" aroma that cuts through the richness of the condensed milk.
You can also add a drop of orange extract if you really want to lean into the fruitiness.
2. The Tropical Swap
Replace the orange gelatin with pineapple or lime gelatin. If you use lime, swap the graham crackers for crushed ginger snaps. The spicy ginger against the tart lime creates a "Moscow Mule" style bar that is incredibly refreshing.
For a pineapple version, use the coconut condensed milk mentioned in the substitution table to go full Piña Colada.
3. gluten-free Modification
This is one of the easiest recipes to make gluten-free. Simply swap the graham crackers for your favorite gluten-free brand. Since we aren't baking the crust, you don't have to worry about the structural integrity as much the butter and sugar will do all the heavy lifting to keep those easy no bake orange creamsicle bars together.
Storage Tips and Reducing Kitchen Waste
No bake bars are the champions of meal prep. Because they rely on gelatin and fat to hold their shape, they actually improve after 24 hours in the fridge as the flavors have time to meld. If you're making these for a party, I actually suggest making them the night before.
- Fridge Storage: Keep the bars in an airtight container for up to 5 days. Any longer and the crust will eventually start to pull moisture from the air, losing that signature "snap."
- Freezer Storage: These bars freeze surprisingly well. Wrap individual squares in plastic wrap and then foil. They will stay fresh for up to 3 months. To serve, let them thaw in the fridge for about 30 minutes they are actually delicious when semi frozen, like a creamy popsicle.
- Zero Waste Tip: If you have leftover graham cracker crumbs, don't toss them! Toast them in a dry pan for 2 minutes and store them in a jar. They make a fantastic crunchy topping for yogurt or vanilla ice cream later in the week.
If you have any leftover orange gelatin powder from a different project, you can even stir a teaspoon of it into a vanilla frosting or use it to flavor a simple syrup for cocktails. We hate seeing good ingredients go to waste in this kitchen!
Serving Suggestions for Maximum Crowd Impact
Presentation is everything with a layered dessert like this. To make these look like they came from a high end bakery, I like to top each square with a tiny, paper thin slice of fresh orange or a small dollop of fresh whipped cream right before serving.
The contrast between the bright orange glaze and the fresh fruit is stunning.
These bars are quite rich, so 16 servings from a 9x9 pan is the sweet spot. If you’re serving them at a larger event, you can even cut them into 32 "bite sized" mini bars. They hold their shape remarkably well on a dessert tray, provided they aren't sitting in direct sunlight for hours.
For a truly nostalgic experience, serve these alongside some old school glass bottles of soda. The bright citrus and creamy vanilla notes take everyone back to summer vacations and simpler times. It’s a no fuss, high reward treat that proves you don't need an oven to be the hero of the potluck.
Just remember: patience during the "Temperature Delta" is what separates the pros from the soggy crust amateurs!

Recipe FAQs
Is it necessary to use a double boiler for the cream cheese mixture?
No, this is a common misconception. A standard hand mixer or stand mixer works perfectly to aerate the room temperature cream cheese, as heat would actually destroy the emulsion you are trying to build.
How to ensure the orange layer doesn't melt into the cream layer?
Allow the gelatin mixture to reach room temperature before pouring. If you enjoyed mastering the emulsification technique here, you will notice that temperature control is equally vital for keeping these distinct layers from blending.
How to keep the crust from getting soggy?
Freeze the pressed graham cracker mixture for exactly 10 minutes before adding the cream layer. This creates a solid lipid barrier that prevents the moisture from the cream cheese from softening your base.
Is it true I can substitute yogurt for the cream cheese?
No, the structure will collapse. This recipe relies specifically on the fat content and consistency of 8 ounces of full fat cream cheese to hold the bars together once sliced.
How to slice these bars cleanly?
Wipe your knife with a hot, damp cloth between every single cut. This prevents the cream layer from sticking to the blade and keeps the layers looking sharp and professional.
Can I speed up the chilling process in the freezer?
No, rushing the 4-hour refrigeration window usually leads to messy, soft bars. Gelatin requires consistent, moderate cold to set its structure properly, so keep them in the main section of the fridge for the best results.
How to get the parchment paper out without tearing the bars?
Line the 9x9 inch pan leaving an overhang on two sides. This creates a handle that allows you to lift the entire block out of the pan effortlessly before you begin slicing.
No Bake Orange Creamsicle Bars

Ingredients:
Instructions:
Nutrition Facts:
| Calories | 231 kcal |
|---|---|
| Protein | 3.0 g |
| Fat | 14.4 g |
| Carbs | 23.1 g |
| Fiber | 0.4 g |
| Sugar | 13.8 g |
| Sodium | 174 mg |
