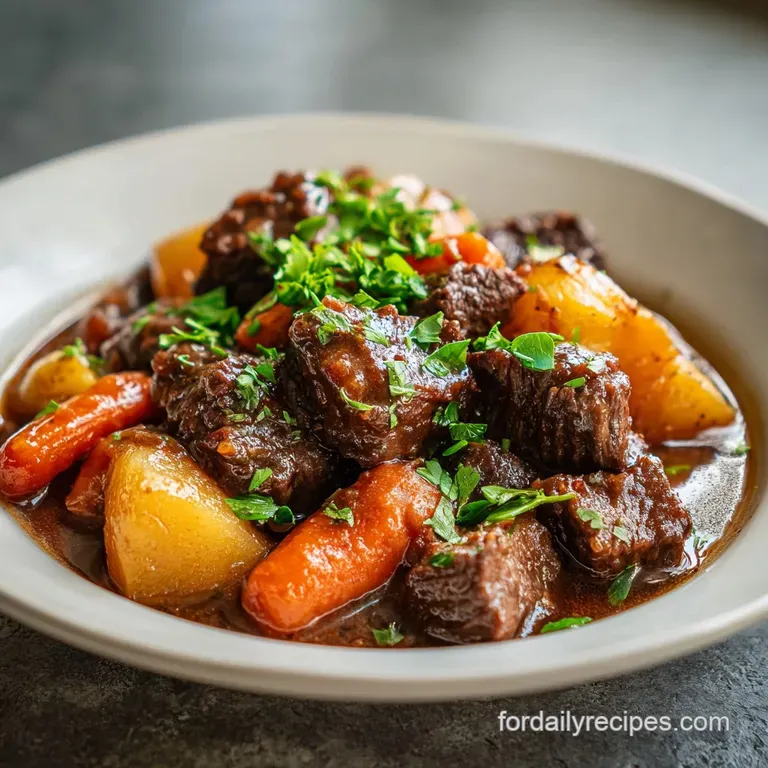
Beef Stew and Crockpot Recipe
- Time: Active 20 minutes, Passive 8 hours, Total 8 hours 20 mins
- Flavor/Texture Hook: Tender, melt in-your mouth beef in a deep, velvety gravy
- Perfect for: Cozy Sunday family dinners and effortless holiday meal prep
- Heritage Beef Stew and Crockpot Comfort
- Science of the Slow Simmer
- Component Analysis of Our Elements
- Essential Heritage Kitchen Tools
- Ingredients & Substitutes
- Creating Time Honored Flavor Layers
- Mastering the Stew Without Errors
- Customizing the Traditional Pot
- Myths About Slow Cooking
- Storage and Zero Waste Methods
- Serving the Perfect Family Bowl
- High in Sodium (⚠️)
- Recipe FAQs
- 📝 Recipe Card
Heritage Beef Stew and Crockpot Comfort
There is a specific sound that defines a Sunday morning in my kitchen, and it is the aggressive sizzle of cold beef hitting a hot cast iron pan. It’s a sound that brings me back to my grandmother’s house, where the air was always thick with the scent of onions softening in butter and the earthy aroma of dried thyme.
She didn't have the convenience of modern gadgets back then, but she understood that building flavor takes time and patience. That heavy pan was her wand, and the stove was her stage.
I remember watching her carefully turn each cube of beef roast, waiting for that perfect mahogany crust to form. She taught me that you can't rush a good stew; you have to let the heat do its work.
This beef stew and crockpot method is my way of honoring those time honored traditions while letting the appliance handle the long, slow simmer. It's a bridge between the heritage of slow cooked comfort and the realities of our busy lives, resulting in a bowl that feels like a warm embrace.
We aren't just tossing things into a pot and hoping for the best. We are building layers, from the initial browning of the meat to the way the starch from the Yukon Gold potatoes naturally thickens the broth over eight long hours.
By the time you lift the lid, the meat shouldn't just be soft it should practically dissolve on your tongue. Trust me, once you smell that red wine and garlic mingling in the steam, you’ll understand why this is the only way I make stew.
Science of the Slow Simmer
Collagen Denaturation: Tough connective tissue in the chuck roast breaks down into gelatin at 160°F, creating a velvety mouthfeel.
Maillard Reaction: Searing the meat at high heat produces complex sugar molecules that provide the foundational savory depth.
Starch Gelatinization: Potatoes release starch granules into the liquid, which swell and burst to provide a natural, creamy body to the sauce.
Osmotic Equilibrium: Salt and aromatics slowly penetrate the cell walls of the vegetables over hours, ensuring flavor is seasoned from the inside out.
| Beef Cube Size | Internal Temperature | Rest Time | Visual Cue |
|---|---|---|---|
| 1.5 inch cubes | 195°F - 205°F | 10 minutes | Meat shreds easily with a fork |
| 1 inch cubes | 190°F - 200°F | 5 minutes | Fibers pull apart without resistance |
| 2 inch chunks | 200°F - 210°F | 15 minutes | Deep mahogany exterior, tender core |
The transition from tough muscle to tender morsels depends entirely on that internal temperature reaching the point where collagen melts. This process is why we choose the low setting for a full eight hours; higher heat can actually tighten the protein fibers before they have a chance to relax and absorb the surrounding juices. If you find yourself needing a heartier version for a crowd, this Crockpot Beef Stew recipe follows these exact thermal principles for consistent results every time.
Component Analysis of Our Elements
| Ingredient | Science Role | Pro Secret |
|---|---|---|
| Beef Chuck Roast | Primary Collagen Source | Choose a piece with heavy white marbling for maximum tenderness. |
| Yukon Gold Potatoes | Natural Thickener | These hold their shape better than Russets but still release enough starch. |
| Red Wine (Dry) | Acidic Tenderizer | The acidity helps break down protein while adding a sophisticated fruit note. |
| Tomato Paste | Umami Foundation | Bloom it in the hot oil after searing the meat to deepen the color. |
Essential Heritage Kitchen Tools
To achieve that deep, time honored flavor, a few specific tools make all the difference. While the crockpot does the heavy lifting, the initial sear requires a heavy bottomed skillet, preferably cast iron.
This ensures a consistent heat that allows the meat to develop a dark, flavorful crust without sticking or steaming. A sturdy wooden spoon is also non negotiable for scraping up the browned bits, or fond, from the bottom of the pan after deglazing with the wine.
You will also want a sharp chef's knife for those uniform 1.5 inch beef cubes. Consistent sizing means every piece of meat reaches that gelatinous stage at the same time. If the pieces are too small, they may overcook and become stringy; if they are too large, the centers might remain stubborn and tough. For those who enjoy a more structured approach to their slow cooking, my Slow Cooker Beef recipe highlights how proper equipment leads to better texture.
1. The Collagen Transformation Science
Connective tissues are like tiny rubber bands holding the meat together. In this stew and crockpot environment, the low heat gently coaxes those bands to snap and transform into liquid gold.
This is why we don't use lean cuts like sirloin; without the collagen, the meat would end up dry and mealy rather than succulent.
2. Building Deep Umami Flavors
Umami is that "fifth taste" that makes a dish feel complete and satisfying. We achieve this by layering the tomato paste and Worcestershire sauce. When these ingredients hit the heat, they undergo a chemical change that intensifies their savory properties, providing a backbone that supports the lighter notes of the carrots and celery.
3. Searing for Savory Success
Never skip the sear. When the beef hits the hot oil, it creates a shatter-crisp exterior that eventually softens into the gravy. This isn't about cooking the meat through it's about creating a flavor profile that can't be achieved by simmering alone.
Ingredients & Substitutes
- 2 lbs beef chuck roast: The gold standard for stew. Why this? High collagen content ensures the meat becomes incredibly tender during the long simmer.
- Substitute: Beef brisket or bottom round. Note: Brisket will be fattier; round may be slightly leaner.
- 1 lb Yukon Gold potatoes: Why this? They provide a creamy texture without disintegrating completely like starchy Russets.
- Substitute: Red potatoes. Note: They stay firm but won't thicken the sauce as much.
- 3 large carrots: Why this? They add a necessary sweetness to balance the salty, savory broth.
- Substitute: Parsnips. Note: Adds a spicier, more earthy undertone to the dish.
- 3 cups low sodium beef bone broth: Why this? Bone broth has more natural gelatin than standard broth, aiding the sauce's body.
- Substitute: Vegetable broth with 1 tsp soy sauce. Note: Adds a different kind of savory depth.
- 1/2 cup dry red wine: Why this? The acidity brightens the heavy fats and cuts through the richness.
- Substitute: Extra broth with 1 tbsp balsamic vinegar. Note: Mimics the acidity without the alcohol.
- 2 tbsp tomato paste: Why this? Provides the deep red color and a concentrated tomato base.
- Substitute: 1/4 cup tomato puree. Note: Thinner consistency, so reduce other liquids slightly.
- 1 tbsp Worcestershire sauce: Why this? Adds fermented complexity and a touch of saltiness.
- Substitute: Soy sauce or tamari. Note: Provides salt but lacks the vinegar/tamarind tang.
Creating Time Honored Flavor Layers
1. The Vital Searing Stage
Start by patting your 2 lbs of beef chuck roast completely dry with paper towels. Heat 1 tbsp of vegetable oil in a heavy skillet until it begins to shimmer. Add the beef in batches, ensuring you don't overcrowd the pan. Sear until a dark mahogany crust forms on all sides.
Remove the meat and set it aside, but keep that pan hot for the next step.
2. The Aromatics and Deglaze
In the same pan, add your chopped yellow onion, carrots, and celery. Sauté for about 5 minutes until the onion edges turn translucent. Stir in the 3 minced garlic cloves and 2 tbsp of tomato paste. Cook for 2 more minutes until the paste smells toasted.
Pour in the 1/2 cup of red wine, using your spoon to scrape every single brown bit off the bottom. This is where the magic happens.
3. The Long Slow Simmer
Transfer the meat and the vegetable wine mixture into your crockpot. Add the cubed Yukon Gold potatoes, 3 cups of beef bone broth, 1 tbsp Worcestershire sauce, 1 tsp dried thyme, and 2 bay leaves. Season with 1 tsp salt and 0.5 tsp black pepper. Cover and cook on low for 8 hours.
Resist the urge to peek; every time you lift the lid, you lose heat and time.
4. The Final Thickening Polish
About 30 minutes before serving, whisk together 2 tbsp cornstarch and 2 tbsp water to create a slurry. Stir this into the beef stew and gently fold in the 1/2 cup of frozen peas.
Cover and cook for the remaining 30 minutes until the sauce is glossy and thick. Remove the bay leaves before ladling into deep bowls.
Mastering the Stew Without Errors
1. Fixing Overly Mushy Vegetables
If you find your potatoes and carrots are falling apart, they were likely cut too small or cooked too long on a high setting. Next time, aim for 1 inch chunks for the potatoes and thick coins for the carrots.
If it happens now, you can gently mash some of the vegetables into the broth to create a thicker, more rustic "chowder" style stew.
2. Thickening a Thin Broth
A watery stew is usually the result of vegetables releasing more moisture than expected. If the cornstarch slurry doesn't do the trick, try taking a cup of the broth and blending it with a few of the cooked potato chunks, then stirring it back in.
This uses the natural starches to bind the liquid without adding extra ingredients.
3. Flavor Adjustments for Balance
Sometimes a stew tastes "flat" even after 8 hours. This usually means it needs a touch of acid or salt. A teaspoon of red wine vinegar or a squeeze of lemon juice at the very end can wake up all the other flavors.
Don't be afraid to add a pinch more salt right before serving to make the savory notes pop.
| Problem | Root Cause | Solution |
|---|---|---|
| Greasy surface | Excess fat from chuck roast | Skim with a wide spoon or use a bread slice to soak up oil |
| Tough meat | Not enough time for collagen to melt | Continue cooking on low for another 60-90 minutes |
| Bitter aftertaste | Burned garlic or tomato paste | Add a pinch of sugar to balance the bitterness |
Common Mistakes Checklist:
- ✓ Never skip the searing step; it is the primary source of flavor depth.
- ✓ Always pat the meat dry before it hits the pan to avoid steaming.
- ✓ Don't add the peas at the beginning; they will turn gray and mushy.
- ✓ Avoid the "High" setting if possible; "Low" produces the most tender results.
- ✓ Ensure the potatoes are submerged in the liquid so they cook evenly.
Customizing the Traditional Pot
1. Traditional Beef Stew with Dumplings
For a truly time honored experience, you can add biscuits or dumplings to the top of your beef stew and crockpot creation. About 45 minutes before the end of cooking, drop spoonfuls of biscuit dough directly onto the surface of the simmering stew.
Cover tightly and let them steam until they are fluffy and doubled in size.
2. Simple Dietary Ingredient Swaps
If you need to keep things gluten-free, ensure your Worcestershire sauce is a certified brand and replace the cornstarch with arrowroot powder. For a dairy-free richness, you can stir in a tablespoon of nutritional yeast at the end, which adds a subtle "cheesy" depth without any milk products.
3. Scaling for Large Families
When doubling this recipe, you don't necessarily need to double the liquid. Use 5 cups of broth instead of 6 to prevent the stew from becoming too thin. Use a 7 quart crockpot to ensure there is enough room for even heat distribution.
If you are halving the recipe, use a smaller 3 quart crockpot so the liquid doesn't evaporate too quickly.
| Method | Cook Time | Texture | Best For |
|---|---|---|---|
| Classic Crockpot | 8 hours (Low) | Silky, falling apart tender | Maximum flavor development |
| High Heat Crockpot | 4 hours (High) | Soft but slightly firmer | When you started late |
| Stovetop Dutch Oven | 3 hours (Simmer) | Dense and rich | Deep caramelization |
Myths About Slow Cooking
One persistent myth is that you must completely submerge the meat in liquid for it to stay moist. In reality, the crockpot creates a sealed steam chamber. Over submerging often results in a "boiled" flavor rather than a braised one.
The vegetables will release their own juices, naturally increasing the liquid level as the hours pass.
Another common misconception is that searing "seals in the juices." Science tells us that moisture is lost regardless of browning. The real reason we sear is for the Maillard reaction the chemical process that creates hundreds of different flavor compounds.
Without it, your and crockpot meal will lack the complexity found in traditional heritage cooking.
Finally, many people believe that "High" for 4 hours is the same as "Low" for 8 hours. While the food will be safe to eat, the chemistry is different.
The slower temperature rise on the "Low" setting allows the tough fibers to relax and the gelatin to fully bloom, whereas the faster "High" heat can sometimes cause the protein to tighten and expel its juices, leading to a drier texture.
Storage and Zero Waste Methods
Store your leftover stew in airtight containers in the fridge for up to 4 days. In fact, many people argue it tastes even better on the second day because the flavors have more time to meld. To reheat, place it in a saucepan over medium low heat and add a splash of broth or water to loosen the gravy.
Avoid the microwave if you can, as it can toughen the beef.
For long term storage, this stew freezes beautifully for up to 3 months. Leave about an inch of headspace in your freezer safe containers to allow for expansion. Thaw it overnight in the fridge before reheating.
To practice zero waste, save your potato peels and toss them with oil and salt to bake into crispy skins, or keep your celery hearts and onion ends in a bag in the freezer to make a homemade vegetable stock later.
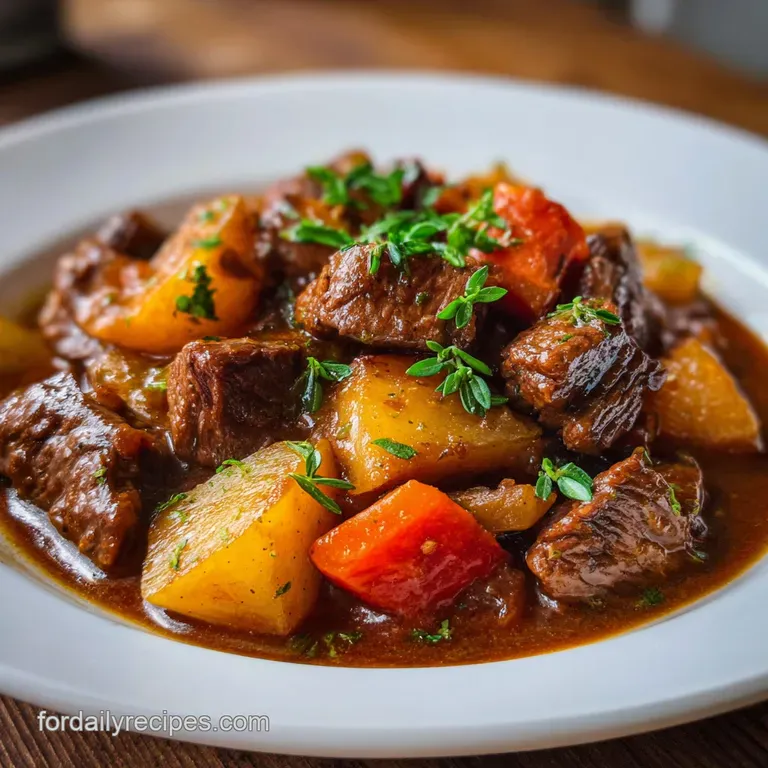
Serving the Perfect Family Bowl
There is nothing quite like a bowl of this beef stew and a side of warm, flaky biscuits. The biscuits are perfect for soaking up every last drop of the velvety gravy. I also love serving this over a bed of creamy polenta or even egg noodles if I'm feeling extra indulgent.
A simple green salad with a sharp vinaigrette provides a nice contrast to the rich, savory notes of the stew.
If you want to keep it simple, just a thick slice of crusty sourdough bread is all you need. The acidity of the bread complements the red wine in the broth perfectly. Whatever you choose, make sure to serve it in deep, warmed bowls.
There's something about the weight of a heavy bowl in your hands that makes the meal feel more grounded and traditional. It’s a dish meant for lingering over, sharing stories, and creating your own heritage memories one spoonful at a time.

High in Sodium (⚠️)
845 mg mg of sodium per serving (37% of daily value)
American Heart Association recommendation about 2,300mg limit
Tips to Reduce Sodium
-
Broth Swap-30%
Use no-salt added beef broth, or make your own broth from scratch. This will significantly reduce the overall sodium content.
-
Cut Back Salt-25%
Reduce the added salt by at least half or eliminate it altogether. Taste and adjust after cooking, adding a small amount only if necessary. Consider a salt substitute.
-
DIY Tomato Paste-20%
Make your own tomato paste using fresh tomatoes and herbs. Alternatively, look for a low-sodium tomato paste option.
-
Worcestershire Watch-20%
Worcestershire sauce is a big source of sodium. Reduce amount to 1/2 tbsp or consider low-sodium tamari as a substitute.
-
Spice It Up!
Enhance flavor with fresh or dried herbs (like rosemary, oregano), garlic powder, onion powder, and other spices instead of relying on salt.
Recipe FAQs
How many hours does a beef stew take in a slow cooker?
8 hours on Low. For ideal texture where the collagen fully melts into gelatin, aim for the full 8-hour cycle on the low setting in the crockpot.
What is the secret ingredient in slow cooker beef stew?
A long, slow sear on high heat before slow cooking. The browning reaction (Maillard) creates foundational savory depth that simmering alone cannot achieve; this technique is similar to how we build flavor in our Egyptian Beef Goulash recipe.
Is it better to cook beef stew in crockpot on high or low?
Low is definitively better for texture. Low heat for 8 hours allows the tough connective tissues to gently break down into luscious gelatin, resulting in fork tender meat.
Do I have to brown stew meat before putting it in the crockpot?
Yes, you absolutely must brown the meat first. Searing the beef creates the deep, complex savory flavor (umami) that permeates the entire dish.
How do I fix beef stew if the broth turns out too thin?
Create a cornstarch slurry and simmer for 30 minutes. Whisk two tablespoons of cornstarch with two tablespoons of cold water, then stir this mixture into the hot stew and let it cook uncovered until the sauce thickens.
Can I substitute my beef chuck roast with a leaner cut?
No, stick to cuts with high collagen content. Leaner cuts like sirloin will dry out during the long cook time because they lack the necessary connective tissue to turn into rich gelatin.
What liquid should I use if I skip the red wine component?
Use extra beef broth plus a teaspoon of acid. To mimic the brightness the wine adds, substitute the 1/2 cup of wine with 1/2 cup of broth plus a splash of balsamic vinegar or lemon juice.
Beef Stew Crockpot Recipe
Ingredients:
Instructions:
Nutrition Facts:
| Calories | 508 kcal |
|---|---|
| Protein | 34.6 g |
| Fat | 26.4 g |
| Carbs | 24.2 g |
| Fiber | 3.8 g |
| Sugar | 4.1 g |
| Sodium | 845 mg |
