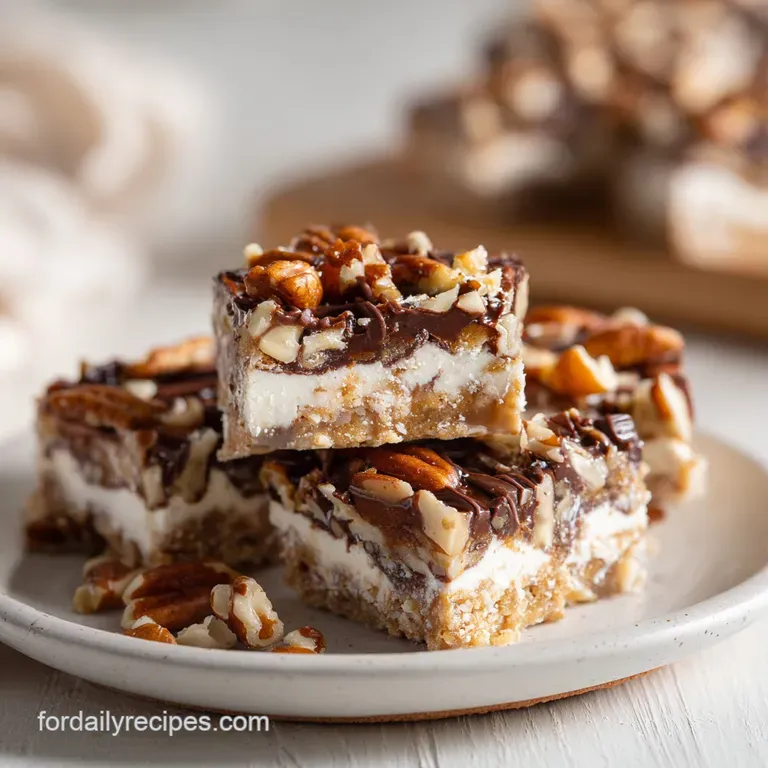
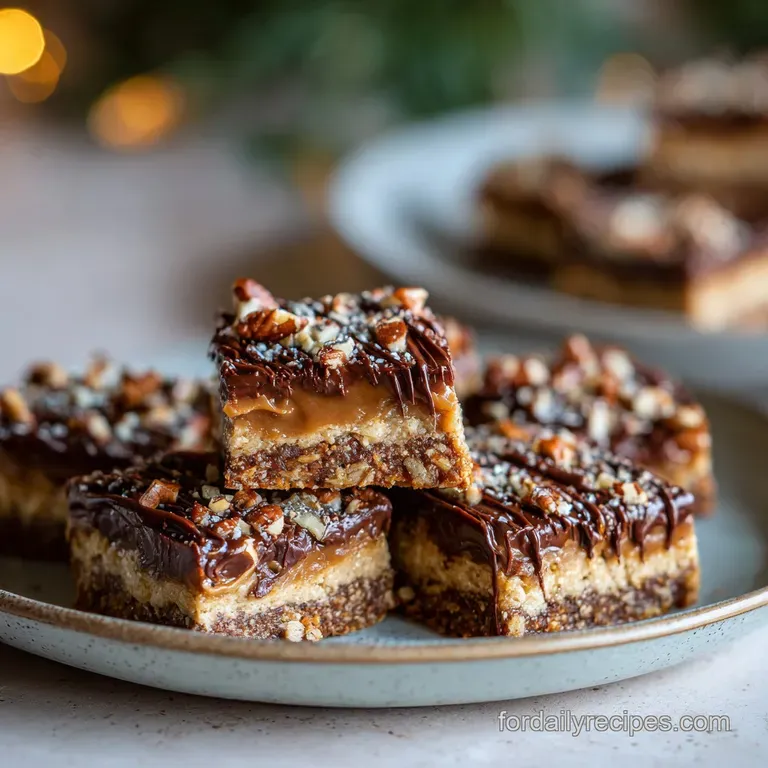
No Bake Turtle Dream Bars: Silky and Decadent
- Time: Active 15 minutes, Passive 4 hours, Total 4 hours 15 mins
- Flavor/Texture Hook: Silky, crunchy, and decadent
- Perfect for: Weeknight treats, summer potlucks, or beginner friendly entertaining
- Create the Ultimate No Bake Turtle Dream Bars
- Why This Layered Dessert Works
- Essential Ingredient Component Analysis
- Sourcing Quality Elements and Swaps
- Minimal Tools for Maximum Efficiency
- Master the Assembly Process
- Solutions for Common Assembly Issues
- Creative Flavor and Texture Swaps
- Handling the Double Batch
- Maintaining Freshness and Storage
- Perfect Pairings for Sweet Treats
- Recipe FAQs
- 📝 Recipe Card
Create the Ultimate No Bake Turtle Dream Bars
Ever wondered why some desserts vanish within minutes while others sit lonely on the snack table? I figured it out on a frantic Tuesday night when I had zero energy to preheat the oven but a massive craving for something rich and velvety. This recipe is the answer to that specific, time pressed hunger.
It’s not just a sugar fix, it’s a clever construction of textures that feels far more complex than the fifteen minutes of work you’ll actually put in.
I remember bringing a tray of these to a neighborhood block party last July. I hadn't even finished setting them down before people were asking for the secret. The "secret" is actually just the way the salted caramel weaves through the toasted pecans to create a satisfying snap in every bite.
There is something truly magnetic about the combination of a dark, salty chocolate crust and a cloud like cheesecake layer.
We are going to focus on efficiency here. You don't need a pantry full of specialized equipment or a degree in pastry arts. By using reliable shortcuts that don't sacrifice flavor, you can produce a dessert that looks like it came from a high end bakery.
Let’s get into how we make these layers behave and stay perfectly distinct.
Why This Layered Dessert Works
- Structural Integrity: Stabilized whipped topping acts as a light but firm net, allowing the cream cheese and pudding layers to hold their shape without gelatin.
- Cold Bonding: Saturated fats in the melted butter and cream cheese solidify when chilled, creating a firm "set" that makes the bars sliceable.
- Sugar Modulation: Fine sea salt in the crust and the use of salted caramel prevents the dessert from becoming cloyingly sweet, highlighting the cocoa notes instead.
- Moisture Balance: Instant pudding uses modified starches that hydrate instantly in cold milk, providing a velvety texture that won't weep into the crust.
| Servings | Ingredient Adjustments | Pan Size | Setting Time |
|---|---|---|---|
| 8 people | Use 150g Oreos, 60g butter | 9x5 inch loaf pan | 4 hours |
| 16 people | Use 300g Oreos, 115g butter | 9x9 inch square pan | 4 hours |
| 32 people | Double all ingredients | 9x13 inch pan | 6 hours |
When you are planning your prep, remember that the depth of the pan matters more than the width for these no bake turtle dream bars. A deeper pan allows for those thick, distinct stripes of color that make the bars look so professional.
If you decide to double the recipe, give it an extra two hours in the fridge to ensure the center is fully firm.
Essential Ingredient Component Analysis
| Ingredient | Science Role | Pro Secret |
|---|---|---|
| Cream Cheese | Provides fat and protein structure | Use full fat blocks only for the firmest set |
| Instant Pudding | Uses pre gelatinized starch for thickening | Whisk for exactly 2 minutes to activate starches |
| Oreo Crumbs | Creates a dense, moisture resistant base | Grind into fine sand to prevent a crumbly crust |
| Whipped Topping | Introduces air and stabilization | Fold gently to keep the volume high |
Choosing the right components is half the battle. If you're hosting a big dinner and need a savory main before this dessert, my Stuffed Shells recipe is a huge time saver that follows this same efficiency first philosophy. Both recipes rely on building layers of flavor without a mountain of dishes.
Sourcing Quality Elements and Swaps
- 300g Oreo cookies: These provide the dark, chocolatey snap. Why this? The filling helps bind the crust without extra sugar.
- 115g unsalted butter, melted: Acts as the "glue" for your base. Why this? Unsalted lets you control the salt levels perfectly.
- 1g fine sea salt: Enhances the chocolate and caramel. Why this? Sea salt dissolves faster in cold mixtures.
- 225g full fat cream cheese, softened: The tangy core of the bar. Why this? Fat content is vital for a sliceable texture.
- 120g powdered sugar, sifted: Sweetens the cheesecake layer. Why this? Dissolves instantly without a gritty mouthfeel.
- 340g stabilized whipped topping (divided): Adds fluff and stability. Why this? Holds its shape longer than fresh cream.
- 110g instant chocolate pudding mix: The velvety chocolate layer. Why this? Sets much faster than cooked custards.
- 480ml whole milk, cold: Hydrates the pudding mix. Why this? Cold milk prevents the starch from clumping.
- 125g pecan halves, toasted: Adds the "turtle" crunch. Why this? Toasting releases oils for better flavor.
- 120ml premium salted caramel sauce: The signature drizzle. Why this? Adds a complex, buttery sweetness.
- 50g semi sweet chocolate chips: The final decorative touch. Why this? Provides a darker, firmer chocolate contrast.
| Original Ingredient | Substitute | Why It Works |
|---|---|---|
| Oreo Cookies | Chocolate Graham Crackers | Similar texture but slightly less sweet and rich |
| Salted Caramel | Butterscotch Sauce | Similar viscosity. Note: Lacks the salt sweet balance |
| Pecan Halves | Toasted Walnuts | Offers a similar crunch with a slightly more bitter edge |
Minimal Tools for Maximum Efficiency
You don't need a standing mixer for this. A simple hand mixer is actually better because it gives you more control over the cream cheese texture. You'll also need a 9x9 inch square baking pan. I always suggest lining it with parchment paper, leaving a bit of overhang on the sides.
This "sling" method lets you lift the entire block of bars out at once, making those clean, straight cuts much easier to achieve.
A sturdy spatula is your best friend here. When you are folding the whipped topping into the pudding and cheesecake mixtures, you want to be gentle. If you stir too aggressively, you’ll knock out the air and end up with a dense, heavy dessert instead of the light "dream" texture we're after.
For the crust, a flat bottomed measuring cup is the perfect tool to press the crumbs into a level, compact layer.
Master the Assembly Process
- Line the pan. Place parchment paper into a 9x9 inch square pan with edges hanging over. Note: This ensures you can lift the bars out for clean slicing later.
- Prep the base. Combine 300g crushed Oreos, 115g melted butter, and 1g sea salt in a bowl.
- Press the crust. Push the crumb mixture firmly into the pan bottom until even and solid.
- Whip the core. Beat 225g softened cream cheese and 120g powdered sugar until silky and smooth.
- Fold the topping. Gently mix 225g whipped topping into the cream cheese and spread it over the crust.
- Mix the pudding. Whisk 110g pudding mix and 480ml cold milk for 2 minutes until thickened and glossy.
- Lighten the chocolate. Fold 115g whipped topping into the chocolate pudding and layer it on the cheesecake.
- Add the crunch. Scatter 125g toasted chopped pecans evenly over the top chocolate layer.
- Finish the drizzle. Heat 120ml caramel and 50g chocolate chips separately, then drizzle until a marbled pattern forms.
- The cold set. Chill in the refrigerator for at least 4 hours until the layers are firm and cold.
Chef's Tip: Before you chop the pecans, toss them in a dry skillet over medium heat for 3 minutes. As soon as you smell that nutty aroma, take them off. It makes a massive difference in the final flavor profile.
Solutions for Common Assembly Issues
Why Your Crust Is Crumbly
If the base falls apart when you try to slice it, it usually means the crumbs weren't pressed down hard enough or there wasn't enough "glue." When you mix the melted butter with the Oreo crumbs, it should feel like wet sand.
If you press a spoonful against the side of the bowl and it doesn't hold its shape, add an extra tablespoon of melted butter.
Why Your Layers Are Running Together
This usually happens if the cream cheese wasn't fully softened or if the pudding didn't have time to thicken before being layered. If the pudding feels too liquid, let it sit in the bowl for an extra five minutes before folding in the whipped topping.
Also, make sure your whipped topping is fully thawed; frozen chunks will melt later and create watery pockets between the layers.
| Problem | Root Cause | Solution |
|---|---|---|
| Soggy Crust | Adding caramel directly to the crumbs | Always place the cream cheese barrier first |
| Lumpy Cheesecake | Cold cream cheese | Ensure cheese is room temp before beating |
| Thin Pudding | Using 1% or skim milk | Stick to whole milk for the necessary fat content |
Common Mistakes Checklist
- ✓ Use a flat bottomed cup to press the crust into the corners of the pan.
- ✓ Sift your powdered sugar to avoid tiny white lumps in the cheesecake layer.
- ✓ Don't over whisk the pudding after adding the whipped topping; keep it fluffy.
- ✓ Wipe your knife with a warm, damp cloth between every single cut for clean bars.
- ✓ Ensure the caramel isn't boiling hot when drizzling, or it will melt the pudding layer.
Creative Flavor and Texture Swaps
If you want to move away from the traditional "turtle" profile, you can easily swap the pecans for crushed pretzels. This adds a salty, malty crunch that pairs beautifully with the chocolate. For another seasonal variation, these bars are a fantastic alternative to Pumpkin Bars during the autumn months, providing that same creamy satisfaction without the baking time.
For a darker, more adult version, use a high percentage dark chocolate pudding and swap the semi sweet drizzle for a bittersweet one. You can even add a teaspoon of instant espresso powder to the chocolate pudding layer to deepen the cocoa notes.
If you're a fan of peanut butter, replacing the cheesecake layer with a peanut butter and cream cheese mixture creates a "Buckeye" style bar that is absolutely addictive.
Handling the Double Batch
When you need to feed a large crowd, doubling this recipe is straightforward. However, don't just dump all the ingredients together and hope for the best. Work in batches when beating the cream cheese to ensure you don't burn out a hand mixer motor.
For the liquids, you can actually reduce the milk by about 5% when doubling; this ensures the larger volume of pudding sets firmly enough to support its own weight.
If you are scaling down to a small loaf pan for a quiet night in, use half an egg's worth of volume if a recipe calls for it, but since this is no bake, you just divide the grams by two.
A smaller pan actually sets faster, so you might be able to slice into it in about 2 hours 30 mins instead of the full four.
| Feature | Fresh Whipped Cream | Stabilized Topping | Result |
|---|---|---|---|
| Prep Time | 5 minutes | 0 minutes | Shortcut saves time |
| Stability | Low (wilts in 1 hour) | High (stays firm for days) | Topping is better for bars |
| Flavor | Rich/Dairy | Sweet/Mild | Fresh is tastier, Topping is structural |
Maintaining Freshness and Storage
Keep these bars in the refrigerator until the very moment you are ready to serve them. Because of the dairy content and the whipped topping, they will soften if left at room temperature for more than thirty minutes. In the fridge, they stay perfect for up to 5 days if kept in an airtight container.
If you have leftovers, they make a great midnight snack straight from the container.
These bars actually freeze remarkably well. If you want to make them a week in advance, wrap the entire pan tightly in plastic wrap and then foil. When you're ready to eat, move them to the fridge for 24 hours to thaw slowly.
For zero waste, any leftover Oreo crumbs can be stored in a jar and used as a topping for vanilla ice cream, and extra caramel sauce is a dream stirred into morning coffee.
Perfect Pairings for Sweet Treats
Since these bars are quite rich, they pair best with something that has a bit of acidity or bitterness. A strong cup of black coffee or a glass of cold milk is the classic choice. If you're serving these at a dinner party, a small bowl of fresh raspberries on the side can help cut through the density of the cheesecake and caramel.
Don't feel like you have to stick to just one dessert, though. If you're building a full dessert spread, these bars sit perfectly next to a plate of Peanut Butter Blossom Cookies. The chewy texture of the cookies provides a great contrast to the velvety layers of the turtle bars. Just be prepared for the turtle bars to be the first thing to disappear!

Recipe FAQs
How to ensure the crust layer stays firm?
Use a flat bottomed cup to press the cookie crumbs firmly into the pan. This method creates a dense, level foundation that holds its shape when you slice the bars later.
Is it necessary to use a double boiler for the melted chocolate topping?
No, this is a common misconception. You can melt the chocolate chips safely in the microwave using short, 20-second bursts, stirring thoroughly in between to prevent overheating.
How to avoid lumps in the cheesecake layer?
Sift your powdered sugar before mixing it with the cream cheese. This simple step ensures the texture remains perfectly smooth and free of white specks throughout the layer.
How to get clean slices when serving these bars?
Wipe your knife with a warm, damp cloth between every single cut. If you enjoyed mastering the clean cut technique here, see how we achieve similar layered precision in our other chilled dessert recipes.
Can I speed up the setting process in the freezer?
How to prevent the caramel drizzle from melting the pudding?
Check that your salted caramel is at room temperature before drizzling. If the sauce is boiling hot, it will soften the delicate pudding and whipped topping layer underneath.
How to keep the pudding layer light and fluffy?
Fold the whipped topping in gently rather than over whisking. Vigorous mixing deflates the air bubbles, which can cause the layer to lose its airy, light consistency.
No Bake Turtle Dream Bars

Ingredients:
Instructions:
Nutrition Facts:
| Calories | 421 kcal |
|---|---|
| Protein | 3.5 g |
| Fat | 26.0 g |
| Carbs | 44.4 g |
| Fiber | 1.8 g |
| Sugar | 32.1 g |
| Sodium | 420 mg |
