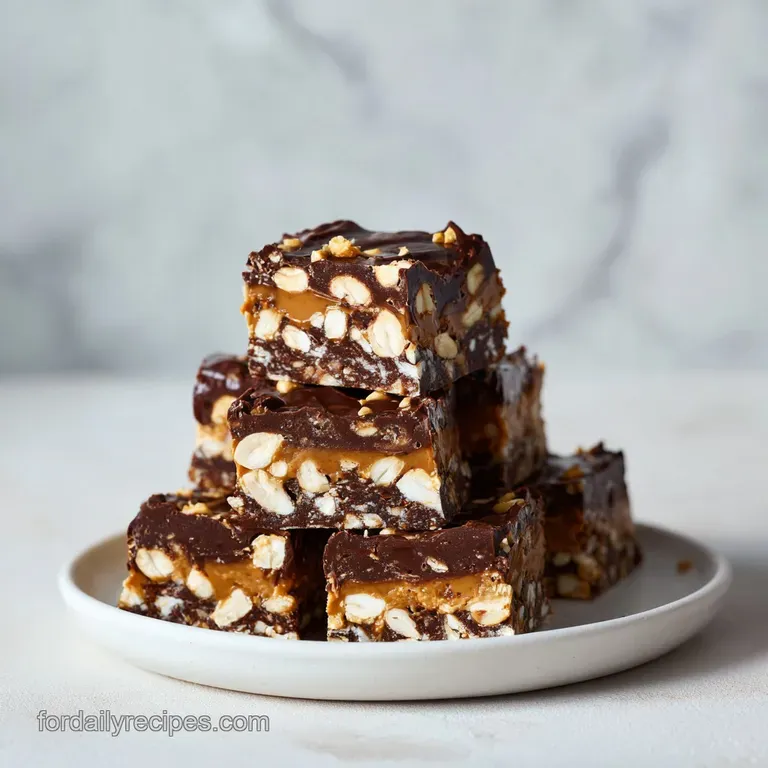
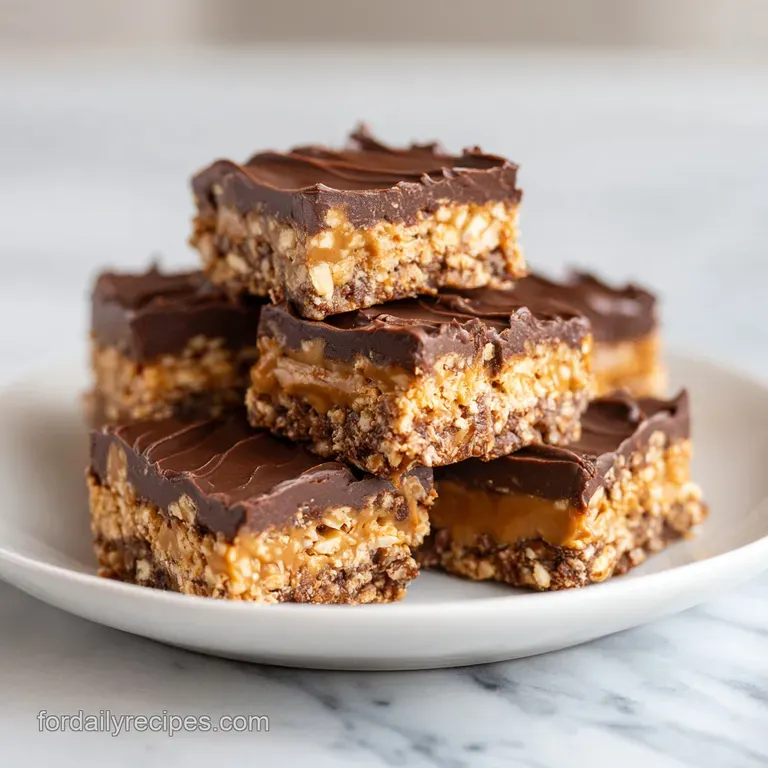
Chocolate Peanut Butter Bars: Creamy and Decadent
- Time: Active 25 minutes, Passive 240 minutes, Total 265 minutes
- Flavor/Texture Hook: Fudgy, salty sweet, and velvety
- Perfect for: Potlucks, weeknight treats, or no bake cravings
- Why These Bars Stay Perfectly Layered
- Component Analysis And Ingredient Roles
- Essential Numbers For Best Results
- Smart Shopping For Better Bars
- The Basic Tools You Need
- Step By Step Assembly Process
- Quick Fixes For Common Blunders
- Delicious Ways To Customize Flavour
- Keeping Your Treats Fresh Longer
- What To Serve On Side
- Recipe FAQs
- 📝 Recipe Card
Forget everything you think you know about no bake desserts being "light" or airy. Most people assume that because you aren't using eggs or flour, you're going to end up with a puddle of sugar that collapses the second it hits room temperature. That is a total myth.
You do not need a hot oven or gelatin to get a dessert that stands tall and proud when sliced.
Honestly, don't even bother with the "lite" versions of these ingredients. I've tried using low-fat cream cheese and natural, oily peanut butter in these Chocolate Peanut Butter Bars before, and it was a disaster.
The natural oil separates, the low-fat base weeps moisture, and you end up with a soggy mess that tastes like disappointment. We're going for gold here, which means full fat, fully loaded ingredients that actually hold their shape.
The magic happens when the salt from the cookie crust hits that rich, chocolatey crown. You get that distinct "shatter" from the frozen base followed immediately by a silky peanut butter cloud. It's brilliant.
We're going to use a few smart swaps, like condensed milk in the topping, to keep things budget friendly while achieving a texture that rivals any expensive bakery.
Why These Bars Stay Perfectly Layered
When we talk about structure in a no bake treat, we are really talking about temperature and fat management. This recipe works because we are layering different types of fats that set at different rates.
The cookie crust uses saturated fats from butter that turn solid when chilled, creating a literal wall that prevents the filling from soaking in.
- Fat Stabilization: The cream cheese provides a dense, structural protein network that holds the peanut butter in place even at room temperature.
- Cold Setting: Freezing the base for exactly 10 minutes creates a thermal barrier, so the warmer peanut butter mixture doesn't melt the crust's butter on contact.
- Ganache Viscosity: Using sweetened condensed milk in the chocolate layer creates a fudge like consistency that stays soft enough to slice but firm enough to stack.
- Air Incorporation: Whipping the heavy cream to stiff peaks introduces tiny air bubbles that lighten the dense peanut butter, preventing the bar from feeling like a brick of lead.
| Premium Ingredient | Budget Alternative | Flavor Impact | Savings |
|---|---|---|---|
| Gourmet Dark Chocolate | Semi sweet Chips (250g) | Slightly sweeter, classic profile | Save $5.00 |
| Homemade Nut Butter | Commercial Creamy PB (250g) | Better salt balance, smoother texture | Save $4.00 |
| Vanilla Bean Paste | Pure Vanilla Extract (1 tsp) | Same floral notes, no black specks | Save $7.00 |
Most people skip the step of chilling the crust, thinking it's just a suggestion. It’s not. If that base isn't cold, the heavy peanut butter layer will push the cookie crumbs around, and you'll lose that distinct, beautiful line between the black cookie and the tan filling.
Trust me, those 10 minutes in the freezer are the difference between a "work of art" and a "crumbly mess."
Component Analysis And Ingredient Roles
| Ingredient | Science Role | Pro Secret |
|---|---|---|
| Cream Cheese (226g) | Emulsifier and base | Must be fully softened to avoid tiny white lumps in your filling. |
| Condensed Milk (120ml) | Texture modifier | Prevents the chocolate from snapping, making every bite velvety and smooth. |
| Sandwich Cookies (300g) | Structural foundation | Use the ones with the filling left in; it acts as extra "glue" for the crust. |
Understanding how these elements interact helps you avoid common pitfalls. The cream cheese isn't just there for flavor; it’s the structural engineer of the whole operation. Without it, the peanut butter would be too soft.
By beating it with the powdered sugar, you're creating a stable matrix that can support the weight of the chocolate topping without compressing the air we fold in later.
Essential Numbers For Best Results
To get these Chocolate Peanut Butter Bars right every time, you need to respect the clock. Time is an ingredient here just as much as the chocolate is. If you rush the setting process, the layers will bleed into each other, and you won't get those clean, sharp edges that make people ask for the recipe.
| Process Stage | Target Duration | Visual Checkpoint | Goal |
|---|---|---|---|
| Crust Freeze | 10 minutes | Matte finish, firm to touch | Prevent crumb migration |
| Filling Prep | 15 minutes | No visible white streaks | Homogenous aeration |
| Final Chill | 240 minutes | Ganache doesn't stick to finger | Slicing integrity |
If you are working in a particularly warm kitchen, you might need to extend that final chill. I usually aim for a total time of 265 minutes from the moment I start pulsing the cookies to the moment I lift them out of the pan. It's a test of patience, but the results are worth every second.
Smart Shopping For Better Bars
When you're gathering your essentials, stick to the generic brands for the cookies and the cream cheese. There is absolutely no reason to buy the name brand version of a chocolate sandwich cookie when it's just getting pulverized into sand anyway. The 300g of cookies called for is roughly 24 standard sized cookies.
If you buy a larger pack, just weigh them out or count them precisely.
For the peanut butter, avoid anything labeled "natural" or "stir." You want the stabilized, creamy kind (250g). The oils in natural peanut butter are too volatile, and they will separate during the 4 hours of chilling, leaving an oily sheen on the surface of your bars.
It’s one of those times where the "processed" stuff actually yields a better culinary result for this specific application.
The heavy cream (240ml for the filling, plus 2 tablespoons for the ganache) needs to be cold straight from the fridge. Warm cream won't whip to stiff peaks, and you need those peaks to provide the "dream" texture in the center.
If your cream stays liquid, the filling will be dense and heavy rather than light and airy.
| Original Ingredient | Substitute | Why It Works |
|---|---|---|
| Unsalted Butter (85g) | Salted Butter (85g) | Adds extra punch. Note: Omit the 0.25 tsp flaky salt if using this. |
| Semi sweet Chips (250g) | Dark Chocolate (250g) | Less sugar, more cocoa. Note: Result will be more bitter/intense. |
| Powdered Sugar (180g) | Granulated Sugar (180g) | Not recommended. Note: Will result in a gritty, sandy texture. |
One thing I've learned the hard way: sift your powdered sugar. I know, it’s a pain and it makes a mess. But those little lumps of sugar in the cream cheese are impossible to beat out once the peanut butter is in there. Take the extra two minutes to sift the 180g of sugar into the bowl.
Your future self will thank you when you're biting into a perfectly silky bar.
The Basic Tools You Need
You don't need a professional kitchen, but a few specific tools make this significantly easier. A food processor is the best way to get that "fine sand" texture for the crust. If you don't have one, put the 300g of cookies in a heavy duty zip top bag and go to town with a rolling pin.
Just make sure there are no large chunks left, or the crust will crumble when you try to eat it.
A hand mixer or a stand mixer (like a KitchenAid) is essential for the filling. You're trying to incorporate air while smoothing out the cream cheese and peanut butter. Doing this by hand is a serious workout and usually results in an uneven texture.
We want that 250g of peanut butter and 226g of cream cheese to be one single, beautiful, tan colored cloud.
Finally,, grab an offset spatula if you have one. It’s the secret to getting that perfectly flat surface. If you don't have one, the back of a large spoon works, but it's harder to get into the corners of your 9x9 inch pan. Lining the pan with parchment paper is non negotiable.
Leave an overhang on the sides so you can lift the entire block out once it's set. Trying to cut these inside a deep pan is a recipe for scratched metal and broken bars.
step-by-step Assembly Process
- Pulse the 300g of chocolate cookies in a food processor until they are a fine, uniform crumb.
- Stir in the 85g of melted butter and 0.25 tsp flaky salt. Note: The mixture should feel like wet sand and hold its shape when pressed.
- Press the cookie mixture firmly into your lined 9x9 inch pan. Freeze for 10 minutes until the base is solid and cold.
- Beat the 226g of softened cream cheese and 250g of creamy peanut butter in a large bowl. Cook 2 mins of high speed beating until the mixture is lightened in color and completely smooth.
- Gradually add the 180g of sifted powdered sugar and 1 tsp vanilla extract. Note: Stop and scrape the sides of the bowl to ensure no white streaks remain.
- In a separate bowl, whip 240ml of heavy cream until stiff peaks form. Note: The cream should hold its shape when you lift the whisk.
- Gently fold the whipped cream into the peanut butter base using a spatula. Do this slowly until the mixture is airy and uniform.
- Spread the filling over the chilled crust. Use your spatula to level it out until the surface is flat and smooth.
- Combine 250g chocolate chips, 120ml condensed milk, and 2 tbsp heavy cream in a bowl. Microwave in 30 second bursts, stirring until the ganache is glossy and pourable.
- Pour the warm chocolate over the filling and tilt the pan to coat. Refrigerate for at least 240 minutes until the top is firm and matte.
Quick Fixes For Common Blunders
Why the chocolate layer cracks
If your top layer is shattering when you try to cut it, the ganache likely lacked enough fat or was chilled for too long without enough condensed milk. To fix this, always let the bars sit at room temperature for about 10 minutes before slicing.
Also, dip your knife in hot water and wipe it dry between every single cut. The heat from the blade will melt through the chocolate smoothly rather than snapping it.
My peanut butter layer is runny
This usually happens for two reasons: either the cream cheese wasn't full fat or the whipped cream wasn't beaten to stiff peaks. If you realize the mixture is too soft before you pour the chocolate on, you can pop the whole pan in the freezer for 20 minutes to firm it up.
It won't be quite as airy, but it will save the structure. Next time, make sure your heavy cream is ice cold before whipping.
The crust is crumbling
A crumbly crust means the butter wasn't distributed evenly or there wasn't quite enough of it. Make sure you use the full 85g of melted butter and press it down with the bottom of a flat measuring cup. The pressure is what actually bonds the crumbs together.
If it's already made and crumbling, serve the bars in cupcake liners to keep them contained.
| Problem | Root Cause | Solution |
|---|---|---|
| Lumpy Filling | Cold cream cheese | Ensure cheese is room temp before mixing. |
| Dull Ganache | Overheated chocolate | Stir more, heat less; use 30 sec intervals. |
| Soggy Crust | Warm filling on soft base | Freeze crust for full 10 mins before layering. |
Common Mistakes Checklist:
- ✓ Use full fat cream cheese only (spreadable or tub versions are too soft).
- ✓ Sift the powdered sugar to prevent "sweet spots" or lumps.
- ✓ Never skip the 10 minute crust freeze; it's the foundation of the dish.
- ✓ Use a hot knife for slicing to get those clean, professional edges.
- ✓ Ensure the heavy cream is whipped to stiff peaks, not just soft ones.
Delicious Ways To Customize Flavour
If you're feeling adventurous, you can easily tweak this recipe without breaking the bank. For a "Crunchy" version, stir in 50g of chopped roasted peanuts into the peanut butter layer right before folding in the whipped cream. This adds a great textural contrast to the velvety filling.
If you want something a bit more sophisticated, add a pinch of espresso powder to the ganache. It doesn't make it taste like coffee; it just makes the chocolate taste "more" like chocolate.
For a variation that reminds me of Peanut Butter Blossom Cookies, you could top the bars with a few extra drops of melted peanut butter swirled into the chocolate ganache before it sets. It creates a beautiful marbled effect that looks much more expensive than it actually is. If you find yourself with extra cookies, crush a few more and sprinkle them over the wet chocolate for an extra crunch on top.
| Method | Time | Texture | Best For |
|---|---|---|---|
| Freezer Set | 1 hour | Ice cream like | Hot summer days |
| Fridge Set | 4 hours | Fudgy/Velvety | Standard serving |
| Room Temp | 24 hours | Very soft/Melt in-mouth | Not recommended |
Keeping Your Treats Fresh Longer
These Chocolate Peanut Butter Bars are quite resilient thanks to the high fat content, but they do need to stay cold. Keep them in an airtight container in the fridge for up to 5 days. Any longer than that and the cookie crust will start to absorb moisture from the filling and lose its "shatter" quality.
If you want to freeze them, they actually freeze beautifully. Wrap individual bars in plastic wrap and then place them in a freezer bag. They will stay fresh for up to 3 months. To eat, just pull one out and let it sit on the counter for 15 minutes.
It’s like a hybrid between a candy bar and an ice cream sandwich.
For a zero waste tip, if you have leftover cookie crumbs that didn't make it into the crust, don't throw them away. Store them in a small jar and use them as a topping for yogurt or vanilla ice cream. The same goes for any leftover ganache it makes a killer dip for apple slices or pretzels. You can also look into making Seven Layer Bars if you have leftover condensed milk, as that recipe uses up those pantry staples perfectly.
What To Serve On Side
Since these bars are incredibly rich, you want to pair them with something that cuts through the fat. A cold glass of whole milk is the classic choice, but a sharp, hot espresso is even better. The bitterness of the coffee balances the 34g of sugar per serving perfectly.
If you’re serving these as part of a dessert spread, keep the other items light. A platter of fresh raspberries or tart green apple slices works well to refresh the palate between bites of the dense, fudgy chocolate.
These bars are the star of the show, so anything else on the plate should be a supporting character that brings a bit of acidity or brightness.
Debunking Temperature Myths
Many people believe that you should melt chocolate on the highest setting of your microwave to get it done faster. This is the quickest way to seize your chocolate. High heat causes the cocoa solids to clump and the fats to separate, leaving you with a grainy, thick mess. Always use 50% power or 30 second bursts.
The residual heat from the bowl and the condensed milk will do most of the work for you.
Another common myth is that "all peanut butter is created equal." As we discussed, the natural stuff is great on toast but terrible in a structured no bake bar. You need those stabilizers in the commercial creamy brands to ensure the layers don't migrate.
The science of lipids tells us that saturated fats are our friends when we want things to stand up straight.
Right then, you're ready to hit the kitchen. Just remember: cold cream, softened cheese, and don't touch that pan for at least four hours once it's in the fridge. Let's crack on and make something your friends will actually be obsessed with. Enjoy the process and, more importantly, enjoy that first fudgy bite!

Recipe FAQs
Is it true I must bake these bars for them to set properly?
No, this is a common misconception. These bars rely on the freezer for the base and a long, four hour refrigeration period for the filling to achieve their final firm structure.
How to achieve a perfectly smooth ganache topping?
Combine the chocolate chips, condensed milk, and heavy cream over low heat or gentle microwave bursts. Stir continuously until the emulsion is glossy and completely free of lumps.
Can I use natural peanut butter for the filling?
No, stick with standard creamy peanut butter. Natural varieties contain oils that may separate, preventing the filling from reaching the stable consistency required for these bars.
How to ensure the cookie base stays intact when slicing?
Freeze the pressed cookie crumb base for the full 10 minutes before adding the filling. If you enjoyed learning how to manipulate textures here, you can see how the same principles of fat-to-crumb ratios create structure in our rich chocolate cookies.
How to tell when the cream cheese and peanut butter are sufficiently whipped?
Beat at high speed for two minutes until the mixture visibly lightens in color. Proper aeration at this stage is essential for creating the light, airy texture of the final layer.
Do I need to soften the cream cheese before starting?
Yes, use room temperature cream cheese for a smooth, lump free filling. Cold cream cheese will not incorporate evenly with the peanut butter and sugar, resulting in a grainy texture.
How to get clean slices without the chocolate cracking?
Run your knife under hot water and wipe it dry between each cut. The gentle heat from the blade allows it to slide through the ganache layer without shattering the set surface.
No Bake Peanut Butter Bars

Ingredients:
Instructions:
Nutrition Facts:
| Calories | 475 kcal |
|---|---|
| Protein | 7.5g |
| Fat | 32g |
| Carbs | 43g |
| Fiber | 2.6g |
| Sugar | 34g |
| Sodium | 188mg |
