Homemade Granola Bars
- Time: Active 10 mins, Passive 20 mins, Total 30 mins
- Flavor/Texture Hook: Toasty, nut forward, and chewy with a satisfying chocolate snap.
- Perfect for: School lunchboxes, hiking fuel, or busy Monday morning meal prep.
- Master the Ultimate Homemade Granola Bars
- The Physics of the Snap
- Essential Recipe Specifications
- Wholesome Elements and Smart Swaps
- Minimal Tools for Maximum Efficiency
- Step-by-Step Practical Preparation
- Solving Common Texture Issues
- Creative Flavors and Variety
- Scaling for Large Batches
- Debunking Granola Myths
- Smart Storage and Minimal Waste
- Ideal Wholesome Pairings
- Recipe FAQs
- 📝 Recipe Card
Master the Ultimate Homemade Granola Bars
The scent of toasting oats is something I’ll never tire of. It fills the kitchen with a warm, popcorn like aroma that makes the house feel like a home. I remember the first time I tried making these; I was so tired of buying expensive boxes of "healthy" snacks that were actually just glorified candy bars.
My first batch was a total disaster I didn't press them hard enough, and I ended up with a tray of loose granola instead of bars.
But that mistake taught me the most important lesson in the world of snacks: the bind is everything. You aren't just mixing ingredients; you’re engineering a structure. When you get that golden shimmer on the oats and smell the almonds start to oils release, you know you’re on the right track.
These are the bars I pack for every road trip and keep in the "emergency" stash in my desk drawer.
We’re keeping things plant forward and wholesome here. There’s no need for corn syrups or weird stabilizers. Just simple pantry staples that work together to create something actually nourishing.
Whether you have allergies in the house or just want a cleaner ingredient list, this method is your new best friend. Trust me, once you see how easy it is to customize these, you’ll never look at the cereal aisle the same way again.
The Physics of the Snap
The secret to these bars lies in the thermal setting of the binders. Applying firm pressure while the mixture is warm compresses the oats into a stable matrix, while the cooling coconut oil and honey act as a culinary cement to prevent crumbling.
Fast Preparation Versus Classic Baking
| Method | Time | Texture | Best For |
|---|---|---|---|
| No Bake Fast | 10 minutes | Very soft and tacky | Immediate hunger |
| Toasted Classic | 30 minutes | Nutty and structured | Weekly meal prep |
| Low Temp Set | 45 minutes | Crispy and dry | Long term storage |
Toasting the oats is a step you shouldn't skip because it removes residual moisture. If you leave that moisture in, the bars will turn soggy within twenty four hours.
Essential Recipe Specifications
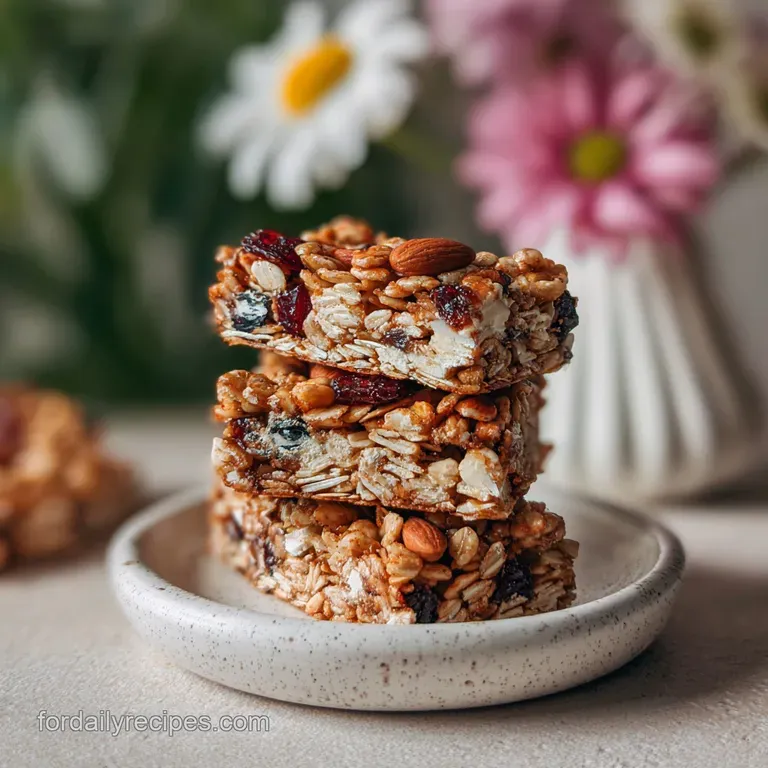
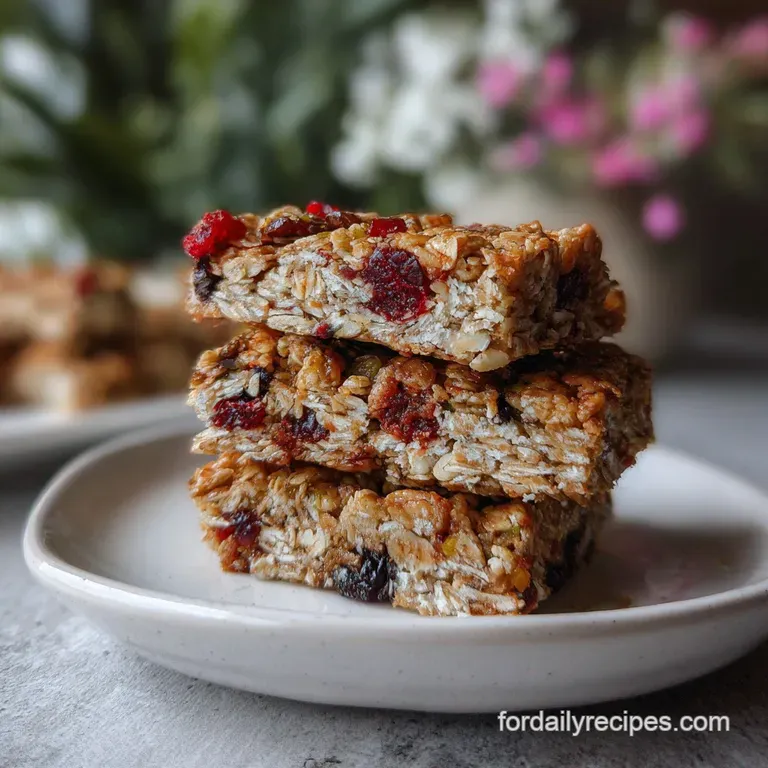
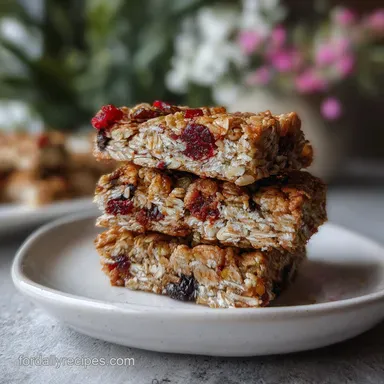
When we talk about meal prep, efficiency is the name of the game. You want a recipe that yields enough to last the week without requiring you to spend your whole Sunday in the kitchen. This batch is designed to fit a standard square pan, giving you twelve generous servings that are sturdy enough to survive a backpack.
If you are looking for a weekend project that pairs well with these snacks, you might enjoy making a Shirley Temple Drink Recipe for a little nostalgic treat. Both are hits with the kids and use simple ingredients you likely already have.
Component Analysis and Role
| Ingredient | Science Role | Pro Secret |
|---|---|---|
| old-fashioned Oats | Structural foundation | Never use "Instant" oats; they turn mushy. |
| Natural Almond Butter | Emulsified fat binder | Use the "runny" kind from the bottom of the jar. |
| Honey | Hygroscopic sweetener | Heat it until it bubbles to create a stronger set. |
| Chia Seeds | Mucilaginous grip | These absorb moisture to help the bars hold together. |
Wholesome Elements and Smart Swaps
Getting the ingredients right is the difference between a bar that shatters and one that bends. I always reach for the highest quality vanilla I can find, as it rounds out the earthy flavor of the oats. If you have dietary restrictions, these are incredibly easy to adapt without losing that signature chew.
- 2 ½ cups old-fashioned rolled oats: Why this? Provides the chewy fiber base needed for structure. (Swap: Certified gluten-free oats)
- ½ cup Chopped almonds: Why this? Adds a necessary crunch and healthy fats. (Swap: Toasted sunflower seeds for a nut free version)
- ½ cup Puffed rice cereal: Why this? Lightens the texture so the bars aren't too dense. (Swap: Extra ½ cup of oats)
- ½ cup Creamy natural almond butter: Why this? Acts as the primary protein rich glue. (Swap: Sunflower seed butter)
- ⅓ cup Honey: Why this? The "liquid gold" that provides stickiness. (Swap: Maple syrup for a vegan option)
- ¼ cup Coconut oil, melted: Why this? Solidifies at room temp to help bars stay firm. (Swap: Grass fed butter)
- 1 tsp Pure vanilla extract: Why this? Enhances the natural sweetness of the grains.
- ½ tsp Sea salt: Why this? Balances the sugars and pops the chocolate flavor.
- ½ cup Mini dark chocolate chips: Why this? Provides little bursts of rich flavor.
- ¼ cup Dried cranberries: Why this? Adds a tart, chewy contrast to the salt.
- 1 tbsp Chia seeds: Why this? Extra "grip" and a boost of Omega-3s.
Minimal Tools for Maximum Efficiency
You don't need a high end stand mixer for this. In fact, a simple sturdy spatula is much better for feeling the consistency of the "dough." I prefer using a heavy bottomed saucepan to melt the binders because it prevents the honey from scorching.
Chef's Tip: Freeze your chocolate chips for 10 minutes before stirring them in. This prevents them from melting completely when they hit the warm oat mixture, giving you distinct chocolate flecks rather than a brown smear.
For the best results, use a metal 8x8 inch baking pan. Glass retains heat too long and can make the edges of your granola bars get too hard before the center sets.
step-by-step Practical Preparation
Toasting for Nutty Flavor
- Preheat your oven to 350°F and line your pan with parchment paper, leaving an overhang on the sides.
- Spread the 2 ½ cups oats and ½ cup chopped almonds on a large baking sheet.
- Bake for 10 minutes until the oats smell like toasted bread and look pale gold. Note: This step is vital for a complex flavor profile.
The Warm Binding Phase
- In a small saucepan over medium low heat, combine the ½ cup almond butter, ⅓ cup honey, and ¼ cup coconut oil.
- Whisk the liquid until it is velvety and small bubbles appear at the edges.
- Remove from heat and stir in the 1 tsp vanilla and ½ tsp sea salt.
Integrating the Mix ins
- Pour the toasted oats, almonds, ½ cup puffed rice, and 1 tbsp chia seeds into a large mixing bowl.
- Drizzle the warm liquid over the dry ingredients and fold until every oat is glistening and coated.
- Let the mixture cool for 5 minutes before folding in the ½ cup chocolate chips and ¼ cup cranberries. Note: Adding them too soon will melt the chocolate.
The Firm Press Technique
- Transfer the mixture to your prepared pan and spread it into the corners.
- Use the back of a greased metal spoon or a flat bottomed glass to press down with significant force.
- Press for 60 seconds until the surface is flat and tightly packed.
Setting for Clean Slices
- Place the pan in the refrigerator for at least 2 hours.
- Lift the bars out using the parchment overhang and slice into 12 even rectangles.
Solving Common Texture Issues
The biggest frustration with homemade snacks is when they don't behave like the store-bought ones. Usually, it comes down to temperature or pressure. If your kitchen is very warm, the coconut oil won't stay solid, and the bars will feel greasy.
Why Your Bar Falls Apart
If the bars are crumbly, they likely weren't pressed hard enough while warm. You really have to put your weight into it. Another culprit is using "dry" nut butter from the top of the jar you need those natural oils to create the emulsion.
| Problem | Root Cause | Solution |
|---|---|---|
| Crumbly texture | Under pressing or dry oats | Press harder; add 1 tbsp extra honey next time. |
| Greasiness | Coconut oil didn't emulsify | Whisk the liquid binder more vigorously while heating. |
| Rock hard bars | Honey was boiled too long | Only heat until small bubbles form; do not hard boil. |
Common Mistakes Checklist
- ✓ Never skip the parchment paper; these will stick to even a "non stick" pan.
- ✓ Use old-fashioned oats only, as steel cut are too hard and instant are too soft.
- ✓ Stir the almond butter thoroughly before measuring to ensure a consistent oil to protein ratio.
- ✓ Wait for the oats to cool slightly before adding chocolate to maintain those distinct chips.
- ✓ Chill for the full 2 hours; slicing while warm is a recipe for a mess.
Creative Flavors and Variety
Once you have the base ratio down, the sky is the limit. I often swap the cranberries for dried blueberries or even chopped dried apricots. If you are serving these as part of a larger lunch, they are a great "dessert" after a savory meal, like something tossed in my Buttermilk Ranch Recipe.
Nut Free Granola Bar Recipe
For school safe snacks, swap the almond butter for sunflower seed butter (SunButter) and replace the chopped almonds with pumpkin seeds or extra puffed rice. The flavor will be slightly more earthy, but the texture remains perfectly chewy.
Homemade Granola Bars with Fruit
If you love a more vibrant bar, increase the dried fruit to ½ cup. I recommend finely chopping larger fruits like dates or figs so they distribute evenly and add to the "glue" factor.
Decision Shortcut
- If you want a crunchier bar, bake the finished pressed tray for 10 minutes at 300°F before chilling.
- If you want a softer bar, add 1 extra tablespoon of almond butter to the liquid mix.
- If you want a vegan bar, ensure you use maple syrup and dairy-free chocolate chips.
Scaling for Large Batches
When scaling this recipe up for a party or a long camping trip, be careful with the spices. Salt and vanilla should only be increased to 1.5x the original amount even if you double the oats, otherwise, the flavor can become overwhelming.
- To Double (24 bars): Use a 9x13 inch pan. You may need to increase the chilling time by 30 minutes to ensure the center is fully set.
- To Halve (6 bars): Use a small loaf pan. Reduce the liquid heating time as it will reach a simmer much faster in a small pot.
Debunking Granola Myths
One common myth is that "healthy" means the bar should be dry. In reality, a bit of fat from the coconut oil and nut butter is what makes the nutrients in the oats bioavailable. Without that fat, the bars wouldn't hold together, and they wouldn't keep you full.
Another misconception is that you need corn syrup for a chewy texture. Many people think honey will make a bar "hard," but as long as you don't over boil the honey, it stays remarkably flexible at room temperature. The key is the moisture balance between the dried fruit and the toasted grains.
Smart Storage and Minimal Waste
These bars stay fresh in an airtight container at room temperature for about 5 days. However, for the best "snap" and chew, I highly recommend keeping them in the refrigerator. They will last up to 2 weeks when chilled.
If you find yourself with a few "ugly" bars or crumbly bits at the bottom of the pan, don't throw them away. Those crumbs are essentially premium granola. I love to sprinkle them over a bowl of plain Greek yogurt or even use them as a topping for baked apples.
If you have extra nuts or seeds that didn't make it into the recipe, keep them in the freezer to prevent the oils from going rancid before your next batch.
Ideal Wholesome Pairings
These bars are quite dense and satisfying on their own, but they play well with other elements of a plant forward diet. I usually grab one alongside a piece of fresh fruit like a crisp apple or a banana for a complete breakfast on the go.
If you’re hosting a brunch, these look beautiful sliced into smaller "bites" and served on a platter. They pair wonderfully with a hot cup of herbal tea or a cold glass of oat milk.
For those who enjoy a bit of contrast, serving them with a small bowl of fresh berries helps cut through the richness of the almond butter and dark chocolate. It’s a wholesome necessity for any busy household.

Recipe FAQs
How do I get my homemade granola bars to stick together?
Press them firmly while warm. Applying significant pressure as the mixture cools compresses the ingredients and helps them bind together as the coconut oil solidifies.
Are homemade granola bars actually healthy?
Yes, when made with wholesome ingredients. They avoid added sugars and stabilizers found in many store-bought versions, allowing you to control nutrient density.
How to make granola bars at home?
Toast oats and nuts, then mix with warm binders. Combine toasted dry ingredients with a heated mixture of nut butter, honey, and coconut oil, press firmly into a pan, and chill to set.
What is a healthy binding agent for granola bars?
Nut butters, honey, and melted coconut oil work well. These ingredients provide healthy fats and natural sweetness while solidifying upon cooling to hold the bars together.
Why are my homemade granola bars crumbly?
Likely due to insufficient pressing or dry ingredients. Make sure to press the mixture very firmly into the pan while it's still warm, and ensure your nut butter is naturally oily, not dry.
Can I make vegan granola bars?
Yes, easily swap the honey. Replace honey with maple syrup or agave nectar and use dairy-free chocolate chips for a completely vegan treat.
How long do homemade granola bars last?
Up to 2 weeks when refrigerated. For the best texture and to maintain their "snap," store them in an airtight container in the refrigerator; they last about 5 days at room temperature.
Homemade Granola Bars
Ingredients:
Instructions:
Nutrition Facts:
| Calories | 297 kcal |
|---|---|
| Protein | 6.1 g |
| Fat | 16.1 g |
| Carbs | 33.5 g |
| Fiber | 4.7 g |
| Sugar | 12.8 g |
| Sodium | 92 mg |
