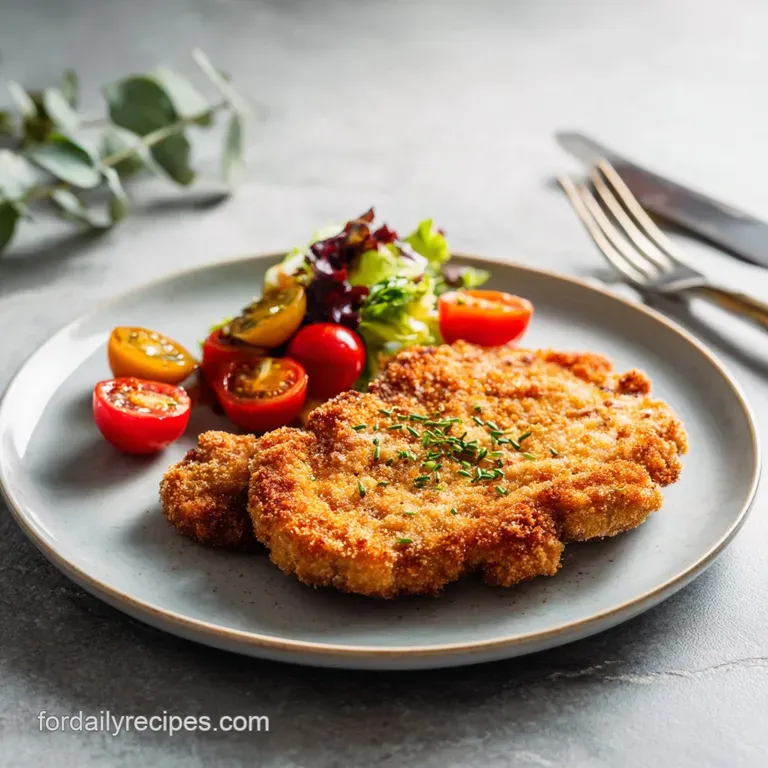
Pork Cutlet: Crispy Golden Pan-Fried Perfection
- Mastering the Classic Crispy pan-fried Cutlet
- The Science of the Golden Crust: Why Panko is Key
- Essential Ingredients for the Perfect Pork Cutlet Recipe
- How to Prepare and Fry Your Breaded Pork Cutlets
- Expert Tips for Flawless pan-fried Pork
- Storing, Reheating, and Preparing Ahead of Time
- Classic Side Dishes to Complete Your Meal
- Recipe FAQs
- 📝 Recipe Card
Mastering the Classic Crispy pan-fried Cutlet
Can you hear that sound? That glorious, gentle sizzle of perfectly pounded meat hitting hot oil? It’s the smell of a home kitchen firing on all cylinders, signaling the arrival of a truly classic Pork Cutlet .
That golden, craggy crust followed by tender, juicy pork is pure comfort food magic, and trust me, you can absolutely nail it.
This isn’t one of those fussy, all-day recipes; this is pure weeknight alchemy. You likely have most of the ingredients already, and the entire process from pounding the meat to draining the fat takes just under an hour of active effort.
A great Pork Cutlet is a lifesaver when the family is hungry and you need a high impact dinner that feels like a special occasion without the special effort.
I’ve made every mistake in the book crust falling off, meat drying out, oil too cold but I’ve refined this method over years of tinkering. Now, I’m giving you the streamlined process that yields maximum crunch and maximum flavour every time.
Let's crack on and make the best breaded Pork Cutlet you’ve ever had.
The Science of the Golden Crust: Why Panko is Key
If you want a truly shatteringly crisp exterior on your breaded items, Panko is not optional; it’s mandatory. Unlike standard breadcrumbs, which are finely pulverized, Panko crumbs are large, light, and flaky, almost like little empty shells.
This structure means they absorb less oil during frying, resulting in a lighter, crunchier coating that stays crisp longer.
What Makes This Dish a Weeknight Winner?
It’s fast. That is the number one reason this recipe is a consistent champion in my rotation. Once the pork is pounded thin, the actual cooking time is mere minutes per side.
Plus, using a simple boneless pork loin for your Pork Cutlet keeps the cost low while maximizing flavour and tenderness. You get a huge payoff for minimal effort, which is exactly what a great weeknight recipe should deliver.
A Quick History of Breaded Pork Dishes
The breaded Pork Cutlet has cousins all over the world, most famously the Austrian Schnitzel or the Italian Costoletta alla Milanese .
The core concept remains the same: take a humble, inexpensive cut of meat, pound it aggressively to break down the fibers, bread it generously, and quickly pan-fry it. This method tenderizes the pork beautifully while protecting it with a flavourful shield.
The Essential Equipment for Frying Perfection
You really don't need fancy tools here, but two pieces of equipment are non-negotiable. First, you need a heavy bottomed skillet; cast iron is my absolute favourite because it holds heat so consistently. Second, a wire rack placed over a baking sheet is essential for draining.
Never, ever place your freshly fried breaded Pork Cutlet directly on paper towels unless you enjoy soggy bottoms.
Achieving Maximum Tenderness: The Pounding Technique
Pounding the pork is not just about aesthetics; it’s about mechanical tenderization. When you strike the pork loin with the flat side of a meat mallet, you are systematically breaking down the tough muscle fibers.
Mistake I once made: I used the sharp, spiky side of the mallet, and the cutlets shredded! Use the flat side, work gently, and aim for absolute uniformity about a quarter inch thick across the whole piece.
This guarantees every inch of your easy Pork Cutlet recipe cooks in the exact same time.
The Triple Dip: Perfecting the Breading Adhesion
The triple dip is the security system for your crust. Flour first, then egg, then Panko. The flour provides a dry surface that the wet egg wash can cling to. The egg wash acts as the glue, and the Panko provides the crunch.
Pro Tip: Gently press the Panko onto the pork with the flat of your hand to ensure it’s fully adhered. This careful process ensures your Pork Cutlet stays perfectly coated during frying.
Temperature Control: Ensuring the Pork Cooks Through
This is where many home cooks fail. If the oil is too cold, the cutlet sits there and slowly absorbs grease, resulting in a dark, greasy crust. If the oil is too hot, the crust burns long before the thin pork interior is cooked. You’re aiming for the fat to be around 350°F (175°C).
The cutlet should sizzle immediately when it hits the oil, but not so violently that you feel like you’re starring in an action movie. This careful control yields a perfectly golden crispy Pork Cutlet .
Essential Ingredients for the Perfect Pork Cutlet Recipe
The beauty of this dish lies in its simplicity. We’re using basic ingredients, but we need to optimize them for texture and flavour. A great Pork Cutlet recipe doesn’t rely on complexity; it relies on quality technique.
Choosing the Best Cut of Pork for Frying
I rely on boneless pork loin, sliced into 1 inch thick medallions. It’s lean, readily available, and responds wonderfully to the pounding process. If you can’t find loin, pork sirloin or even tenderized pork chops (with the bone removed) will work.
Just make sure you trim away any thick silver skin before you start pounding; that stuff won't tenderize no matter how hard you hit it.
| Ingredient | My Top Choice | Viable Substitute |
|---|---|---|
| Pork Loin | Boneless, centre cut | Pork sirloin or thick, boneless chops |
| Panko Crumbs | Japanese Panko (non-toasted) | Crushed cornflakes (very crisp) |
| Frying Fat | Canola or Grapeseed Oil + Butter | Refined Coconut Oil (high smoke point) |
| Egg Wash Liquid | Whole Milk | Water or plant based milk |
Beyond the Panko: Breading Alternatives That Work
If you absolutely must skip Panko, your best option for a crunchy crust is finely crushed cornflakes, which mimic the light, flaky structure Panko provides. If you use standard breadcrumbs, mix them with a teaspoon of oil before coating the pork.
This pre-oiling step helps the standard crumbs crisp up better in the pan, saving the structural integrity of your delicious Pork Cutlet .
Salt and Pepper Strategy: When to Season the Pork and the Flour
Seasoning is critical. You must season the meat directly after pounding. I use Kosher salt and freshly ground black pepper on both sides. But don't stop there! Also, season the flour stage with a pinch of salt and pepper.
The Panko stage usually doesn't need salt added directly, as it will be seasoned again immediately after frying. This layered seasoning approach ensures that every bite of your pan-fried pork cutlet sings, rather than relying on one big blast of salt at the end.
How to Prepare and Fry Your Breaded Pork Cutlets
This section is all about discipline and speed. We set up our station, we work methodically, and then we attack the frying pan with confidence.
Prep Stage: Pounding and Setting Up the Breading Station
The key to a successful frying session is mise en place everything in its place. Set up your station in a line: Seasoned Pork -> Flour Dish -> Egg Wash Dish -> Panko Dish -> Wire Rack. Once you start breading, you don't want to stop. Remember to use the dry hand/wet hand rule to keep things clean.
After coating all your cutlets, pop them on the wire rack and into the fridge. That 30 minute chill is your insurance policy against the crust slipping off when you flip the Pork Cutlet .
The Frying Method: Shallow Oil Depth and Batch Cooking
We are shallow frying here, which means we need enough oil to cover about half the height of the cutlet roughly 1/4 inch deep. Use high smoke point oil (like canola) initially, then drop in the butter right before adding the pork.
The butter adds incredible flavour and helps achieve that signature, appetizing deep gold colour.
Chef’s Note: Do not crowd the pan! If you put too many cutlets in at once, the oil temperature will plummet immediately. This cools the crust, causes grease absorption, and ruins the crunch.
Fry two pork loin cutlets at a time, maximum, depending on the size of your pan.
Fry for about 2.5 to 3 minutes per side. When you flip them, the cutlets should release easily from the pan. If they stick, they aren't ready to turn.
Finishing Touches: Lemon Zest and Parsley Integration
As soon as those beautiful golden brown cutlets come out of the pan, place them on the wire rack and immediately hit them with a tiny pinch of fine salt. The heat from the oil sucks the salt right into the crust, maximizing flavour.
The finishing touch is absolutely essential: a squeeze of fresh lemon and a sprinkle of chopped parsley. The acidity of the lemon cuts through the richness of the fried breaded pork cutlet , balancing the entire dish perfectly.
Expert Tips for Flawless pan-fried Pork
- Panko Prep: If your Panko is looking a little pale, toast it lightly in a dry pan for a minute or two before adding it to your breading station. This guarantees maximum crunch and deep colour in the final product.
- Preventing Smoking: If your oil starts to smoke violently, your heat is too high. Remove the pan from the heat entirely for a full minute, let the temperature drop, then return it to medium heat. Overheating ruins both the oil and your beautiful Pork Cutlet .
- Handle with Care: Only use tongs to handle the breaded pork; a spatula can scrape off the delicate Panko crust. Use gentle pressure when placing or flipping the cutlets.
- Listen to the Sizzle: The frying sound should be consistent throughout the cooking time. If the sizzle dies down, the oil is too cool. If the sizzle turns into a violent spitting roar, the oil is too hot.
Storing, Reheating, and Preparing Ahead of Time
Making a quality Pork Cutlet involves a few steps, so knowing how to prep ahead is crucial for efficiency.
Troubleshooting: Why is My Crust Falling Off?
Nine times out of ten, the crust falls off because you skipped the chilling step. The 30 minute rest allows the egg wash and crumbs to hydrate and bond to the meat fibers. The second most common reason is turning the cutlet too soon before the crust had time to solidify in the heat. Patience is key.
Achieving a perfect crispy Pork Cutlet takes attention to detail, not speed.
The Rest Period: Serving Immediately vs. Letting Them Drain
While most meats need a rest, your pan-fried Pork Cutlet needs to drain, not rest. Get it onto that wire rack immediately to allow air circulation. If you let it sit on a solid surface, the steam trapped underneath will soften the crust, turning your crispy exterior into a sad, damp mess.
Serve your Pork Cutlet within five minutes of coming out of the pan for optimal texture.
Oil Selection: Choosing Fats for over High heat Frying
You need an oil with a high smoke point, like canola, grapeseed, or refined avocado oil. Avoid pure olive oil, which burns too easily. I always advocate for adding a knob of unsalted butter to the oil right before frying.
The butter adds richness and depth of flavour that purely vegetable oil simply cannot provide, making your final Pork Cutlet taste spectacular.
Freezing Uncooked Cutlets for Future Meals
This is one of the greatest tricks for meal prepping! You can freeze the cutlets after they have been breaded. Place the breaded cutlets on a baking sheet lined with parchment paper and freeze them until solid (about 2 hours).
Then, stack them in a freezer bag, separated by parchment paper, and freeze for up to 3 months. To cook, thaw them in the fridge overnight and proceed with the frying instructions. Freezing uncooked breaded Pork Cutlet saves so much time during the week.
The Best Way to Reheat Leftover Breaded Pork
Never, ever use the microwave. You will destroy the texture. The best method for reheating a leftover Pork Cutlet is using an air fryer or a standard oven. Preheat your oven to 350°F (175°C), place the cutlets on a wire rack, and bake for 8– 10 minutes until heated through and the crust is revitalized.
They’ll come out almost as crispy as the first time you made the easy Pork Cutlet recipe .
Shelf Life: How Long Do Cooked Cutlets Last?
Once cooked, your crispy Pork Cutlet will last safely in an airtight container in the refrigerator for 3 to 4 days. They are fantastic cold the next day sliced over a salad, or slipped into a crusty roll for the best Pork Cutlet sandwich of your life.
Classic Side Dishes to Complete Your Meal
A rich, crispy main dish demands simple, bright sides to create balance.
- Mashed Potatoes: Creamy, simple mashed potatoes are the traditional pairing, acting as the perfect foil to the crisp texture of the pork.
- Simple Green Salad: Toss tender mixed greens with a sharp vinaigrette (heavy on the vinegar and Dijon mustard). The acidity is a wonderful palate cleanser.
- Linguine al Limone: A quick, luxurious pasta side tossed with butter, lemon zest, and fresh Parmesan cheese.
This Pork Cutlet is a showstopper, a weeknight staple, and proof that simple cooking, executed well, is always the most impressive. Now go forth and fry!

Recipe FAQs
Why did my pork cutlets come out tough and dry?
Dryness is usually caused by overcooking. Ensure the pork is pounded uniformly thin (about 1/4 inch) and use a meat thermometer; 145°F (63°C) internal temperature is the target, followed by a brief rest. Cooking at excessively high heat can also dry out the meat before the crust browns properly.
How do I prevent the breading from falling off during frying?
The breading falls off due to lack of adhesion or hydration. After completing the three step breading process, place the cutlets on a wire rack for 10-15 minutes to let the coating set and adhere firmly before they hit the hot oil.
Additionally, ensure you always pat the pork completely dry before the initial flour dredge.
Can I use a cooking method other than pan-frying, like baking or air frying?
Yes, though the texture will be slightly less rich and crispy. For air frying, spray the breaded cutlets lightly with oil and cook at 375°F (190°C) for about 8-12 minutes, flipping halfway. Baking requires a similar oil spray and a hotter oven (400°F/200°C) for 15-20 minutes.
How thin should I pound the pork, and what tool should I use?
You should aim for approximately 1/4 inch thickness (6 mm). Pounding ensures quick, even cooking and maximizes tenderness, preventing the exterior crust from burning before the interior is fully cooked. Use the smooth side of a meat mallet or a heavy, flat rolling pin for best results.
Can I prepare and freeze the breaded cutlets ahead of time?
Yes, freezing is a great time saver. Complete the full breading process, then place the cutlets on a baking sheet lined with parchment paper and freeze until solid before transferring them to an airtight container. You can fry them directly from frozen, adding 2-4 minutes to the standard cooking time.
What is the ideal oil temperature for crispy frying?
The ideal shallow frying temperature is between 350°F and 375°F (175°C 190°C). If you don't have a thermometer, drop a few Panko crumbs into the oil; if they immediately sizzle moderately and turn golden within 30 seconds, the oil is ready.
Too low a temperature results in greasy cutlets, while too high causes burning.
Can I substitute traditional breadcrumbs for Panko?
While you technically can use traditional breadcrumbs, Panko is strongly recommended for this recipe. Panko is made from crustless bread and has a flaky, airy structure that absorbs less oil and delivers a much lighter, crispier crust. If substituting, use the coarse variety of standard breadcrumbs.
Crispy pan-fried Pork Cutlet

Ingredients:
Instructions:
Nutrition Facts:
| Calories | 442 kcal |
|---|---|
| Protein | 50.2 g |
| Fat | 13.6 g |
| Carbs | 22.8 g |
