Chicken Cobbler: Savory Cheddar Biscuit Crust
- Time: Active 15 minutes, Passive 45 minutes, Total 60 minutes
- Flavor/Texture Hook: Rich, herbal gravy with a shatter crisp cheddar biscuit topping.
- Perfect for: Stress free weeknight dinners or a cozy Sunday family gathering.
- Why Chicken Cobbler is the Ultimate Comfort Dish
- Vital Stats for This Savory Bake
- Essential Pantry Items for the Dish
- Must Have Tools for Success
- Mastering the Layered Baking Technique
- Solving Common Baking Mishaps
- Flavor Tweaks for Every Palate
- Storing and Saving Your Casserole
- Best Ways to Plate This
- Very High in Sodium
- Recipe FAQs
- 📝 Recipe Card
Why Chicken Cobbler is the Ultimate Comfort Dish
Have you ever wondered why we usually reserve the term "cobbler" for bubbling peaches or tart blackberries? It’s a bit of a culinary mystery that we’ve collectively decided that a buttery, dropped biscuit topping belongs solely in the world of dessert.
I remember the first time I pulled this dish out of the oven on a particularly gray, rainy Tuesday; the kitchen didn't smell like sugar, but like the deep, herbal aroma of thyme and melting butter. My friend Sarah looked at the dish, then at me, and asked if I’d forgotten to stir the ingredients.
I told her to trust the process, even though I was secretly a little nervous myself.
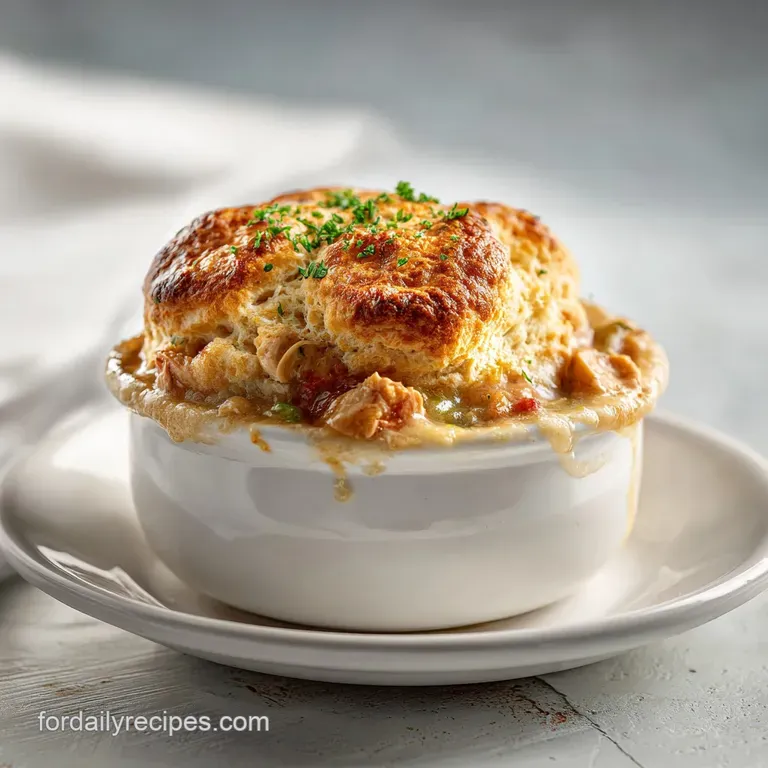
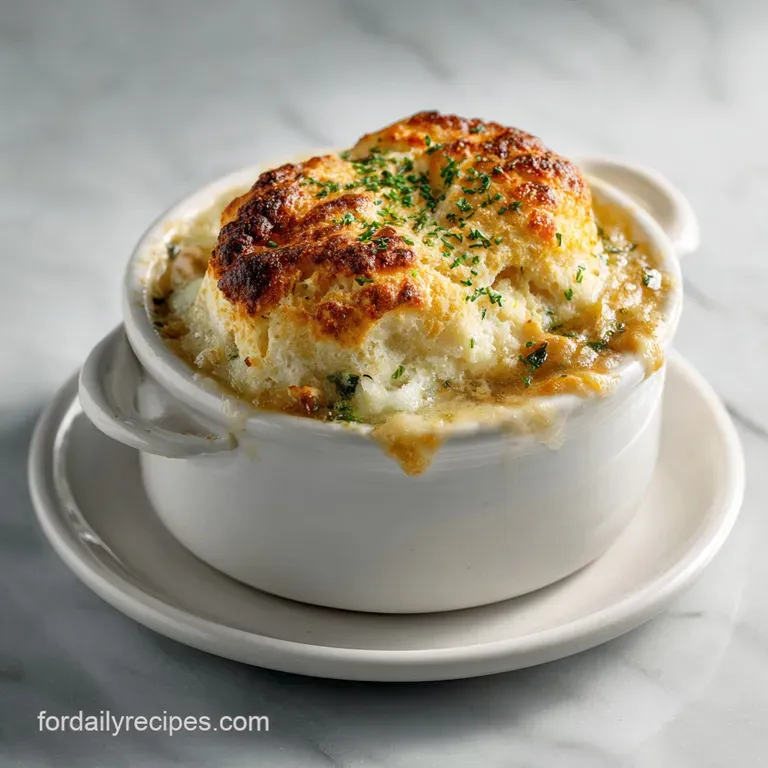
The magic happens when that first forkful breaks through the top. You expect a standard pot pie, but what you get is something far more interesting. There is an audible shatter from the toasted cheddar cheese on top, followed immediately by the steam rising from a thick, velvety chicken filling that has essentially cooked itself into a stew right under the biscuit layer.
It’s a dish that feels like a heritage recipe handed down through generations, yet it uses smart modern shortcuts like biscuit mix to keep things manageable.
We are so used to overworking our food whisking, folding, and stirring until everything is a uniform mush. This dish is an exercise in restraint. By simply layering the components and letting the oven’s heat dictate the movement of the fats and proteins, you create textures that a stirred casserole could never achieve.
It’s honest, hearty, and surprisingly sophisticated in its simplicity. If you've been looking for that one meal that makes everyone at the table go quiet after the first bite, this is it.
The Secret of the Gravity Rule: Most casseroles require mixing to ensure even cooking, but here, density is your friend. The heavy, moisture rich soup and broth mixture sits in the middle, while the lighter, air filled biscuit batter naturally migrates toward the top.
This prevents the topping from becoming soggy, as it "floats" on the steam of the filling rather than being submerged in it.
Steam Infused Vegetables: Because the peas and carrots are layered between the chicken and the liquid, they aren't boiled; they are essentially steamed in chicken fat and broth. This preserves their structural integrity, so they don't turn into the gray mush often found in frozen pot pies.
Fat Cap Browning: The butter starts at the very bottom, but as it heats, it bubbles up through the chicken and the soup. This coats the underside of the biscuit layer in salted fat, while the cheddar on top undergoes a beautiful transformation into a crispy, lacy crust.
| Thickness of Layer | Internal Temp | Rest Time | Visual Cue |
|---|---|---|---|
| 1 inch (Biscuit) | 200°F (93°C) | 5 mins | Deep golden brown and firm |
| 2 inches (Filling) | 165°F (74°C) | 5 mins | Bubbles slowly at the edges |
| Total Dish | N/A | 5 mins | Gravy stops "jiggling" |
While we are focusing on this savory bake today, the layering technique is actually quite similar to how I approach my Cheesy Chicken Casserole, where the rice absorbs the moisture from the bottom up. Understanding how moisture moves in your 9x13 dish is the difference between a soggy mess and a masterpiece.
Vital Stats for This Savory Bake
| Component | Science Role | Pro Secret |
|---|---|---|
| Unsalted Butter | Heat Conductor | Melting it in the pan first creates a non stick "fry" for the chicken base. |
| Cheddar Bay Mix | Leavening Agent | The pre mixed leaveners react with the milk to create immediate lift. |
| Cream of Chicken | Emulsifier | Holds the broth and chicken fat together so the sauce doesn't break. |
| Whole Milk | Hydration | The fat content in whole milk ensures the biscuit stays tender, not rubbery. |
When you are choosing your chicken, I always suggest using a mix of white and dark meat. If you have leftovers from a Sunday roast, that’s even better. The collagen in the dark meat melts into the broth, adding a silkiness that you just can't get from breast meat alone. If you're looking to punch up the herbal notes even further, you can actually swap the dried thyme for a teaspoon of homemade poultry seasoning which adds a much broader flavor profile.
Essential Pantry Items for the Dish
To get this recipe exactly right, you’ll need to follow these measurements closely. Don't be tempted to "eyeball" the liquid ratios, as the biscuit topping depends on a specific hydration level to rise correctly above the soup.
- 115g unsalted butter: Why this? Provides the fat base that prevents sticking and flavors the chicken.
- 500g cooked chicken, shredded: Why this? Pre cooked meat ensures the bake time focuses on the topping texture.
- 300g frozen peas and carrots: Why this? They release just enough moisture to help steam the biscuit from below.
- 475ml low sodium chicken broth: Why this? Controls the salt level while providing the volume for the gravy.
- 298g cream of chicken soup: Why this? Acts as the thickening "glue" for the entire savory filling.
- 1 tsp dried thyme: Why this? The classic aromatic that defines the "pot pie" flavor profile.
- 0.5 tsp black pepper: Why this? Adds a subtle back of-the throat heat to cut through the richness.
- 325g cheddar bay biscuit mix: Why this? Contains specialized seasonings that complement the savory chicken perfectly.
- 475ml whole milk: Why this? The high fat content creates a richer, more velvety biscuit crumb.
- 100g shredded sharp cheddar cheese: Why this? Melts into a crispy "frico" layer on the very top.
| Original Ingredient | Substitute | Why It Works |
|---|---|---|
| Unsalted Butter | Salted Butter | Works fine, just reduce the added salt in the broth mixture. |
| Whole Milk | Heavy Cream (diluted) | Mix 50/50 with water. Adds even more richness to the topping. |
| Chicken Broth | Vegetable Broth | Same liquid volume; provides a more earthy, less "meaty" base. |
Must Have Tools for Success
You don't need a high end kitchen to pull this off, but there are a few items that make the process much smoother. First and foremost is a solid 9x13 inch (approx. 23x33 cm) baking dish.
I prefer glass or ceramic because they hold heat more evenly than thin metal pans, which can sometimes scorch the butter before the chicken even hits the pan.
A balloon whisk is also essential for the biscuit batter. You want to incorporate air without over mixing. Over mixing leads to gluten development, which turns your fluffy cobbler into a tough, bread like slab. Finally, a good kitchen scale is your best friend here.
Measuring in grams rather than cups ensures that your biscuit to liquid ratio is spot on every single time, which is the most common pitfall for beginners.
Mastering the Layered Baking Technique
- Preheat your oven to 400°F (200°C). Slide the 115g of unsalted butter into your baking dish and let it melt in the oven until it is liquid and slightly bubbling. Note: This hot butter creates a sear like effect on the chicken.
- Remove the dish carefully. Scatter the 500g of shredded cooked chicken evenly across the butter.
- Layer the 300g of frozen peas and carrots over the chicken. Do not stir.Note: Leaving the butter at the bottom is crucial for the "fry" effect.
- In a medium bowl, whisk together the 475ml of chicken broth, 298g of cream of chicken soup, thyme, and pepper until the mixture is completely smooth.
- Pour this soup slurry slowly over the vegetable layer. Again, resist the urge to stir; let the liquid find its own level.
- In a separate clean bowl, whisk the 325g of biscuit mix with 475ml of whole milk until just combined. Note: A few small lumps are perfectly fine and actually help the texture.
- Pour the batter in a steady stream over the soup layer, trying to cover as much surface area as possible.
- Sprinkle the 100g of shredded sharp cheddar cheese across the top until the surface is mostly covered.
- Bake for 45 minutes until the top is a deep golden brown and the biscuit layer feels firm to the touch. Note: You should smell the toasted cheese and the savory thyme filling the kitchen.
- Let the dish rest on the counter for 5 minutes until the bubbling subsides and the gravy thickens slightly.
Chef's Tip: If you want an even crispier top, grate your cheddar cheese yourself from a block. Pre shredded cheese is coated in potato starch to prevent clumping, which can interfere with that perfect, lacy melt.
Solving Common Baking Mishaps
Why Your Cobbler is Runny
If you pull the dish out and the middle seems more like a soup than a casserole, the most common culprit is the resting time. The starches in the biscuit mix and the cream of chicken soup need a few minutes off the heat to fully hydrate and "set." If you cut into it immediately, the liquid will rush to the void.
Another possibility is using a broth that isn't whisked well with the soup; if they aren't fully integrated, they won't thicken properly.
Why the Topping is Doughy
This usually happens if the oven temperature is too low or if the biscuit batter was too thick. The batter needs to be pourable so it can sit on top of the liquid. If it's too dense, it sinks into the soup and boils instead of baking. This leads to a "dumpling" texture rather than a "biscuit" texture.
Always ensure your oven is fully preheated to 200°C before the dish goes in.
| Problem | Root Cause | Solution |
|---|---|---|
| Soggy Bottom | Stirring the layers | Never stir! Let gravity and heat do the work. |
| Burnt Cheese | Top rack too high | Move the dish to the middle or lower middle rack. |
| Bland Flavor | Low quality broth | Use a bouillon base or a high-quality bone broth for depth. |
Common Mistakes Checklist
- ✓ Ensure the butter is fully melted and hot before adding the chicken.
- ✓ Do not over mix the biscuit batter; stop as soon as the flour streaks disappear.
- ✓ Use full fat milk for the best rise and flavor in the topping.
- ✓ Check your oven temperature with a thermometer to ensure it's actually at 400°F (200°C).
- ✓ Let the dish sit for the full 5 minutes after baking to allow the sauce to emulsify.
Flavor Tweaks for Every Palate
Scaling this recipe is fairly straightforward, but because we are dealing with a "gravity" bake, the pan size matters immensely. If you want to halve the recipe for a smaller household, you must move to an 8x8 inch square pan.
Using a 9x13 pan for a half batch will result in layers that are too thin, causing the liquid to evaporate too quickly and the biscuits to become hard.
If you are doubling the recipe for a crowd, do not try to fit it all into one deep dish. The "Gravity Rule" only works up to a certain depth. Instead, prepare two separate 9x13 dishes. This ensures the heat can penetrate the center of the casserole without burning the edges.
When scaling spices up, remember that dried herbs like thyme can become overpowering; I suggest only increasing the thyme to 1.5x the original amount even if you are doubling the rest of the ingredients.
| If you want... | Then do this... |
|---|---|
| A spicy kick | Add 1/2 tsp of cayenne pepper to the soup mixture. |
| A veggie boost | Swap half the chicken for sautéed mushrooms or leeks. |
| A crunchier top | Add 50g of crushed buttery crackers over the cheese. |
Storing and Saving Your Casserole
Storage: This cobbler keeps beautifully in the fridge for up to 3 to 4 days. Keep it in an airtight container or cover the original baking dish tightly with foil. The flavors actually deepen overnight as the chicken continues to marinate in the thyme infused gravy.
Reheating: To maintain the integrity of the biscuit topping, avoid the microwave if possible. Reheat a portion in the oven at 350°F (175°C) for about 15 minutes. This helps the cheese on top crisp back up.
If you must use a microwave, use a lower power setting to avoid turning the chicken rubbery.
Freezing: You can freeze the baked cobbler for up to 2 months. Thaw it completely in the fridge before reheating in the oven. I don't recommend freezing it unbaked, as the leaveners in the biscuit mix will lose their potency, and the "Gravity Rule" won't work as well once the liquids have sat together for too long.
Zero Waste Tip: Don't throw away the bones if you roasted your own chicken for this! Toss them into a pot with some celery scraps and onion skins to make a quick stock for your next batch of cobbler.
Even the leftover liquid from the bottom of the dish can be whisked into a morning omelet for an incredible savory boost.
Best Ways to Plate This
When it comes to serving, this is a "scoop and serve" kind of meal. Use a large metal spoon to get all the way to the bottom of the pan, ensuring every plate gets a generous portion of the buttery chicken base, the vegetable heavy middle, and a large shard of the cheesy biscuit top.
It’s naturally quite rich, so I like to serve it alongside something bright and acidic to cut through the fat. A simple green salad with a sharp lemon vinaigrette is perfect.
If you're feeling a bit more fancy, you can garnish the top with a handful of freshly chopped parsley or even a few chives. The green pop of color against the golden brown cheese makes the dish look like it came straight out of a high end bistro.
Because it's a complete meal in one pan, you don't need much else, but a side of roasted broccoli or steamed green beans never hurts. The most important thing is to serve it while it's still steaming hot, right when the aromas of butter and thyme are at their peak.
Myth: You Must Sift the Biscuit Mix
Actually, sifting isn't necessary for this specific recipe. The lumps in the batter provide "pockets" of steam that help the biscuit layer rise and stay airy. If the batter is too smooth, it becomes dense and heavy, which makes it more likely to sink into the soup layer.
Myth: Fresh Chicken is Always Better
Surprisingly, using a rotisserie chicken or yesterday’s leftovers often produces a better flavor. The meat has already had time to rest and the fibers have relaxed, allowing them to soak up the "slurry" of the cobbler more effectively than freshly poached, hot chicken would.
Myth: Cover the Dish with Foil
Many people think covering the dish will keep it moist, but for a cobbler, you want the moisture to evaporate from the top so the biscuits can bake. Covering it will trap steam and result in a pale, soggy topping. Leave it uncovered for the full 45 minutes to get that signature shatter crisp finish.

Very High in Sodium
945 mg 945 mg (41% 41%)
The American Heart Association recommends limiting sodium intake to 2,300 mg per day, with an ideal limit of 1,500 mg for most adults.
Tips to Reduce Sodium
-
Swap Chicken Broth-30%
Replace the 475ml low-sodium chicken broth with no-salt added chicken broth or water. This is the most significant sodium contributor.
-
Rethink Cream of Chicken Soup-20%
The 298g cream of chicken soup is a major sodium source. Look for a 'reduced sodium' or 'low sodium' version of cream of chicken soup, or consider making a homemade low-sodium white sauce seasoned with herbs.
-
Reduce Sharp Cheddar-15%
Use only 50g shredded sharp cheddar cheese instead of 100g. Cheese, especially sharp varieties, can be high in sodium.
-
Measure Biscuit Mix-10%
While the biscuit mix doesn't explicitly state added salt, it's a processed ingredient. If possible, find a low-sodium biscuit mix. If not, be mindful of portion size.
-
Boost Flavor with Herbs
Continue using herbs and spices like dried thyme and black pepper to enhance flavor without adding sodium. Consider adding other low-sodium flavor enhancers like garlic powder or onion powder.
Recipe FAQs
What is a chicken cobbler?
It is a savory comfort dish featuring layered ingredients. It combines shredded chicken, vegetables, and a creamy gravy base, all topped with a biscuit style crust that bakes into a golden, bubbly finish.
Is it true that chicken cobbler is the most delicious chicken dish in the world?
Taste is subjective, but it is certainly a top-tier comfort meal. If you love the combination of savory gravy and fluffy biscuit toppings, you might also enjoy the biscuit chicken pot pie which utilizes similar textural layering techniques.
Is a chicken cobbler the same as a million dollar chicken casserole?
No, this is a common misconception. While both are hearty oven baked meals, a cobbler is specifically defined by its signature biscuit mix topping, whereas casseroles often rely on pasta or different binders.
Where did chicken cobbler originate?
It evolved from traditional American deep dish pot pies. Home cooks adapted the classic fruit cobbler concept by substituting sweet fillings with savory chicken and gravy mixtures to create a one-pan meal.
How to ensure the layers develop correctly during baking?
Avoid stirring the ingredients after layering them in the baking dish. By keeping the chicken, vegetables, soup mixture, and biscuit batter in separate, undisturbed layers, the gravity rule allows the flavors to meld and the crust to rise properly during the 45-minute bake time.
How to store leftovers for the best flavor?
Place the cooled casserole in an airtight container for up to 4 days. The flavors actually improve overnight as the chicken continues to absorb the thyme infused gravy.
How to reheat the dish while keeping the topping crisp?
Warm portions in the oven at 350°F for 15 minutes. Using the oven rather than a microwave prevents the biscuit topping from becoming soggy and helps the sharp cheddar cheese crisp up again.
Savory Chicken Cobbler Recipe

Ingredients:
Instructions:
Nutrition Facts:
| Calories | 528 kcal |
|---|---|
| Protein | 25.8 g |
| Fat | 32.1 g |
| Carbs | 34.2 g |
| Fiber | 2.1 g |
| Sugar | 5.4 g |
| Sodium | 945 mg |
