Roast Duck: Crispy & Rich
- Time: Active 20 minutes, Passive 2 hours 15 mins, Total 2 hours 35 mins
- Flavor/Texture Hook: Lacquered mahogany skin with a citrus infused, tender interior.
- Perfect for: Holiday gatherings or a special heritage style Sunday dinner.
- Creating the Ultimate Roast Duck
- The Science of Why it Works
- Foundational Recipe Specs
- Sourcing Authentic Elements
- Essential Tool Selection
- Execution and Technique
- Fixes for Common Flaws
- Substitutes and Variations
- Storing and Repurposing
- Final Service Details
- Critical in Sodium
- Roast Duck FAQs
- 📝 Recipe Card
Creating the Ultimate Roast Duck
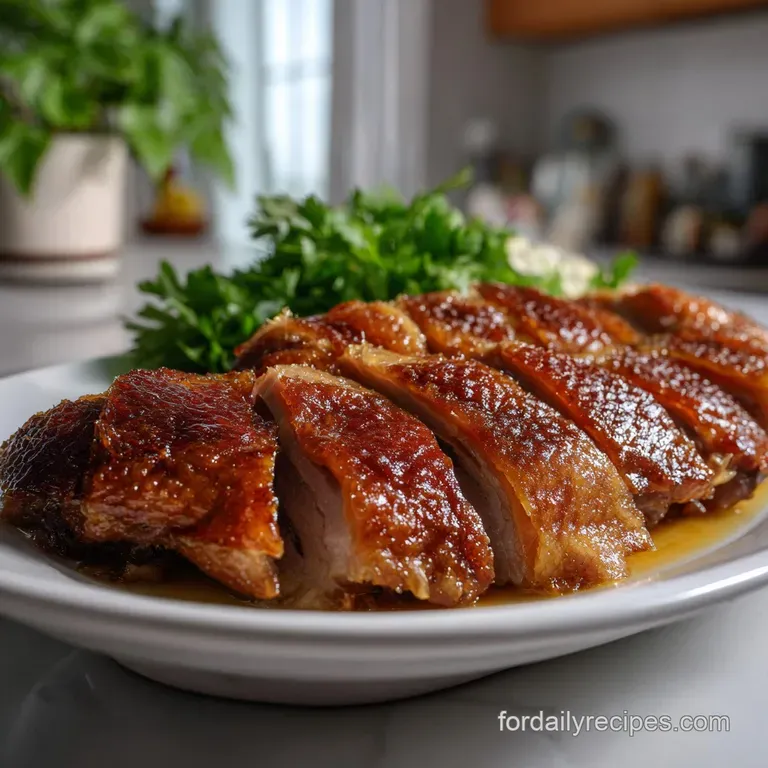
The sound of a knife blade scraping across perfectly rendered duck skin is a melody every home cook should hear at least once. It’s that distinctive crackle, a literal shatter, that tells you the fat has fully liquified and the skin has transformed into something resembling savory stained glass.
I remember the first time I tried this; I was so worried about the smoke alarm that I almost pulled it out early. Trust me, let it ride. The result is a heritage quality centerpiece that makes even the finest poultry seasoning recipe seem like a distant second place.
We often think of this dish as a restaurant only luxury, but it’s actually one of the most rewarding projects you can tackle in your own kitchen. Unlike chicken, which can turn into a dry desert if you look at it wrong, the high fat content here is your safety net.
We are going to layer the flavors from the inside out, starting with aromatics in the cavity and finishing with a glaze that glows like polished cherry wood.
But what about the grease? That’s usually the biggest hurdle. We aren’t just roasting; we’re performing a controlled rendering. By the time we’re finished, you’ll have a bird that’s remarkably lean but incredibly moist, surrounded by a crust that would make a pastry chef jealous.
Right then, let's get into the details of how we make this magic happen.
The Science of Why it Works
Fat Rendering: The high initial heat triggers the subcutaneous fat to liquefy and escape through the pricked skin, effectively frying the skin from the inside out.
Maillard Reaction: The honey and soy glaze provides the necessary sugars and amino acids to create a deep mahogany color and complex savory notes through thermal decomposition.
Decision Shortcut for Success
| Method | Time | Texture | Best For |
|---|---|---|---|
| Traditional Oven | 2 hours 15 mins | Evenly crisp, juicy meat | Hands off heritage cooking |
| Stovetop Sear | 45 minutes | Extra crunchy breast | Fast duck leg/breast prep |
| Air Fryer | 1 hour 10 mins | Maximum fat removal | Smaller birds or portions |
Choosing your method depends on how much time you have and what equipment is currently sitting on your counter. While the oven provides that time honored "whole bird" presentation, the stovetop method is a fantastic way to handle smaller cuts if you aren't doing the whole five pounder today.
Foundational Recipe Specs
Before we start, we need to understand the logistics of the bird. A standard five pound duck isn't like a five pound chicken; the bone to meat ratio is different, and the fat layer is significantly thicker.
This means your cooking strategy needs to focus on heat penetration through that fat barrier to reach the meat without burning the exterior.
| Component | Science Role | Pro Secret |
|---|---|---|
| Kosher Salt | Denatures skin proteins | Use Diamond Crystal for even coverage |
| Boiling Water | Tightens the skin | Scald the bird to jumpstart rendering |
| Maltose/Honey | Accelerates browning | Brush in thin layers for lacquer effect |
The boiling water trick is something I learned from a friend who spent years in professional kitchens. It sounds strange to pour water over a bird you want to be dry, but the heat causes the skin to shrink and tighten instantly, which helps that fat separate much faster once it hits the dry heat of the oven.
Sourcing Authentic Elements
The success of your Roast Duck depends heavily on the aromatics tucked inside the cavity. We want to build layers of scent that permeate the meat from the inside.
- 1 whole duck (approx. 5 lbs / 2.3 kg): Ensure the giblets are removed and the bird is at room temperature. Why this? Even temp ensures the internal fat starts rendering immediately.
- 2 tbsp Kosher salt: Essential for drawing moisture out of the skin.
- 1 tsp black pepper: Freshly cracked provides a much sharper bite than pre ground.
- 1 tbsp boiling water: Used for the initial skin scald.
- 1 orange, halved: Provides acidity and steam inside the cavity.
- 4 cloves garlic, smashed: Releases oils faster than whole cloves.
- 2 inch piece ginger, sliced: Adds a warming, heritage style spice note.
- 3 star anise pods: The secret to that time honored "lacquered" scent.
- 1 bunch green onions: Smashed to release their moisture and sulfur.
- 3 tbsp honey or maltose: Maltose is more traditional, but honey is a great pantry swap.
- 2 tbsp soy sauce (low sodium): Adds the necessary salt and deep color.
- 1 tbsp rice vinegar: Cuts through the richness of the glaze.
If you find yourself short on fresh aromatics, you can lean on a high-quality Poultry Seasoning recipe to fill the gap, though the fresh ginger and star anise are what really define this specific profile.
Essential Tool Selection
You don't need a professional kitchen, but a few specific items will make your life much easier. First and foremost, a roasting pan with a V rack is non negotiable. You need the bird elevated so the rendered fat can drip away; if the duck sits in its own grease, the bottom skin will be soggy and rubbery.
I also highly recommend using a digital meat thermometer. Because duck is red meat, it can be served slightly pink (medium), but for a whole bird, we usually aim for well rendered.
A corn on-the cob holder is my favorite "unconventional" tool for pricking the skin it has two sharp tines that make quick work of the hundreds of tiny holes we need to poke without piercing the meat.
Execution and Technique

Step 1: Prepping for Maximum Crunch
Pat the duck completely dry with paper towels. Use a sharp skewer or a corn on-the cob holder to prick the skin all over, especially around the legs and breast where the fat is thickest. Note: Do not pierce the meat, or the juices will run out and steam the skin from the inside.
Step 2: The Scalding Ritual
Place the duck on a rack over the sink and pour 1 tbsp boiling water slowly over the skin. Watch the skin tighten and turn translucent.
Step 3: Interior Aromatic Layering
Stuff the cavity with the orange halves, smashed garlic, ginger slices, star anise, and green onions. This creates an aromatic steam chamber.
Step 4: Seasoning for Physics
Rub the entire exterior with 2 tbsp Kosher salt and 1 tsp black pepper. Note: Salt draws out the moisture that prevents crisping.
Step 5: Initial over High heat Blast
Preheat your oven to 425°F and roast the duck breast side up for 20 mins until the skin begins to turn golden and sizzle.
Step 6: The Long Render
Lower the oven temperature to 350°F. Continue roasting for 1 hour 30 mins, flipping the bird every 30 minutes to ensure even fat drainage.
Step 7: Glaze Application Timing
Whisk the honey, soy sauce, and rice vinegar together. During the last 20 mins of cooking, brush the glaze over the duck in three separate layers. Observe the skin turning a deep mahogany lacquer.
Step 8: Final Temperature Check
Ensure the internal temperature at the thickest part of the thigh reaches 165°F. The legs should wiggle easily in their sockets.
Step 9: Resting for Juiciness
Remove from the oven and let it rest on a cutting board for at least 15 mins. Note: This allows the internal juices to redistribute so they don't pour out when carving.
This resting period is just as vital as it is for a Chuck Roast In Oven recipe, as it ensures every bite of the breast is as succulent as the legs.
Fixes for Common Flaws
Why Is My Skin Still Rubbery?
This usually happens if the fat wasn't given enough time to render or if the oven temperature was too low. If the skin isn't "shattering" when you poke it with a fork, the moisture is still trapped in the collagen layers.
Managing Excessive Smoke
Duck fat has a relatively low smoke point. If your kitchen is filling with haze, it's likely the fat dripping into the pan is burning. Adding a cup of water to the bottom of the roasting pan (below the rack) can help stabilize the temperature of the drippings.
| Problem | Root Cause | Solution |
|---|---|---|
| Soggy Bottom | Duck sat in rendered fat | Use a V rack to elevate the bird |
| Burnt Glaze | Applied too early | Only glaze during the final 20 mins |
| Tough Meat | Not rested long enough | Rest 15-20 mins before carving |
Common Mistakes Checklist
- ✓ Forgot to prick the skin (traps fat and leads to greasy meat).
- ✓ Skipping the drying step (moisture is the enemy of a crisp crust).
- ✓ Crowding the roasting pan with vegetables (steams the bird instead of roasting it).
- ✓ Using a flat pan without a rack (the bottom will never crisp up).
- ✓ Peeking too often (dropping oven temp slows the rendering process).
Substitutes and Variations
While the traditional flavor profile is hard to beat, you can certainly adapt this recipe based on what you have in your heritage pantry.
| Original Ingredient | Substitute | Why It Works |
|---|---|---|
| Maltose | Honey (1:1 ratio) | Similar viscosity and sugar content for browning. |
| Rice Vinegar | Apple Cider Vinegar | Provides necessary acidity. Note: Slightly fruitier finish. |
| Star Anise | Five Spice Powder (1 tsp) | Contains the same licorice like aromatic compounds. |
If you want to try an easy citrus variation, swap the orange for a lemon and add a teaspoon of dried thyme to the salt rub. It changes the profile to something more Mediterranean but keeps that signature crunch.
Storing and Repurposing
Storage: Keep leftovers in an airtight container in the fridge for up to 4 days. To reheat and keep the skin crisp, use an air fryer or a hot oven (400°F) for 5-8 minutes. Microwave reheating will make the skin soft and rubbery.
Zero Waste: Never throw away the carcass! The bones make an incredible stock that is much richer than chicken. You can also save the rendered fat (liquid gold) in a jar in the fridge. Use it to roast potatoes next week; they will be the best potatoes you've ever tasted. If you have leftover meat, it makes an incredible filling for a French Dip Sandwich Recipe adaptation.
Final Service Details
When it's time to serve your Roast Duck, carving is the final hurdle. I prefer to remove the legs and wings first, then slice the breast meat into thin strips. This ensures everyone gets a piece of that magnificent skin.
For sides, think of things that cut through the richness. A simple cucumber salad with rice vinegar or some steamed bao buns with a little extra hoisin sauce works wonders. The contrast between the fatty, velvety meat and a crisp, acidic side dish is what makes this meal feel like a true heritage feast passed down through generations.
Chef's Note: If you really want to go the extra mile, use a handheld hairdryer on the "cool" setting to dry the duck's skin for 10 minutes before putting it in the oven. It sounds crazy, but it’s the secret to that glass like texture.

Critical in Sodium
1420 mg mg of sodium per serving (62% % of daily value)
The American Heart Association recommends limiting sodium intake to about 2,300mg per day.
Tips to Reduce Sodium in Your Duck Recipe
-
Reduce Added Salt-25%
The recipe uses 2 tbsp of Kosher salt. Reduce this amount by half, starting with 1 tbsp, or eliminate entirely and add after cooking to taste. This could significantly lower the sodium content.
-
Control Soy Sauce-20%
Even low-sodium soy sauce contains sodium. Use 1 tbsp instead of 2 tbsp, or dilute the 2 tbsp with 1 tbsp of water or unsalted rice wine to reduce its intensity and overall sodium content. You can also explore using coconut aminos, which are naturally lower in sodium.
-
Enhance Citrus Flavor-10%
Increase the orange halves from one to two and add zest to boost the citrus flavor, which can help compensate for reduced saltiness. More flavorful ingredients require less salt.
-
Spice it Up
Experiment with additional herbs and spices like white pepper, fennel seed, or Sichuan peppercorns to enhance the flavor profile and reduce the need for salt. Consider toasting spices for deeper flavour
Roast Duck FAQs
How long does it take a duck to cook in the oven?
Approximately 2 hours and 35 minutes total. This includes 20 minutes at high heat (425°F), 1 hour 30 minutes at moderate heat (350°F), and a 15-minute rest. Ensure the internal temperature reaches 165°F at the thickest part of the thigh.
What are common mistakes when roasting a duck?
Yes, there are several common pitfalls. Key mistakes include not pricking the skin sufficiently to allow fat to render, skipping the drying step which prevents crisping, crowding the pan which steams the bird, and not resting the duck before carving, which leads to dry meat.
How should roast duck be cooked?
Start by pricking the skin all over, then scalding it with boiling water to tighten it. Roast at a high temperature (425°F) for about 20 minutes, then reduce to 350°F for another 1.5 hours, flipping every 30 minutes. Apply a glaze in the final 20 minutes and rest before carving.
How long does it take to cook a duck at 350 degrees?
At 350°F, a duck typically needs about 1 hour and 30 minutes after an initial blast at higher heat. This moderate temperature allows the fat to render slowly and the meat to cook through evenly without burning the exterior.
For a whole bird, this time is factored into the overall cooking process, usually following a high heat start.
Can I substitute honey in the glaze?
Yes, honey is a good substitute for maltose in the glaze. Use a 1:1 ratio. Both provide similar viscosity and sugar content, which is crucial for achieving that deep mahogany, lacquered skin through browning.
Why is my duck skin still rubbery after roasting?
No, this indicates the fat hasn't fully rendered. This usually happens if the initial high heat blast was too short, the oven temperature was consistently too low, or the skin wasn't pricked enough to allow the subcutaneous fat to escape and crisp up properly. If you enjoyed mastering fat rendering here, see how the same principle of heat management applies to achieving a perfect crust on Bratwurst in Air Fryer: Crispy Casing Ready in 15 Minutes.
What is the best way to rest roast duck?
Rest the duck on a cutting board for at least 15 minutes after removing it from the oven. This allows the juices to redistribute throughout the meat, ensuring a more succulent and flavorful final product. This resting period is critical, similar to how you'd rest other roasted meats for optimal moisture, like in our Baked Chicken Thighs: Oven Only Method.
Roast Duck

Ingredients:
Instructions:
Nutrition Facts:
| Calories | 912 kcal |
|---|---|
| Protein | 48.6 g |
| Fat | 71.4 g |
| Carbs | 14.2 g |
| Fiber | 1.1 g |
| Sugar | 11.5 g |
| Sodium | 1420 mg |
