Dutch Oven Bread: Effortless Hearth Loaf Recipe
- The Effortless Hearth Loaf: No-Knead Dutch Oven Bread Recipe
- Ingredients You Need for Dutch Oven Bread
- Mixing, Proofing, and Baking Your Crusty Loaf
- Achieving Perfection: Troubleshooting and Expert Baking Tips
- Maximizing Shelf Life: Storing and Reviving Homemade Rustic Bread
- Beyond Butter: Ideal Pairings for Freshly Baked Sourdough-Style Bread
- Recipe FAQs
- 📝 Recipe Card
The Effortless Hearth Loaf: No-Knead Dutch Oven Bread Recipe
That sound. You know the one. That shattering, musical crackle the minute your knife hits the crust. Making a perfect loaf of Dutch Oven Bread is, without a doubt, the single most rewarding thing you can do in your kitchen. The aroma alone is worth the wait.
Seriously, forget those terrifying videos featuring complicated kneading and messy flour explosions. This method requires four simple ingredients and about five minutes of actual hands-on work. It's incredibly cheap, astonishingly easy, and delivers the most rustic, professional looking loaf you could ever ask for.
I used to struggle endlessly trying to get that perfect, thick crust until I discovered the secret of steam and heat. Now, I’m sharing the exact, fool proof blueprint for stellar, perfect Dutch Oven Bread every single time. Let’s crack on!
What Makes This the Ultimate Beginner's Bread?
The genius behind this specific method is patience, not physical effort. We rely on a super minimal amount of yeast and a very long, slow 12 to-18 hour proof. This isn't just about making the dough rise; it’s about deep flavor development.
The extended fermentation breaks down the starches in the flour, creating that beautiful, complex, slightly tangy flavor profile. You genuinely get that amazing, deep sourdough feel without the actual sour dough commitment.
The beautiful texture of this easy Dutch Oven Bread is solely due to time.
Why the Dutch Oven is Non-Negotiable for Texture
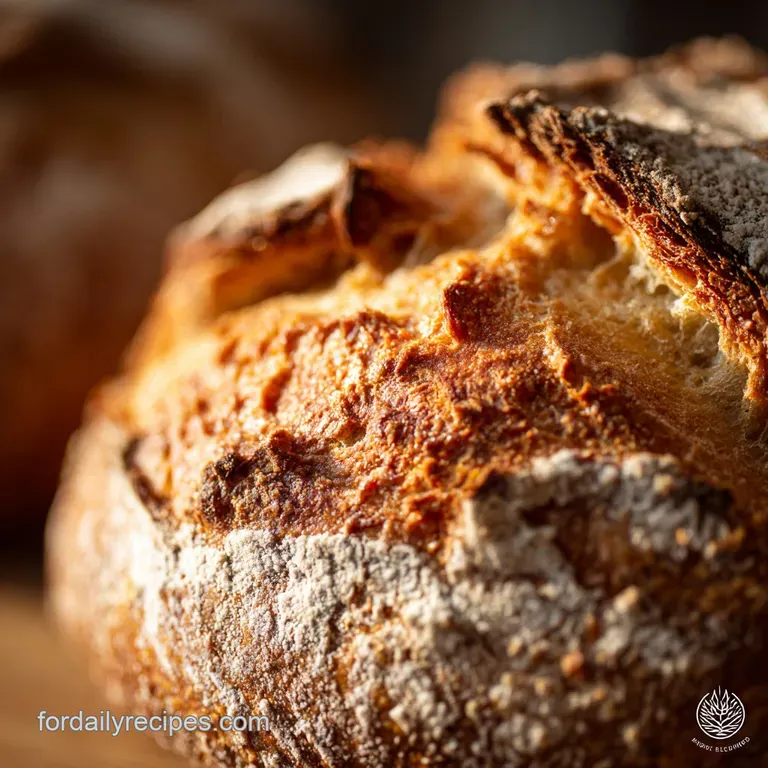
If you want that deeply blistered, thick, shatteringly crisp crust, you absolutely need steam. A lot of steam. The enclosed environment of the preheated pot that's what makes this a superior Dutch Oven Bread technique traps all the moisture escaping from the dough.
This trapped humidity keeps the crust supple for the first half hour, allowing for maximum lift, or "oven spring," before the crust sets hard. Without that sealed moisture, your loaf spreads wide, sets early, and ends up dense and pale.
Chef's Note: The Dutch oven mimics the steam injection systems found in professional bakeries. It’s the single most important tool in creating true rustic Dutch Oven Bread Loaf texture at home.
Required Kitchen Equipment Checklist
You don't need a fancy stand mixer or a professional proofing basket to make fantastic Dutch Oven Bread . However, a few items are absolutely critical for success. You need a 5 to 6 Quart (or larger) Dutch oven, because that heat retention is everything.
If you don't already own one, this recipe alone justifies the purchase.
Ingredients You Need for Dutch Oven Bread
This recipe is built on simplicity. The quality of your ingredients really shines through when the list is this short. We are aiming for that chewy, open crumb that makes this particular Dutch Oven Bread so famous.
Main Ingredients Notes
Accuracy matters enormously here, especially with this high hydration dough. Using a digital scale is my biggest recommendation for achieving the correct texture every time.
Flour: Use bread flour if you have it; the higher protein content gives a slightly better chew and structure. All-purpose flour works perfectly well too, just know your crust might be slightly softer overall.
Water: Lukewarm is essential. If the water is too hot, you will kill the tiny, sensitive amount of instant yeast we are using for this spectacular No Knead Dutch Oven Bread . Too cold, and the yeast won't wake up efficiently enough to handle the long proof.
Yeast: We use a shockingly small amount of instant yeast. This ensures the slow, controlled rise that builds flavor, preventing the dough from over proofing too quickly. Do not be tempted to add more!
Easy Substitutions and Swaps
What if you’re missing a key item? Don't stress. We can almost always make it work when making this irresistible Dutch Oven Bread .
| If you don't have... | You can use... | Notes |
|---|---|---|
| Instant Dry Yeast | Active Dry Yeast | Use the same amount, but proof it first in 1/4 cup of the recipe’s lukewarm water for 5- 10 minutes until frothy. |
| All-Purpose Flour | Bread Flour | Will yield a slightly chewier loaf and absorb water slightly differently. |
| Parchment Paper | Semolina or Cornmeal | Generously dust the bottom of the hot Dutch oven to prevent sticking, but handling the dough without the sling will be much harder and hotter. |
| Fine Sea Salt | Kosher Salt | Increase quantity by about 25% to account for larger crystal size (e.g., 2 tsp instead of 1.5 tsp). |
Essential Equipment
We talked about the scale and the pot already, but let’s emphasize the importance of the parchment paper sling. If you try to drop the raw dough directly into the preheated pot, you will risk severely burning your hands. Plus, the dough will likely stick instantly, impeding the oven spring.
The parchment paper sling is the key to safe and easy handling of your very hot Dutch Oven Bread vessel.
Mixing, Proofing, and Baking Your Crusty Loaf
The Initial Mixing and Overnight Rest
This first step should take you less than two minutes, seriously. In your large mixing bowl, whisk together the flour, salt, and instant yeast. Then, pour in the lukewarm water all at once. Use a wooden spoon or spatula to mix until the ingredients are just combined .
There should be absolutely no dry pockets of flour left, but stop immediately once incorporated. The dough will be shaggy, sticky, and frankly, ugly. That’s perfect. Cover it tightly no air gaps!
This long, slow rest (12- 18 hours) is where the real chemistry happens, creating all those incredible, flavorful bubbles that define great Dutch Oven Bread No Knead .
Shaping the Dough: The Fold and Tuck Method
Heavily dust a clean work surface with flour. Gently scrape the dough out of the bowl onto the floured surface. Do not punch the dough down forcefully. We want to preserve every single one of those precious air bubbles. The shaping process is a gentle dance.
Perform a quick letter fold: fold the top and bottom edges into the center, then the sides into the center. Flip the dough over and, using minimal flour, gently pull the edges under itself.
This pulling motion creates essential surface tension, which gives your Dutch Oven Bread its beautiful final rise and shape (a boule ) in the oven. Place the shaped dough seam side down onto your parchment paper square for the final 30 minute rest.
Safe Transfer: Handling the Hot Dutch Oven
Warning: The pot is lava hot. Seriously, treat the preheated Dutch oven like a dangerous piece of machinery. Use heavy duty mitts that cover your forearms. Carefully remove the pot from the oven, take off the lid, and lift the dough by the corners of the parchment paper sling. Gently lower it, paper and all, into the hot pot. If you try to drop the dough straight in, you risk deflating it completely, resulting in a squat loaf.
Temperature Control: Baking Covered vs. Uncovered Stages
The two-stage baking process is the absolute foundation of achieving that perfect crust on your homemade Dutch Oven Bread .
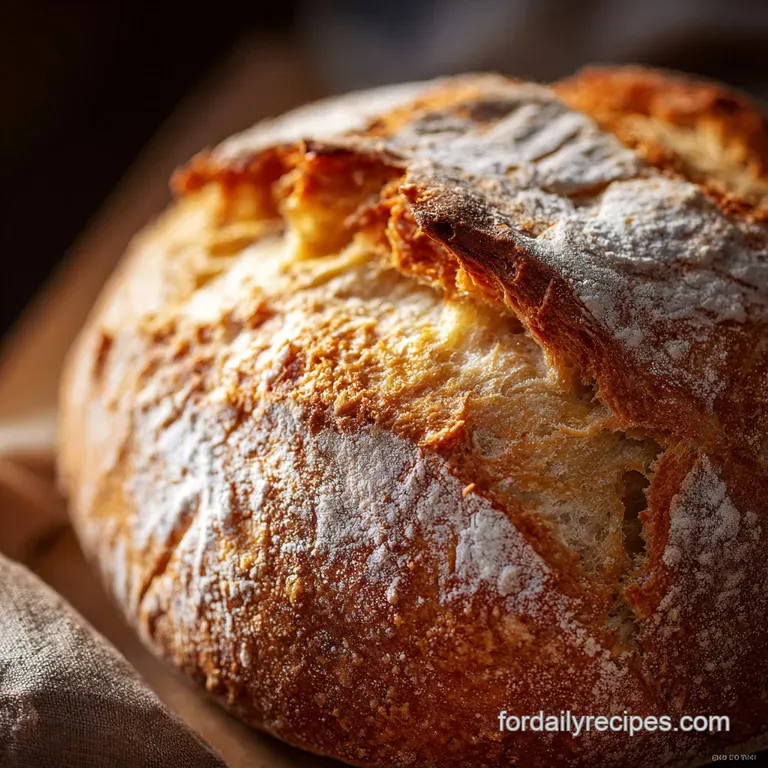
Stage one (covered, 30 minutes at 450°F / 230°C) is about maximizing the rise and building that crucial steam environment inside the pot. This is where the magic happens and your dough expands dramatically.
Stage two (uncovered, 10– 15 minutes at 425°F / 220°C) is about drying out the crust, developing deep golden color, and finishing the internal cook.
Don't skip the temperature reduction after removing the lid; it prevents the crust from burning while the interior finishes cooking through. This specific Dutch Oven Bread Temperature sequence is vital.
Achieving Perfection: Troubleshooting and Expert Baking Tips
Solving a Dense or Flat Loaf
If your Dutch Oven Bread comes out flatter than you expected, 90% of the time it’s one of three things:
- You Over Proofed It: The long, slow proof is delicate. If you leave it too long (especially in a warm kitchen), the gluten structure collapses, and it won't rise in the oven.
- You Skipped the Preheat: The pot must be screaming hot. If the pot isn't hot enough, the dough relaxes and spreads sideways before the heat can force it upwards.
- You Handled It Too Roughly: Punching the dough down aggressively during shaping is a no-no. Be gentle; your goal is to rearrange the dough, not deflate the beautiful structure you spent 18 hours creating.
Essential Dutch Oven Care Before Preheating
Make certain your pot is spotlessly clean and fully dry before placing it in the oven to preheat. For enameled cast iron, a damp pot can create steam spots that crackle the enamel. The intense heat required for perfect Dutch Oven Bread demands a dry, clean start.
I once forgot a few stray crumbs inside, and they burned and smoked horribly when I reached 450°F. Learned that lesson the hard way.
Listen for the Thump: Knowing When Your Loaf Is Done
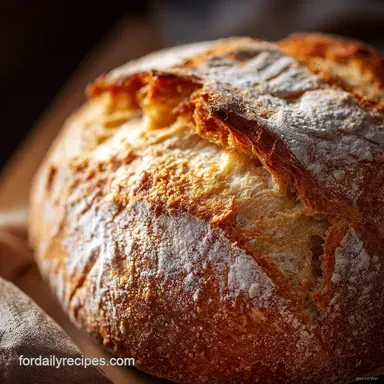
Color is a great indicator, but internal temperature (200°F 210°F / 93°C 99°C) is the gold standard. If you don't have a thermometer, rely on the classic baker's thump test. Once fully baked, remove the hot loaf from the pot, hold it carefully, and rap your knuckles against the bottom crust.
If it sounds hollow, deep, and resonant like a drum it's done. If it sounds dull, put that gorgeous Dutch Oven Bread Tasty recipe back in for five more minutes, uncovered.
Maximizing Shelf Life: Storing and Reviving Homemade Rustic Bread
Best Practices for Room Temperature Storage
Never, ever put fresh bread in the refrigerator! It accelerates staling faster than anything science knows. For this incredibly crusty Dutch Oven Bread , the best method is storing it cut-side down on a cutting board, covered loosely with a clean linen tea towel or placed in a dedicated bread box.
It stays excellent for 2 3 days this way. The crust will soften a little, but the inside will remain delicious.
Quick Fixes for Stale Bread
Got a rock hard end-piece of bread? Do not throw it out! Stale bread makes incredible, flavorful croutons or breadcrumbs, but you can also completely revive it for immediate eating. Briefly run the entire loaf under the faucet (yes, really, water!). The crust should feel damp but not soaking wet.
Then, place it in a 350°F (175°C) oven for 5– 10 minutes. The exterior moisture steams the interior, softening the crumb while re-crisping the crust. It’s like magic for your leftover successful Dutch Oven Bread loaf.
If you plan to freeze it, slice the cooled loaf first. Wrap the slices tightly in plastic wrap, then place them in a freezer bag or foil. Freeze for up to three months.
Beyond Butter: Ideal Pairings for Freshly Baked Sourdough Style Bread
Savory Dipping Oils and Spreads
This hearty, thick crusted loaf is the ultimate vehicle for flavor. I absolutely adore dipping warm, thick slices into high-quality olive oil mixed with a splash of balsamic vinegar, fresh oregano, and a pinch of chili flake.
It’s also perfect for mopping up every last drop of sauce from any rich, tomato based meal.
It makes the best slice for topping with creamy goat cheese and honey, or serve it alongside a robust charcuterie platter. If you’re feeling extra ambitious, the slight tanginess of this dough would make an excellent crust component for a savory version of my ambiguous recipe amount crossword Perfect Ratio Shortbread Tartlets — the texture contrast would be divine! This truly rustic Dutch Oven Bread needs bold partners.
Making the perfect loaf of Dutch Oven Bread really boils down to trust trusting the incredibly long proof, trusting the heat, and trusting the steam.
Stop buying expensive loaves at the store; you now possess the knowledge to create bakery quality bread in your own kitchen with minimal fuss. Go forth and enjoy that magnificent crust!

Recipe FAQs
Do I really need to preheat the Dutch oven?
Yes, preheating the Dutch oven is absolutely crucial for achieving the perfect crust and oven spring; this step transforms the pot into a miniature professional steam oven. The immediate blast of intense heat sets the crust quickly and encourages maximum yeast activity, providing the signature crunchy, blistered exterior and high rise.
Skipping this step results in a flat, softer, and often pale loaf.
Why is my bread dense, gummy, or not rising sufficiently?
Density often results from under proofing or incorrect measurement, specifically too much flour relative to the water (low hydration). Ensure your dough has doubled in volume during the bulk fermentation and measure ingredients by weight for precision.
Additionally, make sure to let the baked bread cool completely (about 1.5 to 2 hours) before slicing to prevent a gummy texture.
Can I use whole wheat flour or alternative flours in this recipe?
You can substitute up to 50% of the white flour with whole wheat or bread flour, but remember that whole wheat absorbs significantly more moisture, so you may need to add a couple of extra tablespoons of water.
This simple recipe is not ideal for 100% gluten-free flours, which require specific binders like xanthan gum and tailored liquid ratios for structure.
How should I store the leftover Dutch Oven Bread?
Store the cooled bread unwrapped or loosely covered with a clean tea towel at room temperature for the first 24 hours to maintain the crispness of the crust. For longer storage, place the towel wrapped loaf inside a paper bag or a breathable bread box, which will help slow staling while allowing moisture to escape.
Avoid storing homemade bread in the refrigerator, as this speeds up the staling process.
How long is too long for the initial proof (fermentation)?
While the no-knead method is designed for a long, slow ferment, exceeding 18 to 20 hours at standard room temperature (especially in warm climates) can lead to over proofing and the dough collapsing when handled.
If you need to delay the bake significantly, transfer the dough to the refrigerator after 12 hours of room temperature proofing for a slower, controlled cold ferment.
Can I add seeds, cheese, or herbs to the dough?
Yes, you can easily incorporate dry ingredients like seeds (sunflower, sesame), dried herbs, or nuts during the initial mixing phase, ensuring they are evenly distributed throughout the dough.
Be cautious when adding wet ingredients like fresh olives, shredded cheese, or sundried tomatoes, as these may release moisture and require you to slightly adjust the total water content.
What should I do if my crust is tough or burnt on the bottom?
A tough crust often means the bread was overbaked or dried out during the uncovered phase; ensure you reduce the heat and only uncover the bread for the last 15-20 minutes. If the bottom is consistently burning, place a pizza stone or an inverted baking sheet on the rack beneath the Dutch oven to act as a heat shield during the baking process.
No Knead Dutch Oven Bread
Ingredients:
Instructions:
Nutrition Facts:
| Calories | 150 kcal |
|---|---|
| Fat | 0.5 g |
| Fiber | 1 g |
