Dinner Rolls Recipe
- Time: Active 30 minutes, Passive 2 hours 10 mins, Total 2 hours 40 mins
- Flavor/Texture Hook: Honey sweetened dough with a velvety, pull apart crumb and a salty crisp top
- Perfect for: Holiday heritage feasts, Sunday family roasts, or beginner bread bakers
- Crafting Memories with the Ultimate Dinner Rolls Recipe
- The Science Behind a Heritage Bake
- Selecting Premium Components for Fluffy Results
- Essential Ingredients and Smart Substitutions
- Essential Tools for the Perfect Batch
- Mastering the Art of Dough Shaping
- Solving Common Bread Baking Obstacles
- Adjusting the Batch Size
- Debunking Bread Baking Truths
- Maintaining Freshness Through Smart Storage
- Enhancing Visual Appeal and Flavor Finish
- Recipe FAQs
- 📝 Recipe Card
Crafting Memories with the Ultimate Dinner Rolls Recipe
The kitchen on a Sunday morning used to have a very specific scent in our house. It was the sharp, earthy tang of yeast blooming in warm milk, mingling with the floral sweetness of honey.
I remember watching my grandmother - she called them her "heritage biscuits" even though they were clearly yeasted rolls - as she worked the dough with hands that never seemed to tire. There is a certain magic in seeing a shaggy mess of flour transform into a smooth, elastic ball that bounces back under your thumb.
We often think of bread as a side dish, but when you pull these from the oven, they become the centerpiece. That first crackle as the soft crust yields to your fingers, followed by the steam rising from a buttery center, is a sensory experience no store-bought version can mimic.
I've spent years tweaking her method, figuring out exactly why some batches felt like bricks while others floated off the plate.
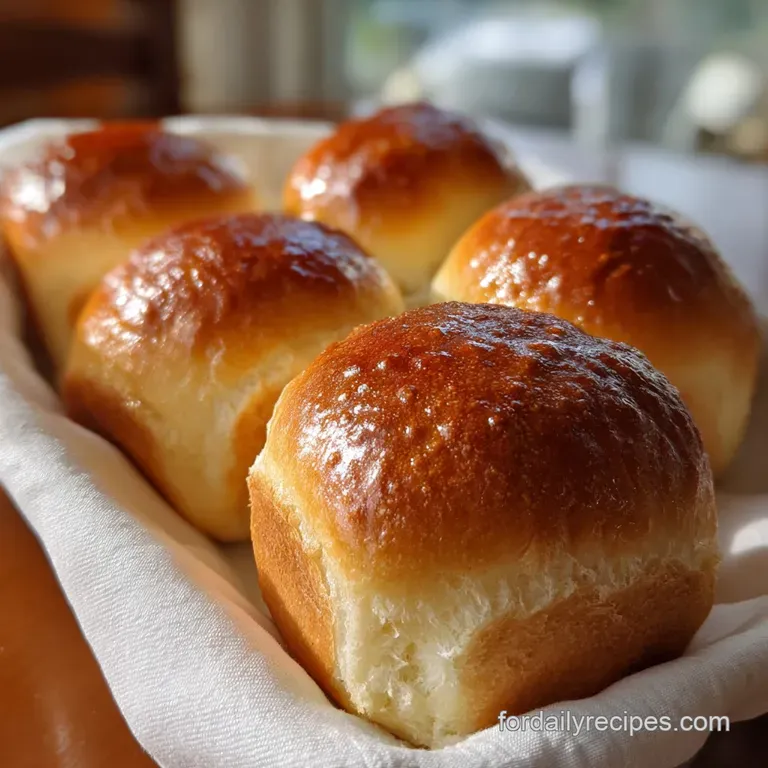
This specific dinner rolls recipe is the result of those experiments. We are going for a high contrast experience here: a sweet, rich interior balanced by a generous sprinkle of flaky sea salt on a golden, butter washed top.
It’s about more than just food; it’s about that feeling of home that only a warm tray of bread can provide. Let’s get our hands floury and make something that your family will ask for every single year.
The Science Behind a Heritage Bake
Gluten Network Architecture: Bread flour contains more protein than all purpose varieties, creating a stronger lattice that traps carbon dioxide bubbles for a higher, fluffier rise.
Fat Induced Tenderness: The lipids in whole milk and softened butter coat the flour proteins, shortening the gluten strands to ensure the crumb remains velvety rather than chewy.
Enzymatic Browning: Honey provides simple sugars that react with the milk proteins during baking, producing a deep mahogany crust through the Maillard reaction.
| Feature | Homemade Rolls | store-bought Shortcut |
|---|---|---|
| Crumb Texture | Velvety and irregular | Uniform and often dry |
| Aroma Profile | Toasty, yeasty, and sweet | Mildly chemical or bland |
| Longevity | Stays soft for 2 days | Dries out within hours |
The contrast between the "snap" of the outer crust and the almost weightless interior is what defines a professional grade roll. While a shortcut might save time, it lacks the complex flavor development that occurs during the two hour fermentation window.
Selecting Premium Components for Fluffy Results
| Ingredient | Science Role | Pro Secret |
|---|---|---|
| Bread Flour (500g) | Structural foundation | Weigh it with a scale to avoid dense, "flour heavy" rolls. |
| Whole Milk (240ml) | Hydration and richness | Keep it at 43°C; anything hotter will kill the yeast instantly. |
| Active Dry Yeast (7g) | Leavening agent | Ensure it foams; if it stays flat, your yeast is dead. |
| Honey (45g) | Flavor and fermentation | Acts as a humectant to keep the rolls moist for days. |
For this dinner rolls recipe, we use specific weights because volume measurements like "cups" are notoriously unreliable. A "cup" of flour can vary by 30 grams depending on how hard you pack it. If you want that consistent, cloud like result, treat your scale like your best friend in the kitchen.
Essential Ingredients and Smart Substitutions
- Bread Flour (500g):Why this? High protein ensures the rolls have the strength to rise tall. Substitute: All purpose flour (rolls will be slightly shorter and softer).
- Whole Milk (240ml):Why this? The fat content creates a tender, rich crumb structure. Substitute: Unsweetened almond milk (less rich, but works for dairy-free).
- Active Dry Yeast (7g):Why this? Provides a reliable rise and classic bakery aroma. Substitute: Instant yeast (skip the 10 minute bloom step).
- Honey (45g):Why this? Adds a floral sweetness and helps with crust browning. Substitute: Granulated sugar (cleaner sweetness, less moisture).
- Unsalted Butter (56g softened + 28g melted):Why this? Softened butter incorporates smoothly into the dough for even fat distribution. Substitute: Vegan butter sticks.
- Large Egg (1 unit):Why this? Adds structure, color, and a rich mouthfeel. Substitute: 1/4 cup of plain yogurt (for an egg free version).
- Fine Sea Salt (9g):Why this? Tightens gluten and balances the sweetness of the honey. Substitute: Table salt (use slightly less as it is saltier by volume).
- Flaky Sea Salt (1 tsp):Why this? Provides a crunch and a sharp contrast to the sweet dough. Substitute: Maldon sea salt or omit if preferred.
This dough is a dream to work with, but remember that the temperature of your kitchen plays a huge role. If it’s a chilly winter day, your rise might take an extra 30 minutes. Don't rush it - the flavor is building while you wait.
Essential Tools for the Perfect Batch
You don't need a professional bakery to get these right, but a few specific tools make the process much smoother. A stand mixer such as a KitchenAid is a lifesaver for the 8 minute kneading process, though you can absolutely do this by hand if you’re looking for a workout.
A digital thermometer is my most used tool here; it takes the guesswork out of warming the milk.
I also highly recommend using a 9x13 inch (23x33 cm) metal baking pan. Glass pans hold heat differently and can lead to over browned bottoms before the centers are fully set. If you only have glass, lower your oven temperature by about 10 degrees.
Finally, a bench scraper is brilliant for dividing the dough into 15 even pieces without tearing the delicate gluten strands we worked so hard to build.
Mastering the Art of Dough Shaping

1. Bloom and Activate
Whisk the 240ml warmed milk, 7g yeast, and 45g honey in your mixer bowl. Note: Let it sit for 10 minutes until a thick, foamy head forms on the surface.
2. Mix and Knead
Add the egg, 56g softened butter, 500g bread flour, and 9g fine sea salt. Use the dough hook to mix on low until a shaggy ball forms and pulls away from the sides.
3. Develop the Gluten
Increase speed to medium and knead for 7-8 minutes. Note: The dough should be tacky but not sticky, feeling like a soft earlobe when pinched.
4. The First Rise
Place dough in a greased bowl, cover with a damp cloth, and let sit in a warm spot. Note: Wait 60-90 minutes until the dough has doubled in size and looks puffy.
5. Divide and Conquer
Punch down the dough to release air and turn onto a floured surface. Divide into 15 equal pieces (about 60-65g each) using a sharp bench scraper.
6. Shape the Rounds
Tuck the edges of each piece under itself to create a smooth top, then roll on the counter with a cupped hand. Place in a greased 9x13 pan in a 3x5 grid pattern.
7. The Final Proof
Cover the pan and let the rolls rise again for 45 minutes. Note: They are ready when they touch each other and look bloated.
8. The Golden Bake
Bake at 190°C for 18-20 minutes. Note: Remove until the tops are deep golden brown and sound hollow when tapped.
9. The Finishing Touch
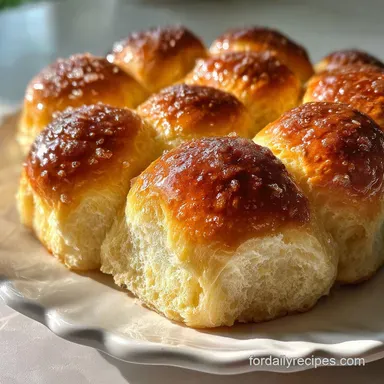
Immediately brush with the 28g of melted butter and sprinkle with the 1 tsp of flaky salt. Note: This creates that shatter crisp salty crust against the soft interior.
Solving Common Bread Baking Obstacles
Sometimes the dough just doesn't behave. I remember one Thanksgiving where my rolls looked like flat puckers because I killed the yeast with boiling milk. It happens to the best of us! The key is watching the dough, not just the clock. If your kitchen is cold, the "1 hour" rise might actually take two.
Why Your Rolls are Dense
If your rolls feel heavy like stones, you likely added too much flour or didn't let them proof long enough. Bread flour absorbs moisture differently than all purpose, so if you're measuring by volume, you might be packing the cup too tightly.
Always aim for a dough that is slightly tacky; if it's "clean" and dry to the touch, it's over floured.
| Problem | Root Cause | Solution |
|---|---|---|
| No Rise | Yeast was expired or milk was too hot | Check expiration; keep milk under 45°C. |
| Crust is Hard | Oven was too hot or baked too long | Use an oven thermometer; brush with butter immediately. |
| Soggy Bottoms | Rolls sat in the pan too long after baking | Move to a wire rack within 5 minutes of removing from oven. |
Common Mistakes Checklist
- ✓ Never skip the "bloom" - it's your insurance policy that the yeast is alive.
- ✓ Don't use cold eggs - they can solidify the softened butter into clumps.
- ✓ Resist adding more flour during kneading - the stickiness often disappears after 5 minutes of work.
- ✓ Always preheat your oven for at least 20 minutes to ensure a steady temperature.
- ✓ Give the rolls space during the second rise so they have room to expand.
Adjusting the Batch Size
Scaling a yeast recipe is more about physics than just math. If you want to halve this dinner rolls recipe, simply use one small egg or beat a large egg and use half of it by weight.
You’ll want to use a smaller square baking pan (8x8 inch) to ensure the rolls still snuggle up against each other, which helps them rise upward rather than outward.
For doubling the batch, you don't necessarily need to double the yeast; 10g to 12g is usually sufficient for 1kg of flour. However, the rise times will remain largely the same, but the kneading might need to happen in two batches if your stand mixer isn't professional sized. For a crowd, serving these alongside a big batch of Shredded Chicken Recipes makes for an incredible "make your own slider" bar.
Debunking Bread Baking Truths
A common misconception is that you must use sugar to "feed" the yeast. In reality, yeast can break down the starches in flour for food just fine. We add honey or sugar in this dinner rolls recipe primarily for flavor and to help with the crust color, not because the yeast will starve without it.
Another myth is that you need to sift your flour every time. Unless your flour is old and lumpy, sifting isn't strictly necessary for rolls. In fact, if you're measuring by weight, sifting before weighing will actually give you a different volume, but the weight remains the same.
Focus more on the temperature of your ingredients than the airiness of your dry flour.
| Goal | Strategy | Outcome |
|---|---|---|
| Ultra Soft Crust | Brush with milk before baking | Prevents the crust from getting too dark and keeps it pliable. |
| Chewier Texture | Replace 50g flour with 50g Potato Flour | Adds moisture and a distinct "bouncy" chew. |
| Yeasty Flavor | Cold ferment in fridge overnight | Slows down yeast, allowing complex organic acids to develop. |
Maintaining Freshness Through Smart Storage
These rolls are at their absolute peak about 15 minutes after they leave the oven. However, life happens. To store them, wait until they are completely cool to the touch. Placing warm bread in a plastic bag creates steam, which leads to a soggy crust and eventually mold.
Once cool, wrap them tightly in foil or place in an airtight bag for up to 2 days at room temperature.
For zero waste enthusiasts, don't throw away stale rolls! They make the most incredible croutons or bread pudding. You can even pulse them in a food processor for fresh breadcrumbs that beat anything in a canister.
If you have leftover rolls that are starting to harden, a quick 10 second zap in the microwave with a damp paper towel will revive that velvety crumb, though they should be eaten immediately after reheating.
To freeze, place the baked (and cooled) rolls in a freezer safe bag for up to 3 months. To reheat, I like to wrap them in foil and pop them into a 150°C oven for 10-12 minutes. This gently warms them through without drying out the interior.
Enhancing Visual Appeal and Flavor Finish
When it comes to the presentation of this dinner rolls recipe, the "pull apart" factor is your biggest asset. Serving them directly in a beautiful cast iron skillet or a ceramic baking dish adds a rustic, heritage feel to the table.
I always save that final brush of butter and the sprinkle of flaky salt for the very last second before the tray hits the table. The salt crystals should still be visible, catching the light like little diamonds on the golden crust.
If you want to vary the texture, try a contrast of toppings. A mix of sesame seeds or poppy seeds adds a savory "crunch" that pairs beautifully with the sweet honey dough. For a texture that mimics a Sweet Cornbread Recipe, you can even sprinkle the bottom of the pan with a little cornmeal before adding the dough balls. This gives a delightful "shatter" to the bottom crust while keeping the tops soft and pillowy. Just remember: bread is meant to be shared, so don't worry if they aren't perfectly symmetrical. The irregularities are what prove they were made by hand with love.

Recipe FAQs
What is the secret to soft dinner rolls?
Proper dough hydration and fat content. Using whole milk and butter coats the flour proteins, shortening gluten strands for a tender, velvety crumb. Over kneading or insufficient proofing can also lead to dense rolls.
What flour is best for dinner rolls?
Bread flour is best. Its higher protein content creates a stronger gluten network, allowing the rolls to rise taller and achieve a fluffy texture. All-purpose flour can be used but will result in slightly shorter, softer rolls.
What are the basic ingredients for dinner rolls?
Flour, liquid, yeast, salt, and fat. Typically, this includes bread flour, whole milk or water, active dry yeast, fine sea salt, and butter or oil. Eggs and sweeteners like honey or sugar are also common additions for richness and flavor.
What is the difference between dinner rolls and buns?
Generally, there is no strict culinary difference; they are often used interchangeably. "Dinner rolls" are typically served with a meal, while "buns" might be associated with sandwiches or burgers. However, recipes for both can vary widely in ingredients and texture.
Can I use all-purpose flour instead of bread flour for dinner rolls?
Yes, but the texture will be different. All-purpose flour has less protein, leading to a less developed gluten structure, resulting in rolls that are slightly shorter and softer, rather than the tall, airy structure achieved with bread flour.
How do I ensure my dinner rolls are light and fluffy?
Accurate measuring and proper proofing are key. Use a kitchen scale for flour to avoid density issues. Ensure your yeast is active and allow the dough to double in size during both rising periods. If you enjoyed mastering dough handling here, see how the same skill is applied in our Philly Cheesesteak Pizza: Crispy Baked recipe.
Why are my dinner rolls dry?
Over baking or too much flour are common culprits. Baking for too long evaporates moisture, and using too much flour by volume (instead of weight) can create a dry, dense dough. Ensure you're following precise measurements and baking until just golden brown.
Dinner Rolls Recipe
Ingredients:
Instructions:
Nutrition Facts:
| Calories | 178 calories |
|---|---|
| Protein | 4.1 grams |
| Fat | 5.9 grams |
| Carbs | 26.1 grams |
| Fiber | 0.8 grams |
| Sugar | 3.4 grams |
| Sodium | 245 milligrams |
