Peanut Butter Blossom Cookies: Chewy, Crumbly, and Chocolatey
- Unlocking the Secret to the Ultimate Classic Peanut Butter Blossom Cookie
- The Science of the Crumb: Achieving that Signature Chewy-Crumbly Texture
- Essential Components for Your Blossom Cookie Batch: Ingredients and Substitutions
- Master the Method: A Step-by-Step Guide to Baking Peanut Butter Blossoms
- Troubleshooting and Expert Advice: Ensuring Cookie Perfection
- Keeping Your Cookies Fresh: Storage and Make-Ahead Strategies for Peanut Butter Blossoms
- Perfect Pairings: How to Serve and Enjoy This Classic Treat
- Recipe FAQs
- 📝 Recipe Card
Unlocking the Secret to the Ultimate Classic Peanut Butter Blossom Cookie
Can you smell that? It’s the scent of warm, salty sweet roasted peanuts mingling with melting milk chocolate, a scent so deeply nostalgic it could cure a bad day instantly. That perfect combination is the magic of peanut butter blossom cookies , easily the most beloved drop cookie in the holiday canon, and honestly, they should be made all year round.
These are not the fussy, roll out, decorate for-hours cookies. These are fast, dependable, and always disappear first from any party tray. If you need a guaranteed win that costs next to nothing and takes barely an hour, this recipe is your lifesaver.
After years of trial and error (and way too many batches of flat, sad blobs), I’ve refined the method for guaranteed results. Ready to ditch the guessing games and make the world's best peanut butter blossom cookies ? Let’s crack on.
The Science of the Crumb: Achieving that Signature Chewy Crumbly Texture
The perfect blossom is a study in contrasts: a chewy, rich centre, a slightly crisp, sugar crusted edge, and a soft, yielding chocolate centre. Getting this balance right requires understanding why the ingredients behave the way they do. This isn't just baking; it's chemistry!
A History of the American Holiday Cookie Staple
While these treats feel timeless, the original concept, known as "Peanut Butter Kisses," first gained national attention in the mid-1950s after they were entered into the Pillsbury Bake Off. They quickly became a staple, especially among Traditional Christmas Cookies .
They are a testament to simple, quality ingredients working together in harmony.
What Makes the Classic Blossom So Addictive?
It’s the beautiful dance between salty and sweet, right? The peanut butter provides that satisfying density and a hint of salinity that cuts the pure sweetness of the sugar and the milk chocolate. It’s comforting, familiar, and inherently balanced.
The dough base for the ultimate peanut butter blossom cookies must be firm enough to hold the sugar coating but soft enough to yield to the chocolate press.
Quick Glance: Difficulty, Prep Time, and Yield
| Metric | Detail |
|---|---|
| Difficulty | Easy (Great for beginners) |
| Active Prep Time | 15 minutes |
| Chill Time | 30 minutes (minimum) |
| Yield | 3 Dozen Peanut Butter Kiss Cookies |
The Ideal Fat-to-Sugar Ratio for Peanut Butter Dough
We use a mix of softened butter and creamy peanut butter, plus equal parts granulated and brown sugar. The brown sugar is critical because it introduces molasses, which keeps the dough moist, prevents excess gluten development, and guarantees that signature chewiness.
This blend is what prevents these peanut butter blossom cookies from being dry or cakey.
Why Rolling in Granulated Sugar is Non-Negotiable
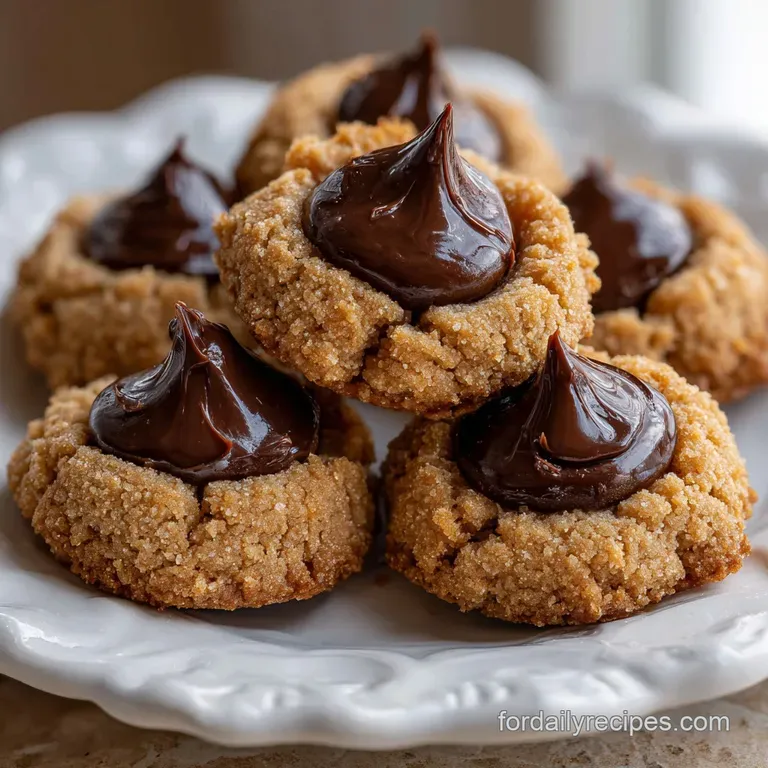
This isn't just for looks! The external layer of granulated sugar serves two functions. First, it helps prevent spreading by creating a physical barrier around the dough ball. Second, it melts slightly during baking, creating that shiny, delicate crust that provides the satisfying initial crunch when you bite into the best chocolate peanut butter blossom cookies .
Trust me, skip the roll and you skip half the experience.
The Critical Importance of the Chocolate Kiss Timing for Peanut Butter Blossom Cookies
This is where beginners panic. You pull the cookies out edges set, centres still pale and immediately press the Kisses in. They will crack a bit. That's okay! Do not press the chocolate into a raw cookie, and do not press it into a cool cookie.
It has to be done while the cookie is still piping hot from the oven so the base of the chocolate melts just enough to adhere, ensuring the Kiss doesn't pop off later. Mastering the timing is what separates a good batch of peanut butter blossom cookies from an incredible one.
Essential Components for Your Blossom Cookie Batch: Ingredients and Substitutions
Listen, I’ve made thousands of cookies, and 90% of success comes down to quality ingredients and proper measurements. When shopping for ingredients for your peanut butter blossom cookies , keep these tips in mind.
Measuring Essentials: Kitchen Scale vs. Volume Cups
If you want soft, perfectly chewy results every time, invest $20 in a cheap digital scale. Cups are too variable, especially for flour. If you insist on volume, please, please use the "spoon and level" method spoon the flour into the measuring cup lightly, then scrape the excess off the top with a straight edge.
Packed flour makes dry cookies.
Choosing the Right Peanut Butter (Processed vs. Natural)
This is a non-negotiable rule for these specific cookies: Use conventional, processed creamy peanut butter (like Jif or Skippy). Natural peanut butter, the kind that separates oil at the top, has a different fat and sugar structure.
It releases oil during creaming and causes the cookies to spread flat, making sad, greasy chewy peanut butter cookies . Save the natural stuff for your toast.
Chocolate Options: Beyond the Standard Kiss
While the Hershey's Kiss is the iconic crown for peanut butter blossom cookies , feel free to play around.
| Standard Ingredient | Viable Substitution/Variation |
|---|---|
| Hershey’s Kiss | Mini Reese’s Peanut Butter Cups, Rolo candies, square of quality dark chocolate (70% cocoa) |
| Creamy Peanut Butter | Crunchy peanut butter (adds texture, may increase spread slightly) |
| Butter | Vegetable shortening (for a lighter, more crumbly result) |
| All-Purpose Flour | 1:1 gluten-free Baking Blend |
Dairy & Flour Alternatives for Dietary Needs
If you need to make these dairy-free, use a high-quality vegan butter substitute (sticks, not tubs). The flavour holds up perfectly in these peanut butter blossom cookies . For gluten-free needs, 1:1 blends work fantastically well. No need to change the wet ingredients or baking time.
Chef's Note: If you want a deeper peanut flavour, slightly toast your flour before mixing. Spread it thinly on a baking sheet and bake at 350°F for 5 minutes, then cool completely before mixing.
Master the Method: A step-by-step Guide to Baking Peanut Butter Blossoms
This is the exact sequence I use every time. If you follow this precisely, you will succeed.
Phase 1: Creaming the Sugars and Fat for Maximum Lift
- Prep the Room: Make sure your butter is truly softened it should dent easily when pressed but not be melted. Preheat the oven to 350°F (175°C) and line your sheets with parchment paper. Crucially, unwrap all 36 Kisses now! If you do this later, the cookies will cool too much.
- The Creaming Process: In your stand mixer, combine the butter, both sugars (granulated and brown), and the peanut butter. Beat on medium speed for a full 3 minutes, scraping down the sides halfway through. This mixture needs to be fluffy, light, and pale yellow. Creaming the butter and sugars is foundational for the structure of your peanut butter blossom cookies .
- Wet Additions: Add the egg and vanilla. Mix only until the egg yolk disappears, then stop. Overmixing here creates too much gluten development, leading to tough cookies.
Phase 2: Mixing the Dry Ingredients and Forming Consistent Balls
- Dry Blend: Whisk your flour, baking soda, and salt together in a separate bowl. This prevents pockets of leavening that taste terrible.
- Combine: With the mixer on the lowest speed, slowly add the dry ingredients in three additions. Stop the mixer the second the flour streaks vanish. The dough will look shaggy, thick, and firm. Don't worry, that's correct.
- Chill Time: Cover the bowl tightly and chill the dough for at least 30 minutes. If you skip this, your easy peanut butter blossoms will spread into thin pancakes.
Phase 3: Baking Protocol and the Critical Chocolate Press
- Shape and Coat: Place the extra rolling sugar in a shallow dish. Using a 1.5 tablespoon scoop, form uniform balls. Roll each ball completely in the sugar, ensuring a full, glistening coat. Remember that uniform balls ensure every single peanut butter blossom cookies bakes evenly.
- Bake: Place the sugar coated balls on the prepared sheets, about 2 inches apart. Bake for 8 to 10 minutes. When they are ready, the edges should look lightly set and just turning golden, but the centres will look soft and slightly pale.
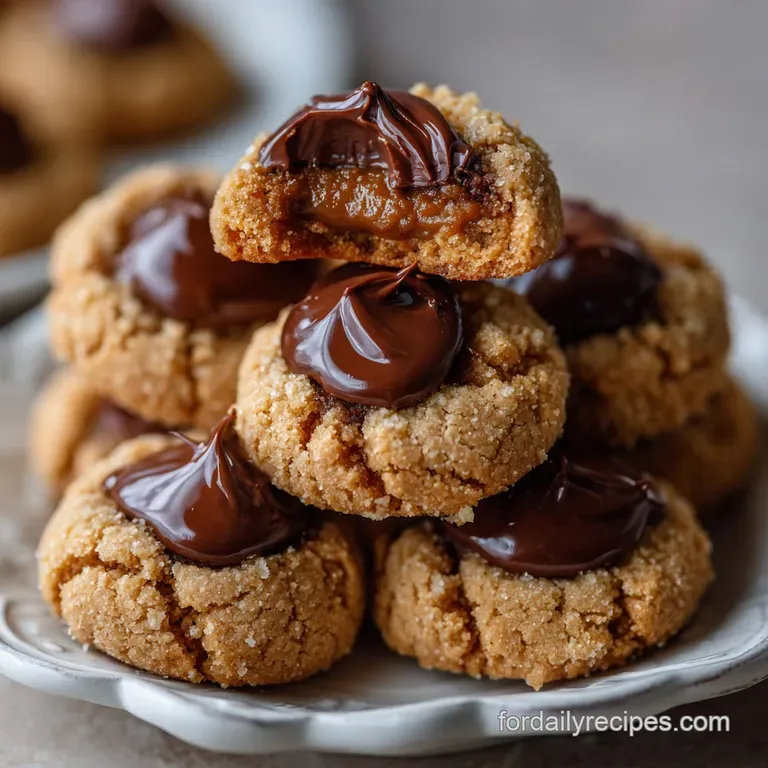
- Press the Kiss: Immediately remove the tray from the oven and place it on a cooling rack. Working quickly, press one unwrapped chocolate kiss firmly but gently into the centre of each cookie. Listen for the satisfying crackle sound! If the cookie cracks too much, gently push the edges back together with a spoon or spatula.
- Cool: Let the cookies cool completely on the tray for 10 minutes. This allows the chocolate to set and the delicate centre of the softest peanut butter blossoms to finish setting up. Then, transfer to a wire rack.
Troubleshooting and Expert Advice: Ensuring Cookie Perfection
Every baker faces cookie disasters. Here’s how to fix the most common issues specific to this recipe.
Preventing Dough Stickiness and Spread (Why Chilling Matters)
Over spreading is the number one tragedy when baking peanut butter blossom cookies . This usually happens because your dough was too warm or your fats were too soft. If your dough is sticky after chilling, throw it back in the fridge for another 15 minutes.
If they still spread rapidly in the oven, your oven temperature might be wrong (check it with a thermometer!) or your flour measurements were too low.
The Chocolate Kiss Mishap: How to Avoid Cracking
If the chocolate melts instantly into a puddle, your Kisses were too warm. Put them in the freezer for 10 minutes before pressing. If the cookie cracks aggressively when you press the Kiss, it means you waited too long, and the cookie’s crust had already hardened.
You need to press that chocolate within 60 seconds of pulling them out of the oven!
Altitude Adjustments for High Elevation Baking
Baking above 3,500 feet? Your cookies might spread faster. Try adding an extra 1 2 tablespoons of flour to the recipe to stabilize the structure. Also, consider reducing the baking soda by 1/4 teaspoon to reduce lift and subsequent collapse.
Keeping Your Cookies Fresh: Storage and make-ahead Strategies for Peanut Butter Blossoms
The great news about these fantastic cookies is how well they store and freeze. This makes them perfect for prepping ahead of the holiday season.
Best Practices for Storing Baked Cookies
Once the chocolate has fully set (usually an hour after baking), transfer the classic peanut butter blossoms to an airtight container. Store them at cool room temperature not in the fridge, which will dry them out. They will keep beautifully for 5 to 7 days.
If you stack them, consider placing a small piece of parchment or wax paper between layers to protect the chocolate tops.
Freezing the Dough vs. Freezing the Finished Cookie
Luckily, both the dough and the finished peanut butter blossom cookies freeze beautifully.
- Freezing Dough Balls: Form the sugar coated dough balls and flash freeze them on a tray until solid (about 2 hours). Transfer the solid balls to a freezer bag or container. They last up to 3 months. When ready to bake, place them directly on the baking sheet and add 2– 4 minutes to the total bake time.
- Freezing Baked Cookies: Allow the finished, cooled cookies to harden completely. Layer them in an airtight container with parchment paper between layers. Thaw overnight at room temperature. The texture remains excellent!
Perfect Pairings: How to Serve and Enjoy This Classic Treat
Honestly, nothing beats a perfect batch of warm peanut butter blossom cookies . But sometimes you need a little something extra.
Ideal Beverages to Complement Salty Sweet Flavors
These cookies crave a creamy counterpoint. Serve them alongside a big, cold glass of milk, a creamy oat milk latte, or a strong black coffee. The acidity and bitterness of coffee cut through the richness wonderfully.
If you’re looking for other easy, crowd pleasing recipes for your cookie tray, definitely check out my guide for [Snickerdoodle Cookies: Classic Chewy Recipe with Perfect Tang] the cinnamon sugar tang offers a lovely contrast to the peanut butter.
Or, if you prefer the pure, unadulterated peanut flavour without the chocolate, I also have a killer [Peanut Butter Cookies: The Proper Criss Cross Classic Recipe] you’ll adore.
Go forth and bake, my friend! You’ve got this.

Recipe FAQs
Why are my peanut butter blossoms too dry and crumbly?
This is usually caused by using too much flour or overmixing the dough once the dry ingredients are added. Ensure you measure flour accurately using the spoon and-level method, rather than scooping directly from the bag.
If the dough seems overly dry before baking, try adding one teaspoon of milk or a tiny bit more peanut butter to bind it.
When exactly should I press the chocolate kisses into the cookies?
The chocolate kisses must be pressed immediately upon removing the cookies from the oven, while they are still piping hot. If you wait even a few minutes, the surface will set, causing the kiss to crack the cookie when pressed.
Press gently but firmly enough so the base of the chocolate melts slightly and adheres securely.
My cookies flattened too much while baking. What went wrong?
Excessive spread is often due to the butter being too soft or melted, or the dough not being chilled sufficiently. Always ensure your butter is softened but still cool to the touch before creaming. If your kitchen is warm, chill the rolled dough balls for at least 30 minutes before baking.
Can I freeze the peanut butter blossom dough before baking?
Yes, this dough freezes exceptionally well. Scoop and roll the dough balls in sugar, then place them on a baking sheet to flash freeze until solid before transferring them to an airtight bag. When ready to bake, place the frozen dough balls on the sheet and add 2 to 3 minutes to the total baking time.
What can I use as a substitute if I don't have Hershey's Kisses?
You can substitute Kisses with miniature peanut butter cups, small chocolate squares, or even Rolo candies for a caramel variation. Another great option is pressing 5-6 semi sweet chocolate chips clustered in the center of the cookie instead of a single piece of chocolate.
Ensure the substitutes are also pressed in immediately after baking.
How should I store baked peanut butter blossoms to keep them fresh?
Store cooled cookies in an airtight container at room temperature for up to 5 days. It is highly recommended to place a sheet of waxed paper or parchment paper between layers to prevent the chocolate kisses from sticking to the cookie above.
Avoid refrigerating, as the cold air quickly dries out the peanut butter dough.
Can I make these classic cookies gluten-free?
Absolutely; these cookies convert very easily to gluten-free. Simply substitute the all-purpose flour with a high-quality 1:1 gluten-free baking blend that contains xanthan gum. You generally do not need to make any other adjustments to the amount of wet or dry ingredients for a successful, soft cookie.
Classic Peanut Butter Blossoms Recipe
Ingredients:
Instructions:
Nutrition Facts:
| Calories | 180 kcal |
|---|---|
| Protein | 4.0 g |
| Fat | 11.0 g |
| Carbs | 19.0 g |
