Buttermilk Biscuits Recipe: Heritage Baking
- Time: Active 15 minutes, Passive 15 minutes, Total 30 minutes
- Flavor/Texture Hook: Flaky, buttery layers with a tangy, tender crumb
- Perfect for: Slow Sunday brunches, holiday gatherings, or classic comfort dinners
- The Ultimate Flaky Buttermilk Biscuits Recipe
- Why This Heritage Method Works
- Components of a Perfect Rise
- The Essentials You Will Need
- Tools for the Best Bake
- Crafting the Perfect Flaky Dough
- Solving Your Common Baking Hurdles
- Personalizing Your Southern Biscuit Batch
- Proper Storage and Reheating Tips
- Best Pairings for Your Biscuits
- Recipe FAQs
- 📝 Recipe Card
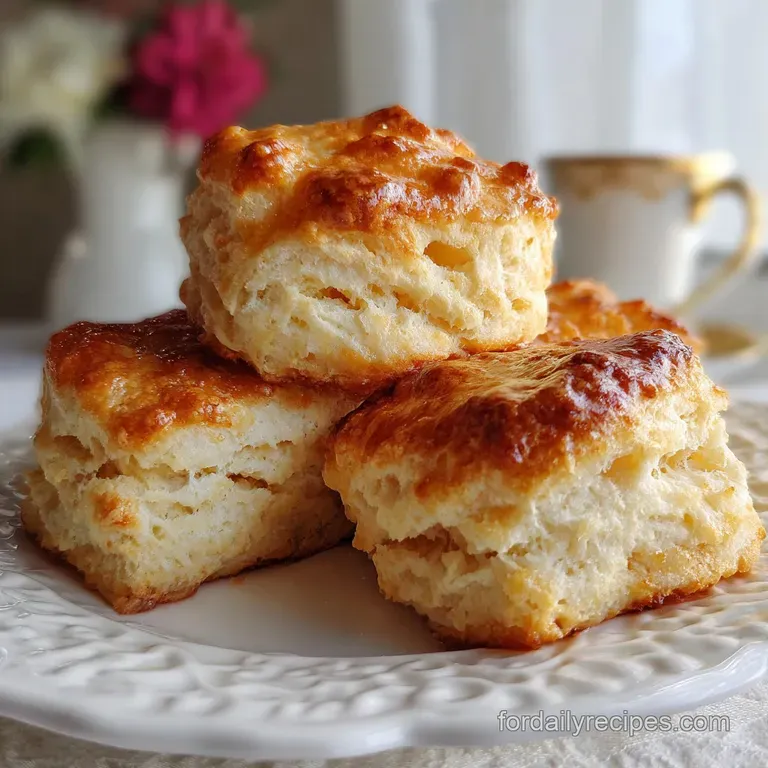
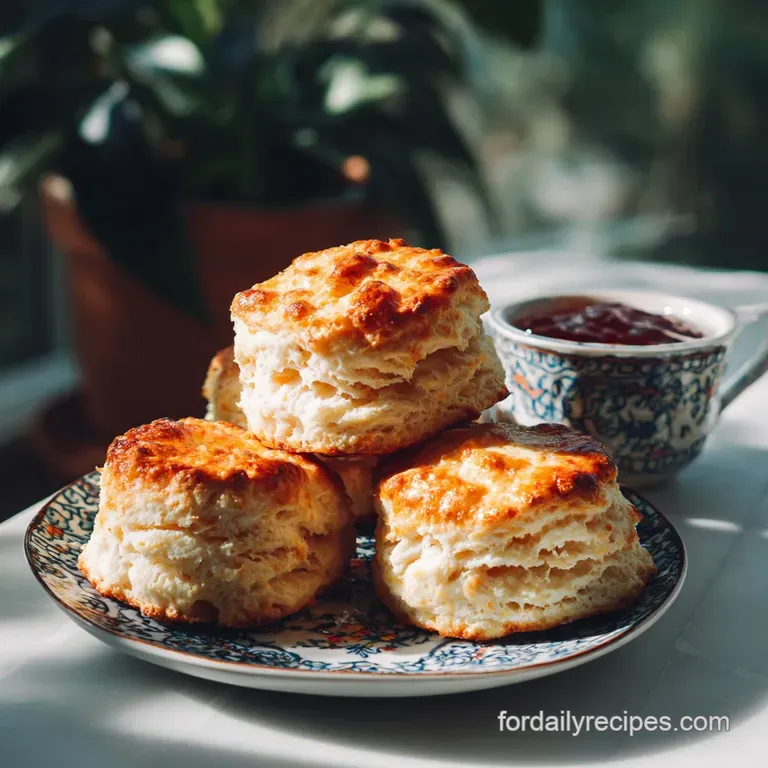
The Ultimate Flaky Buttermilk Biscuits Recipe
The first time I stood at my grandmother's counter, the air was thick with the scent of toasted flour and the cold, sharp tang of cultured milk. She didn't use a scale back then, but she had a rhythm a gentle "thwack" of the dough hitting the wooden board and the rhythmic grating of butter that looked like fallen snow.
When those pans came out of the oven, the tops didn't just crunch; they would shatter into a million buttery shards, revealing a velvety, steaming center that begged for a drizzle of honey.
We are chasing that exact sensory memory today, focusing on the contrast between the crisp, bronzed exterior and the cloud like interior. This isn't just a side dish; it is a heritage piece that connects us to the cooks who came before us, using simple elements to create something truly monumental.
You don't need a professional bakery setup to achieve this just a light touch, very cold ingredients, and a little bit of patience.
You’ll find that the secret isn't in a fancy machine, but in the temperature of your hands and the quality of your fats. We've all had those heavy, leaden discs that pass for bread in some places, but this recipe ensures every bite is a celebration of lamination and lift.
Right then, let’s get the oven preheated and your butter in the freezer, because we’re about to make the best batch of your life.
Why This Heritage Method Works
- The Steam Explosion Mechanism: When frozen butter hits the high heat of the oven, the water content evaporates instantly, forcing the dough layers upward to create a flaky structure.
- Acid Base Equilibrium: The lactic acid in the buttermilk reacts with the baking soda, producing carbon dioxide bubbles that provide immediate lift before the gluten sets.
- Gluten Suppression: Keeping the dough cold and handling it minimally prevents the development of tough protein strands, ensuring a tender, melt in-your mouth crumb.
- Lamination Technique: Folding the dough onto itself creates distinct physical barriers of fat, which translate into the visible "accordion" layers after baking.
| Method | Time | Texture | Best For |
|---|---|---|---|
| Traditional Cut | 30 minutes | Tall, flaky, distinct layers | Classic breakfast, heritage meals |
| Drop Biscuits | 20 minutes | Craggy, rustic, crispy exterior | Quick weeknight sides, cobbler tops |
| Melted Butter | 25 minutes | Soft, uniform, cake like | Sandwiches, biscuits and gravy |
While some modern versions try to skip the folding process, the time honored way of laminating the dough is what provides that signature "shatter" when you bite into the crust. It’s the difference between a simple bread roll and a true southern masterpiece that pulls apart in thin, buttery sheets. Just like my Buttermilk Ranch Recipe, this dough relies on the tang of real cultured milk to provide depth and character that you just can't get from plain milk.
Components of a Perfect Rise
| Ingredient | Science Role | Pro Secret |
|---|---|---|
| All Purpose Flour | Structural framework | Use a lower protein brand for a softer, more delicate crumb |
| Frozen Butter | Leavening agent | Grate it while frozen to ensure even distribution without melting |
| Buttermilk | Acidic tenderizer | Shake the carton vigorously to incorporate the butterfat solids |
| Baking Powder | Primary lift | Check the expiration date; old powder leads to heavy, flat biscuits |
The Physics of the Rise
The height of your biscuit is determined by the "Thermal Shock" experienced by the cold fat. As the temperature jumps from 40°F to 425°F, the fat stays solid just long enough for the dough to set around the expanding steam pockets.
The Essentials You Will Need
To begin this journey, gather these specific measurements. Don't be tempted to substitute the buttermilk with a "cheat" version of milk and lemon juice unless you're in a total bind, as the viscosity of real buttermilk is key to the dough's hydration.
- 2.5 cups (312g) All Purpose Flour: Why this? Provides enough structure for height without the toughness of bread flour.
- 1 tablespoon (15g) Baking Powder: Why this? The heavy hitter for that dramatic, sky high rise.
- 0.25 teaspoon (1.5g) Baking Soda: Why this? Reacts with buttermilk for extra fluff and better browning.
- 1 teaspoon (6g) Fine Sea Salt: Why this? Sharpens the buttery notes and balances the honey finishing touch.
- 1 teaspoon (4g) Granulated Sugar: Why this? Promotes the Maillard reaction for a bronzed, crispy crust.
- 0.5 cup (113g) Frozen Unsalted Butter: Why this? Creates the steam pockets required for flaky lamination.
- 1 cup (240ml) Cold Buttermilk: Why this? Adds the signature tang and tenderizes the gluten proteins.
- 1 teaspoon (7g) Honey: Why this? A hint of floral sweetness to glaze the hot tops.
- 1 tablespoon (14g) Melted Butter for brushing: Why this? Adds a silky sheen and keeps the crust from drying out.
| Original Ingredient | Substitute | Why It Works |
|---|---|---|
| Unsalted Butter | Salted Butter | Use same amount; reduce added sea salt by half to balance. |
| All Purpose Flour | Pastry Flour | Creates a finer, more fragile crumb. Note: Harder to handle. |
| Buttermilk | Plain Greek Yogurt | Thin with 2 tbsp milk; provides similar acidity and fat. |
Using the right substitutions is a fine art, but the goal is always to maintain that high fat content and acidic environment. If you decide to go the yogurt route, ensure it's full fat to mimic the richness of traditional buttermilk.
Tools for the Best Bake
You don't need a drawer full of gadgets, but a few specific items will make the process much smoother. A heavy baking sheet, preferably light colored aluminum, prevents the bottoms from scorching before the middles are cooked through.
If you use a dark non stick pan, you might find the bases get a bit too "crispy" for comfort.
Chef Tip: Freeze your box grater for 10 minutes before you start. This prevents the frozen butter from melting against the metal as you work, keeping those precious fat curls intact.
A sharp edged biscuit cutter is also a non negotiable for me. If you use a glass or a dull tin, you'll pinch the edges of the dough together, effectively "sealing" the layers and preventing them from expanding upward. We want those layers to be free to climb as high as possible.
Crafting the Perfect Flaky Dough
Phase 1: Incorporating the Fat
- Whisk the dry base. In a large chilled bowl, combine the flour, baking powder, baking soda, salt, and sugar until fully aerated.
- Grate the frozen butter. Use the large holes of a box grater to shred the 113g of frozen butter directly into the flour mixture. Note: This keeps the fat pieces uniform and cold.
- Toss and coat. Using a fork or your fingertips, gently toss the butter curls in the flour until every piece is separated and dusty.
Phase 2: Hydrating the Dough
- Create a well. Push the flour to the sides and pour the 240ml of cold buttermilk into the center.
- Fold gently. Use a spatula to bring the flour into the liquid until a shaggy, messy dough forms. Stop as soon as no dry pockets remain.
Phase 3: Creating the Flaky Layers
- Turn out the dough. Place the shaggy mass onto a lightly floured surface and pat it into a rough rectangle.
- Perform the lamination. Fold the dough in half, turn it 90 degrees, and pat it down again. Repeat this 5 times total. Note: This creates the internal layers that will "shatter" later.
- Check the thickness. Pat the final dough to exactly 1 inch thick. Note: This is Numeric Checkpoint 1 for a tall rise.
Phase 4: Cutting and Baking
- Cut the rounds. Press a sharp 2.5 inch cutter straight down—do not twist. You should get 10 servings from this batch.
- Bake until golden. Place the rounds on a parchment lined sheet, touching slightly for support, and bake at 425°F for 15 minutes until the tops are golden and the edges are crackling.
- Finish with honey butter. Brush the hot tops with the 14g of melted butter mixed with the 7g of honey.
Solving Your Common Baking Hurdles
Preventing a Slanted Rise
If your biscuits look like the Leaning Tower of Pisa, it’s usually due to uneven pressure during the cutting phase or "twisting" the cutter. When you twist, you essentially weld the layers together on one side, forcing the dough to expand toward the path of least resistance.
Always press straight down and pull straight up for a vertical, proud rise.
Fixing a Dense or Heavy Texture
A "hockey puck" biscuit is almost always the result of over working the dough. Every time you touch the dough, the heat from your hands melts the butter and develops the gluten. Work as fast as possible, and if the dough starts to feel sticky or warm, pop the whole board into the fridge for 10 minutes to reset the temperature.
| Problem | Root Cause | Solution |
|---|---|---|
| Tough Crumb | Over handling the dough | Fold only 5 times; use a light "butterfly" touch. |
| Burnt Bottoms | Dark pan or low rack | Use light aluminum pans; bake on the middle rack. |
| No Layers | Butter was too soft | Freeze butter for 20 minutes before grating into flour. |
Common Mistakes Checklist: ✓ Never use room temperature buttermilk; it must be cold from the fridge to keep the fat solid. ✓ Don't skip the lamination folds this is where the "magic" layers happen.
✓ Ensure your oven is fully preheated for at least 20 minutes before the pan goes in. ✓ Avoid using a rolling pin; your hands are gentler and won't compress the air pockets. ✓ Place biscuits so they are just barely touching on the pan; they'll help each other climb higher.
For mornings when you're in a rush and can't commit to the full lamination process, my 3 Ingredient Biscuit recipe is a great alternative that still hits the spot.
Personalizing Your Southern Biscuit Batch
The beauty of this heritage dough is its versatility. While the honey butter glaze is classic, you can easily pivot to a savory profile. Try folding in half a cup of sharp cheddar and a tablespoon of chive to the dry ingredients for a sharp, aromatic twist.
Or, if you're feeling adventurous, a teaspoon of cracked black pepper in the flour adds a sophisticated heat that pairs beautifully with sausage gravy.
If you’re catering to specific dietary needs, you can adapt this recipe with a few smart swaps. A high-quality gluten-free all purpose blend (look for one with xanthan gum) works surprisingly well here, though you may need to add an extra tablespoon of buttermilk as those flours tend to be thirstier.
Crafting a Plant Based Version
For a dairy-free experience, use a high fat vegan butter stick (frozen and grated) and make "buttermilk" by adding a teaspoon of apple cider vinegar to cold soy milk. The soy milk has the highest protein content of plant milks, which helps with the browning and structure.
| Servings | Flour Amount | Butter Amount | Pan Size |
|---|---|---|---|
| 5 Biscuits | 1.25 cups (156g) | 0.25 cup (57g) | 8 inch cake pan |
| 10 Biscuits | 2.5 cups (312g) | 0.5 cup (113g) | Standard baking sheet |
| 20 Biscuits | 5 cups (624g) | 1 cup (226g) | Two baking sheets |
When scaling up, remember that the "hands on" time increases. You'll want to work in batches to keep the dough cold. If you're making 20 biscuits, keep the second half of the ingredients in the fridge while you're cutting the first ten.
Proper Storage and Reheating Tips
These gems are best enjoyed within twenty minutes of leaving the oven while the interior is still steaming and the crust is at its peak "shatter" stage. However, if you find yourself with leftovers, they store reasonably well.
Place them in an airtight container once they are completely cool; they will stay fresh at room temperature for about 2 days or in the fridge for up to 5 days.
To revive that crispy exterior, avoid the microwave it will turn your beautiful biscuit into a gummy, tough mess. Instead, wrap them loosely in foil and pop them into a 350°F oven for 8 minutes. This gently warms the center while resetting the fats in the crust.
If you have stale biscuits that are past their prime for eating plain, they make the most incredible croutons for a winter stew or a base for a rustic bread pudding.
Zero Waste Tip: Don't throw away those odd shaped dough scraps after cutting your rounds! Gently press them together into one "ugly" biscuit. It might not be the prettiest, but it often has the most crispy edges and is the cook's reward for all that hard work.
Best Pairings for Your Biscuits
No southern table is complete without a variety of spreads. While a simple pat of salted butter is divine, consider a seasonal fruit preserve or a thick, velvety apple butter. The contrast of the salty dough against the sweet fruit is a hallmark of this heritage style.
If you're looking for a full meal, these biscuits are the essential companion to a bowl of slow cooked grits or a plate of crispy fried chicken.
If you have extras, they're the base for my Chicken and Dumplings recipe, where the high fat content creates a rich, dumplings style finish when simmered in broth. You can also split them open and use them as the foundation for a decadent eggs benedict the craggy surface is much better at catching hollandaise sauce than a standard English muffin.
Finally,, consider the "Sweet/Savory" contrast. A hot biscuit with a slice of salty country ham and a thin smear of honey is a flavor profile that has sustained generations. It is simple, honest, and perfectly balanced.
Whether you're serving them at a holiday feast or a quiet Tuesday morning, these biscuits carry the warmth of a homemade embrace in every flaky layer.

Recipe FAQs
What flour makes the best buttermilk biscuits?
All-purpose flour. It provides a good balance of protein for structure without being too tough, resulting in a tender crumb and good rise.
What is the secret to a good biscuit?
Keeping ingredients very cold and minimal handling. Cold butter creates steam pockets for flakiness, and overworking the dough develops gluten, making biscuits tough.
How to give buttermilk biscuits more flavor?
Add savory ingredients or enhance the tang. Incorporate sharp cheddar cheese and chives into the dough, or ensure your buttermilk is truly tangy for a richer flavor.
What do British people call buttermilk biscuits?
They generally don't have a direct equivalent term. British baking traditions lean more towards scones, which are similar but typically sweeter and often contain eggs.
Can I use milk and vinegar instead of buttermilk?
Yes, but it's a compromise. Mix 1 tablespoon of white vinegar or lemon juice with enough milk to equal 1 cup; let it sit for 5 minutes. It mimics the acidity for lift but lacks the fat content and flavor complexity of true buttermilk, similar to how we achieve a dairy-free tang in our Seafood Boil Sauce Recipe: Ultimate Buttery Garlic Butter Style.
Why are my biscuits tough?
You likely overmixed or overworked the dough. This develops too much gluten, leading to a chewy, dense texture instead of a tender crumb.
How do I get tall, flaky layers?
Achieve this through proper lamination and temperature. Repeatedly folding the dough creates distinct layers of fat and dough, which expand in the oven. Keeping everything cold until baking is crucial for that steam driven lift.
Buttermilk Biscuits Recipe
Ingredients:
Instructions:
Nutrition Facts:
| Calories | 218 calories |
|---|---|
| Protein | 4.0 g |
| Fat | 10.8 g |
| Carbs | 26.0 g |
| Fiber | 0.9 g |
| Sugar | 1.5 g |
| Sodium | 406 mg |
